General
Live FX offers different workflows to integrate with Unreal Engine output. All workflows are based on controlling Unreal Engine to ingest the correct 2D render from the 3D scene, for color grading, compositing and projection.
- LED Projection – preferably using the GPU texture-share option to minimize (additional) latency.
- Inner / outer Frustum projection from Unreal Viewport or nDisplay output.
- Direct display of Unreal nDisplay output.
- Set extensions.
- Green-screen compositing – use SDI for easy timecode-sync with live camera capture.
- Render Unreal camera frustum background to key with live camera capture
- XR elements. Matte out objects from Unreal scene, to composite them in front of the green screen actor(s).
- Output color graded camera capture and matte into an Unreal scene.
In most cases Unreal and Live FX run on the same system but sometimes it is necessary to split the workload over multiple systems.
- On a single system you can use GPU texture sharing, where the rendered image from Unreal is shared directly with Live FX on the GPU of the system. The advantage is that it does not add latency (Note that Unreal has an inherent latency of 3-4 frames from entering camera position and rendering the image based on that position).
- Texture share only works if both Unreal and Live FX operate on the same system and on the same GPU. When splitting operations over GPUs, you need to use an SDI/NDI stream. You can just connect an SDI output to an input channel on the same device.
- An SDI / NDI image stream between Unreal and Live FX does add latency to the stream. Especially with projection in an LED volume with a lot of camera movement and action in the scene this will be noticeable. In a green-screen context this is less of an issue as long as the background and keyed foreground are in sync.
- The Unreal system that feeds into Live FX, can be part of an Unreal Multi-User setup, which makes it possible to live-edit the Unreal scene from a separate machine and leave the projection uninterrupted.
- In a projection context it can make sense to have a separate Unreal system for rendering of the outer frustum, which is less time sensitive than the inner frustum.
- In a Multi-Node Live FX setup (multiple separate Live FX systems to manage a large LED volume) you can use an SDI stream from a separate Unreal system. The SDI stream with the inner frustum image) would be split across the Live FX systems.
- There is currently no easy setup where each system in a Live FX multi-node setup has its own Unreal instance. This is theoretically possible but would involve a lot of manual management across the nodes.
Workflow Elements
The Unreal support for the various workflows in Live FX is made up from the following elements.
- Unreal Live Link. Available in the Live Links panel. This sends camera position and lens data to Unreal, manages camera offsets in the Unreal scene, and offers the option to start / stop Unreal projects directly from the Live FX interface.
- Unreal Live FX (Live Link) plug-in. This Unreal plug-in is added to the Unreal project and has functions to create a Live FX camera in the Unreal scene and control the camera from the data that it receives from the Unreal Live Link in Live FX. The plug-in can also generate an nDisplay configuration from a Live FX stage file.
- Unreal Texture Share node. This captures the Texture Share image from the active Unreal project as well as metadata to sync the image with the original camera tracker data.
- Generic SDI / NDI capture node. This capture has the option to synchronize with other captures based on timecode.
Unreal Live Link
The Unreal Live Link looks for the active camera of the current active shot in the player and sends the camera positional data and lens data to an Unreal system / project which includes an Unreal Live FX plug-in. If the current shot in the player does not have an active camera, then the Live Link does not send out any data – also no auxiliary commands like for generating a snapshot of the current scene.
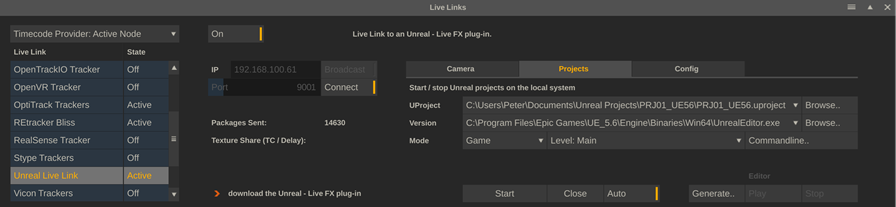
IP connection
Enter the IP address of the system on which the Unreal project runs. In case Unreal runs on the same system as Live FX, you can use the network IP address of the system or the 127.0.0.1 local host address. Ensure that the port number used is set to the same as with the Unreal Plug-in. In case that the camera data is to be sent to multiple Unreal systems, enable the Broadcast option. Press Connect to start sending.
When connected, the packet counter will show and update. If a texture share is used and a texture share node is active, the timecode of the last received texture is displayed as well as the number of frames it took to render that frame – a.k.a. the latency. This number is used to sync the image with the original camera tracker data. If the live link detects that frames from Unreal are skipped (e.g. if Unreal is unable to render in realtime), the info will flash in red.
Camera tab
From the camera tab you can set an offset to the current camera position to place the camera on the desired position in the Unreal scene, as that position does not necessarily align with the stage origin that is used for the (physical) camera tracker. The offset acts as a plane on which the actual (virtual) camera resides. The position and rotations are combined and sent to Unreal.
Rather than entering that offset manually, using the translation and rotation controls, it is easier to use the Navigate option. When enabled (and viewing the texture share or SDI/NDI output from Unreal in the viewport) you can use the keyboard and mouse to game-like navigate the Unreal scene: move forward/backward, up/down, left/right, pan/tilt the view. Use the mouse wheel to accelerate / decelerate the motion. Use Escape to exit the navigation mode. The Reset button clears the offset.
The bookmark controls allow you to save and easily recall an offset. This can be used to e.g. define several possible camera positions and quickly switch between them to compare.
Note that the offset values can be stored with the current clip. You can add multiple versions of a clip, each with their own offset. Bookmarks however are stored as project settings.
Projects tab
Project Selection
From this tab you can start / stop Unreal projects directly from the Live FX user interface. The project settings are stored, so on any next Live FX session, a setup can be quickly recalled.
First select the Unreal project that you want to use from disk. Next select which Unreal version to use with this project. For this, select the UnrealEditor.exe file in the Engine\Binaries\Win64 folder of the specific Unreal version.
Start mode
Next, select the mode in which to open the project:
- Editor. Open the project in the Unreal editor. Usually the first time, when the project has not been setup with the Live FX plug-in and camera. When starting the project in the Unreal editor, any texture share is only available when starting playback in Unreal. The texture share resolution is tied to the Unreal Viewport resolution.
- Game. Start the project in game mode without direct output to the screen. This requires that the Live FX plug-in in the project is activated by default. The resolution of the output is defined through the command line parameters used (see below).
- nDisplay. This starts the project in nDisplay mode and requires the presence of an nDisplay configuration file. More details on how to generate the configuration file are discussed later.
The levels dropdown shows all available levels in the selected project. When leaving this to default, opening the project in editor mode results in a new level being created.
Command Line
The Command line option shows a panel with various options that are used to start the Unreal project, depending on the selected mode.
- Output Resolution (Game mode). Set the resolution of the texture share output. By default, UHD.
- Texture Alpha. Enable to include an alpha channel in the texture share image. The alpha channel can be used to matte-out objects. Note that when including an alpha channel, the texture share is limited to 8bit output.
- nDisplay node name (nDisplay mode).
Note that each startup mode has a full set of command lines, which are stored in the ue_cmd.xml settings file that is included with the installation of the software. These command lines can be customized: copy the file to the c:\programDATA\Assimilator\Settings folder and edit that local version. Be sure to properly maintain the xml formatting.
Start / Auto Close
Press Start to open the selected Unreal project in the correct mode. Note that startup of an Unreal project can take some time. Check the startup state by switching between apps, using Alt-Tab.
When the Auto Close option is enabled, Live FX will try to close an Unreal project that was started, when starting a new project or when exiting the Live FX project. Projects that were started from outside the Live FX UI are not closed automatically.
Editor Start / Stop
When a project is started in Editor mode, the Play / Stop options become available. The Play option signals Unreal through the Unreal plug-in to start playback mode and switch to full screen mode, to ensure maximum Viewport resolution for the texture share. The Stop option switches back to normal view and stops playback.
Generate
This opens a panel to set the specification for rendering a (high resolution) image of the current Unreal project (with the current camera pose). The image can be a 2D or equirectangular image, which can be used e.g. as outer frustum for the current projection or be used with generating a storyboard when prepping for a shoot. The generated image is stored in the Snapshot path, as set in the System Settings of the Live FX system. The shot is automatically loaded into the project, into the snapshot tray as well as attached to the cursor to be used in the composition shot.
Config
- Store settings per node. Store camera offset settings with each node rather than as a single offset for all projection setups in the project.
- Pass lens settings. When enabled, the focal length, sensor size and focus are also applied to the Unreal virtual camera. Otherwise, just the position and rotation data.
- Allow Subframe data. Send tracker data as fast as possible or just a single position per frame.
- Extended Logging. Add extra information to the Unreal log by the plug-in as well as extra info by the texture share node in the regular app log. Enable if the live link / texture share is not working as expected.
- Default Texture Share delay (frames). In a standard projection share, Live FX sends camera tracking data and timecode to Unreal Live FX Plug-in and the timecode is returned with the Texture Share image so that Live FX can determine the latency of the image. That latency - measured in frames - is used with the virtual camera live link in a projection composition node to sync/delay the frustum display. When using nDisplay (or in possible other non-default Unreal setups), the Texture Share cannot include timecode metadata. In that case, the latency set in the config section is used.
Live FX Unreal plug-in
The Unreal Live FX Live Link plug-in is available from here for various Unreal versions.
Download the correct version, and unzip the content of the download into the plug-in folder inside your project: ..\your_ue_project\Plugins\. When you (re)start the Unreal project, the plug-in should be available: a new Live FX button should be available on the toolbar in the Unreal Editor.

Clicking the button opens a panel with the following options:
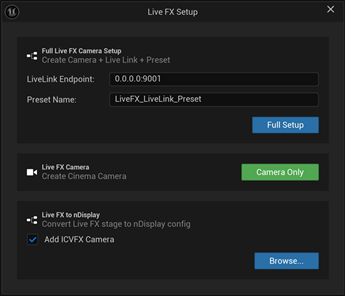
- Full Setup. Create a Live FX camera, create a Live Link with Live FX to receive tracking data from Live FX, create and set a project Live Link preset so each time the project is started, the live link is active by default.
- Camera Only. Create just Live FX camera. Use this for creating cameras on (additional) levels in your project, when the default live link and preset are already created or If you want to create these manually.
- nDisplay Setup. Convert a Live FX stage file (export of a single stage from the Stage Manager), including meshes into an nDisplay configuration file. Optionally with an ICVFX camera, which is tied to the Live FX camera and can provide the inner frustum image of the nDisplay output. Note that the nDisplay option is only available as of Unreal version 5.6.
The Live FX camera is a derivative of the standard Unreal cinema camera with additional functionality to automatically tie to the Live Link plug-in, use the texture share function and generate metadata with the texture share for the receiving side.
Note that when using texture sharing, the Unreal project should not be set to a specific framerate, nor be genlocked or use a timecode provider. In a texture share setup, Live FX provides the timing and determines the framerate. That also means that when the Unreal project runs from the Editor and has a viewport, this should not be the active application when doing an actual take (can be while editing of course).
Basic Steps
Recap on fast setup:
- Add the Live FX plug-in in the Unreal project folder
- Start Live FX and either create a live capture or projection setup based on an Unreal Texture share. Ensure that the camera of the shot is activated.
- Activate the Unreal Live Link in the Live Link panel and from the Project tab, select the Unreal project and start it in Editor mode.
- Switch to Unreal once started and use the Live FX button to create the Live FX camera + presets. Save the level.
- Switch back to Live FX and use the Editor Play button to start Unreal playback. The texture share should now produce an image (ensure that Live FX is in playback mode!). Test the setup by e.g. panning the virtual camera in the Camera menu and making sure the rotation is visible in the image from Unreal.
- Now restart the Unreal project, but this time with the save level selected and in Game mode. This should startup faster and now you can set the output resolution independently from the display resolution (see command line dropdown).
- Check that the texture share timecode display in the Live Link panel shows the correct timecode and a stable delay-count. This delay is used with the live linked camera of the shot, to ensure that the camera uses the same camera-tracker data - for e.g. drawing the frustum outline – as was used to render the frame by Unreal, which added latency to the image stream.
Unreal Texture Share node
The Unreal Texture Share node is used to capture a shared GPU memory buffer with an image from Unreal. Depending on the context this Source option is either set to Viewport or to nDisplay. Next, the id of the desired texture share is entered - for the Viewport source, this is usually the 'FinalColor' texture. In case the source is nDisplay, an additional dropdown becomes available to quickly select the ICVFX texture (representing the inner frustum display) or one of the LED wall outer frustum displays.
The Auto Size and Aspect options allow the node itself to adapt to the size of the actual texture from Unreal.
SDI Setup
For SDI (or NDI) output from Unreal, you can also use the Live FX camera but creating the actual SDI output is a manual task, as that depends on the specific hardware that is used. What is important with setting-up an SDI output is that it includes the timecode from the Live FX Live Link plug-in. That is done by creating a Live Link Timecode Provider, which is linked to the Live FX Live Link. The cinema camera for the SDI output should then use this timecode provider.
The timecode can be used to sync the Unreal image stream with the live camera capture in a green screen setup.
nDisplay workflow
Note that the Live FX - Unreal nDisplay workflow is available with Unreal version 5.6 or up.
The Unreal Live FX plug-in can convert a Live FX stage file into an nDisplay configuration file. In this conversion, the wall names from the stage manager are used to label the texture share elements.
Note that this conversion does not include the actual output mapping (how the different wall(s) and camera frustum map on the final output (texture)). This needs to be done manually and then the configuration needs to be compiled and re-exported. The exported version should then be used when starting Unreal in nDisplay mode.
In the Live FX projection setup, when selecting Unreal Texture share as the source, you now also select whether this should assume a default Viewport output or nDisplay output. In the latter case, instead of using a single node and referencing that for all walls, a new instance of the texture share node is used for each wall with the mode set to nDisplay. The texture name that is set in the node, depends on the type of projection selected (either the default or the per-wall setting in the Advanced panel of the Projection setup). Walls set to use a frustum projection, use the texture of the ICVFX camera (VP_ ICVFX) – this is the inner frustum image. When using a Direct projection or when setting the texture share as background, the specific wall texture is used (VP_<wall_name>).
Note that the exact texture name can be changed at any time in the node menu of the texture share node instance.
XR Workflow
(currently still experimental / WIP)
When enabling the Alpha command line setting in the Unreal Live Link panel and starting an Unreal project from there, the texture share from the project will include an alpha channel.
The setting will also cause the Unreal Live FX plugin to enable the postprocess material option for the Live FX camera. This will cause all objects to also have that option enabled to generate alpha.
The alpha can as such be used in Live FX to mask objects and composite the objects ‘in front’ of the (green-screen) actor.
Note that currently this is not (yet) integrated in the Live Setup panel and creating such a setup requires additional manual setup / compositing.
Also note that the texture share with alpha limits the RGB output of the texture to 8bit.
An alternative XR workflow is to do a USD export from Unreal of specific objects. Then load this USD into Live FX and tie this USD node to the same (camera tracker) as the Unreal texture share and use the USD for masking out the object from the texture share / SDI capture.