GENERAL

The Timeline menu contains function to to manipulate slots, tracks, collector nodes and the timeline as a whole.
SLOT
INSERT
Insert an edit in the current position - splitting the current slot.
DELETE
Delete all the selected slots.
FIT SHOT
Adjust the length of the current slot to match the IN and OUT points of the shot.
TRIM LEFT / RIGHT
The trim function removes the left / right part of the current shot from the current frame position.
ENABLE / DISABLE
This button Enables / Disables the current slot. Disabling slots was already described in Chapter - The Construct. Disabling a slot means that it will be skipped on regular playback. When the disabled slot is on the main track the play position will jump over the slot. If the slot is on a sub-track the slot and its content will just be ignored. A disabled slot is displayed with a red line below it.

LOOP MODE
The LOOP MODE controls how a shot behaves if the slot is longer than the actual source clip’s IN and OUT points.
- Once: The source clip plays normally until the source OUT point is reached. After that point, the final image is held as a freeze frame until the end of the slot.
- Loop: The source clip plays normally until the source OUT point is reached. After that point, the clip loops back to the source IN point, and continues looping in this way until the end of the slot.
- Bounce: The source clip plays normally until the OUT point is reached. After that point, the clip plays in reverse until the source IN point is reached. The source clip continues to ‘bounce’ in this way until the end of the slot.
- Reverse: The source clip plays in reverse, beginning at the source OUT point and playing backward until the source IN point is reached. After that point,the IN point image are held as a freeze frame until the end of the slot.This is essentially the same as the ONCE mode, but in reverse.
- Reverse Loop: This is the same as the LOOP mode, but in reverse.
- Reverse Bounce: This is the same as the BOUNCE mode, but in reverse.
TRACK
ADD
Adds a new track to the multi-layered timeline.
DELETE
Remove the current selected track. Note that you can not remove the main track.
ACTIVE
Toggle the current track active / inactive - and as such not included in the main output. Note that you can not inactivate the main track.
LOCK
Lock / unlock the current track (or all tracks if the All button is enabled). Locking a track means that you can not change the timings of the track. Locking a completed timeline will prevent accidental changes. The lock function can also be managed with the Lock Timeline button in the Media menu in the Construct. When a track is locked, the track selector is displayed with a lock in it.
ANALYZE
The Analyze button opens the Shot Analyzer dialog to divide a single shot with multiple scenes up in individual cuts.
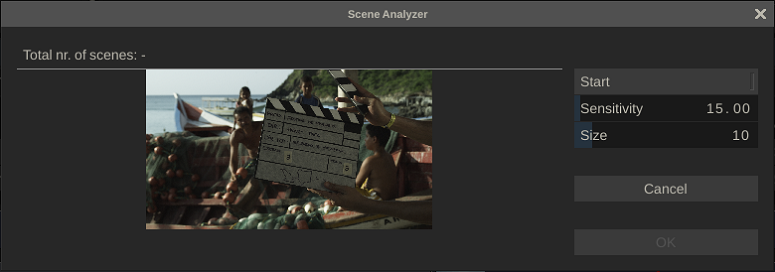
Analyzing a clip has two steps: the initial analysis and then setting the Sensitivity and Size values, which determine where SCRATCH inserts edits.
To start the initial analysis, press the Start button in the Shot Analyzer window. This begins the analysis of the current clip. Don’t worry about the Sensitivity and Size parameters. They do not affect the analysis.
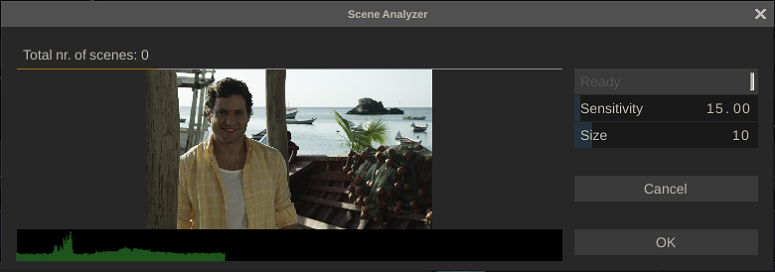
A green graph begins to appear in the bottom of the Shot Analyzer window. This graph shows the differences that SCRATCH is detecting between frames. Large vertical spikes indicate big changes in the image,which are usually indicative of a change of scene within the clip.
You can stop the analysis at any time by pressing the Stop button.
Once the analysis is complete, the green graph is overlaid with vertical orange lines that indicate where SCRATCH inserts edits based on the current values for Sensitivity and Size. At this point, you can modify the Sensitivity and Size values to get the orange lines corresponding to the large spikes found during the analysis.
Note: The Analyze function is not available when you entered the Player with a single shot.
Sensitivity
The Sensitivity parameter determines how large of a difference must have been detected to insert a new edit. The higher the vertical spike on the graph, the bigger the difference SCRATCH detected. By increasing the Sensitivity, SCRATCH will create edits from shorter vertical spikes. Lowering the Sensitivity will create edits only for the larger vertical spikes. If a spike turns orange, an edit will be inserted at that point in the clip.
Size
The Size parameter determines the minimum number of frames that must exist between new edit points. The default setting of 10 means that SCRATCH will not create an edit of less than 10 frames duration when the analysis is applied.
As you adjust the Sensitivity and Size values, you see the orange edit indicators updating. Once you get the edit indicators lined up to your satisfaction, press the Apply button to insert the new edits. You can also press the Abort button to close the Shot Analyzer window and leave the timeline unchanged.
COLLECTOR
Use the controls in this section to Create a Collector node.The collector node was discussed in Chapter - The Construct and represents a timeline in a node. The Create collector function creates a new Collector node with all currently selected items in the editor. Items of sub-tracks will be added as Layers on top of the selected items in the first track.
The Replace option will remove the selected items on the timeline and replace them with the single new Collector node. The Trim option will skip any space between selected items. If Trim is off - the collector will preserve the space between selected items.
If the current selected shot on the timeline is a Collector node the Create button will turn in an Expand button. Expanding a Collector node will remove the collector and create new slots and shots in its place. If you enable the Incl. Grade option, SCRATCH will wrap each expanded source node in a nest node and will apply any grade from the collector onto that nest node. That way all grading is preserved, including any possible grading on the source shots.
FLATTEN
The Flatten section allows you to consolidate tracks. The Flatten function depends on the options set.
SLOT
If Slot is enabled the Flatten function will consolidate only the current slot on the main track. For each sub track with media on that section of the timeline, a Layer is created on the shot on the main track with the sub-track media as Fill. The media on the sub-track for that section is removed.
TRACK
The full sub-track is consolidated into Layers on the shots on the main track. Using the All option will do this for all sub-tracks at once.
MISC FUNCTIONS
COLOR FRAME
Create a new color frame and attach it to the pen for dropping at a
particular position in the timeline. This offers the same functionality
as the corresponding button on the Media menu of the Construct as
described in Chapter - The Construct.
COPY
This button will copy the current slot (if not empty) and attach it
to the pen. Alternatively if you are dragging a shot, slot or even a
track and click the button - the move action is changed into a copy.
Meaning that if you drop the shot or track it will create a copy of the
item and leave the source as is.