GENERAL

The Video menu allows you to control the timings and appearance of shots on the timeline.
SOURCE
IN
This represents the first frame of the source clip being used within a particular edit segment. This number is an absolute frame count from the beginning of the source clip.
OUT
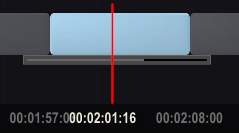
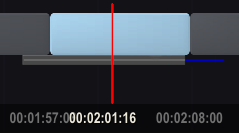
This represents the OUT point that is being used on the source clip. This number does not necessarily correspond to the last frame being used in the slot, but rather the last frame of the clip that is used to fill the slot. If the OUT point is less than the duration of the slot, the image freezes on the OUT frame for the remaining duration of the slot. If the OUT point is greater than the duration of the slot, the clip behaves as normal. This number is an absolute frame count from the beginning of the source clip.
When slipping the outpoint before the actual media length a black line will appear indicating that there is media left after the out-point. When the outpoint is set beyond the actual media length a blue line appears, indicating that this will result in 'missing frames'. In the Player Settings menu you can configure SCRATCH to show blue frames for missing frames or just repeat the last known frame. You can also set the color there - which will also be used in this case. Blue is the default.
You can also use the Quick Keys to slip a shot one frame at a time. See quick keys overview using Quick Key: h.
RECORD
In
This Numerical Slate indicates the absolute frame number in the timeline where the current slot begins. You can change this number and the start point for the current slot adjusts to the new value. The source clip maintains the same IN point so that the first frame of the slot is the same source frame.
LENGTH
This value indicates the total length of the current slot. You can change this number and the overall length of the current slot adjusts to the new value. The behavior of slots after the current slot is determined by the status of the Ripple button in the Configure Timeline section.
VARI-SPEED
VS (Variable Speed)
This Numerical Slate represents the speed of the current shot. Depending on the F toggle button to the right of the numeric slate - the speed is displayed as a percentage (off) or as a framerate (on). A negative value represents reverse playback of a clip. To create a single frame edit or freeze frame use a value of 0.
Note that when the Ripple option is enabled, SCRATCH will adjust the length of the shot when altering the vari-speed. When you set the vari-speed to a negative value, SCRATCH automatically sets the out-point of the shot based on the slot length. This ensures that the same shot section is used as before the negative vari-speed. To ensure that the adjusted clips starts at exactly the same frame and additional offset (see below) might be set. This is only done when setting a negative vari-speed. The shot out-point or vari-speed offset is not adjusted when changing from a negative to a positive vari-speed.
OFFSET
The Offset Numerical Slate is intended to determine where SCRATCH starts evaluating a variable speed. For example, if a shot is 100 frames long and you have slipped the shot 10 frames, and then set a variable speed of 50 percent, moving the Offset to 10 ensures the first frame you indicated is truly the first frame that appears in the edit. If the Offset is left at zero, the variable speed is calculated from the beginning of the entire shot. The first frame of the edit is then the fifth frame of the entire shot since the variable speed is calculated from frame zero.
MODE
The re-timer type SCRATCH will use: Nearest Frame or Rolling Mix. In the former mode SCRATCH will simply skip / repeat frames. The Rolling Mix will blend frames together.
RAMP
This option removes the current vari-speed from the shot. Then it instantiates the SCRATCH Re-timer plug-in and makes the current shot the input of the plug-in. All original vari-speed parameters are copied over to the Re-timer plug-in and an animation curve is initiated on the plug-in. Finally, SCRATCH will open the Shot menu in the Matrix, which gives you access to all the plug-in parameters for further tweaking.
TRANSITION
PULL-DOWNS
This main pull-down allows you to define the type of transition between the previous slot and the current slot. Each of the transitions has additional parameters that can be selected.
Cut
This defines the transition as an instantaneous change from one shot to the next.
Dissolve
This defines the transition as a dissolve with one image disappearing as another appears. There are 3 possible dissolve types you can select from:
- Normal: a standard video-style dissolve.
- Optical: a more traditional film-style dissolve, simulating the optical process of printing each image onto film
- Additive: defines the transition as an additive-mix-style dissolve, where the
incoming and outgoing images are mixed together using an additive
method. The result is bright are as remaining bright for longer than
darker areas of the image.
Fade To Color
This defines the transition as a gradual fade from one image into a single color image. When selected you can set the color with the color-pot control that is displayed next to the pull down control.
Wipe
This defines the transition as animating one image over the other is a predefined path. There is a list of possible (SMTP standard) wipes you can choose from: e.g. Horizontal, Vertical, Barn Doors, various Diagonal, etc. When you select a Wipe transition two more options become available:
- R - button. Which, when enabled - reverses the standard wipe: e.g. top-down becomes bottom-up.
- Size: This defines the size of the border between the two shots in the wipe transition. Over the size of this transition the two shots are blended together.
C - CLIPPED
The C button is enabled by default which means both the A and B images in the transition are clipped (for color values below 0 and above 1) before they are combined. Not clipping images in a transition can lead to unexpected results. however, clipping an image might give a color shift when moving to the first frame and/or moving past the last frame of the transition.
N - GAMMA NEUTRAL
The N button is only available with the Normal Dissolve and various Wipe transitions. This option will cause SCRATCH to first apply a gamma correction on both shots in the transition, then perform the blending operation and finally to apply the gamma of the current shot again.
IN
This Numerical Slate defines the number of frames before the edit point that are used for the transition.
OUT
This Numerical Slate defines the number of frames after the edit point to be used for the transition. By default this is set to a 1 second interval.
A Dissolve Transition is displayed in the Edit Panel by a green triangle above the edit point.

TRANSITION ANIMATION
Note that you can animate a transition in the Curve Editor - which is explained in more detail in the next chapter. To open the curve editor, set the play position at the first frame of the shot with the transition and click the Animate button on the main menu bar.
ORIENTATION
Source images can rotated along the horizontal and/or vertical axes
FLOP
 – rotate 180 degrees horizontal.
FLIP
 – rotate 180 degrees vertical.