GENERAL
In the Edit Panel you can setup and adjust the timeline by extending, shrinking, inserting and moving tracks, slots and shots using drag and drop rather than using the controls. This paragraph covers the different gestural actions.
SLOTS
EXTEND, SHORTEN, MOVE
You can extend or shrink a Slot by clicking it at either end and dragging it left or right. When you click the middle section of a slot and drag it left or right you move the slot as a whole. You can also pick a slot up and drag it to another position on the same or other track.

An important determinant in how these actions behave are the Edit Modes which you can toggle in the Video menu or using quick keys (see quick key overview by clicking Quick Key: h).
 |
Reveal Previous shot - link the slot-in with the slot-out of the previous slot. Shortening a slot by dragging its in-point right will automatically extend the previous slot.
|
 |
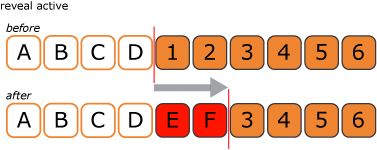
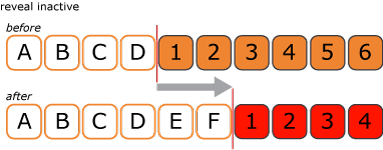
Reveal Next shot - link the slot-out with the slot-in of the next slot. Extending a slot by dragging its out-point will automatically shorten the next slot.
|
 |
Ripple - any changes to the current slot duration ripple down the timeline. This causes all slots after the current slot to be shifted in time by the amount the current slot was lengthened or shortened.
|
 |
Ripple Track - ripple changes on main track to sub tracks.
|

|
Reveal Media - maintain media while slipping the slot.
|
  |
Insert vs. Overwrite mode. When drag-drop a shot into the timeline it will either replace existing media or push the existing media to the side.
|
 |
Enable / Disable drag mode. When disabled you can not start a drag action
|
 |
Replace mode - replace the shot in the active slot with the shot on the pen. Maintain the slot size and position.
|
Note that when hovering over the mode buttons the description is displayed in the label above the buttons. Furthermore, when hovering the mouse above a slot on the timeline the Reveal Prev / Next and Ripple modes are displayed above the slot ends:
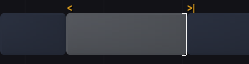
- Reveal Previous On / Off: display '<' or '|' at the left edit.
- Reveal Next On / Off: display '>' or '|' at the right edit.
- Ripple On / Off: display '>' or '|' at the right edit (together with the Reveal Next Mode).
REVEAL PREVIOUS / NEXT MODES
With the Reveal Previous / Next and Ripple options off - the slot is bound to the positions of the prior and next slots. With these modes on, adjusting the slot in / out position might affect the next or previous slots. The examples below make their function clear.
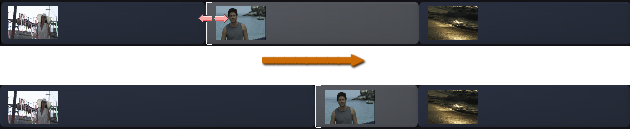
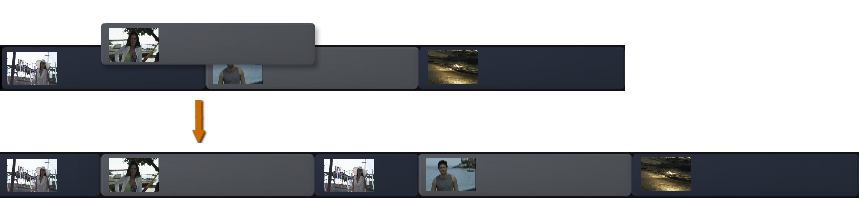
Reveal Previous On: Dragging in-position of slot to the right and as a result the previous slot's length increases.
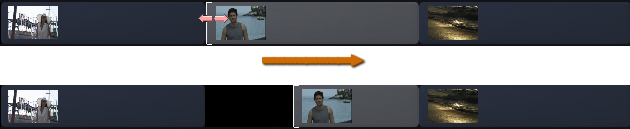
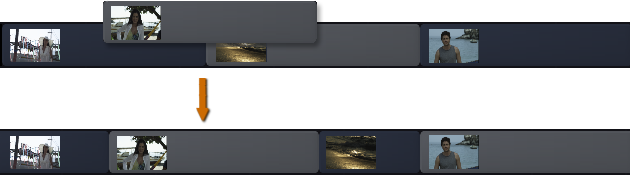
Reveal Previous Off: Dragging the in-position of the slot to the right, but now the previous slot is not linked - leaving a gap.
SLIPPING MEDIA
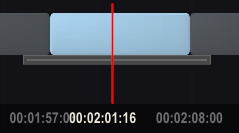
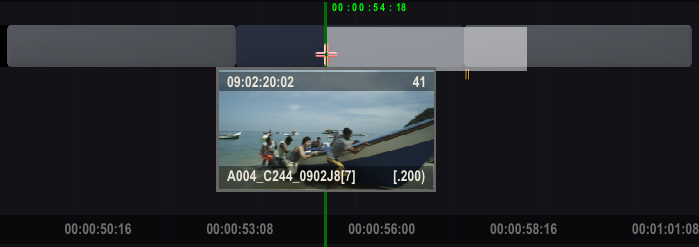
The current selected slot is displayed with a grey bar below it -indicating the length and position of the actual media. If the source clip is longer than the current slot, a smaller gray bar extends under the edit bars to show you how many frames are available before and after the current slot.
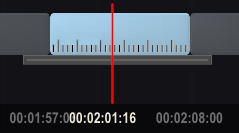
You can slip the source shot by holding down the shift key and dragging the slot left or right. While dragging, a ruler is draws showing you how many frames you are slipping.
You can also use the Quick Keys to slip a shot one frame at a time. Open the quick key overview by using Quick Key: h.
Another way to slip source media is to use the Reveal Media Edit-mode. When this mode is enabled and the duration or position of a slot is changed, the in-point of the source shot is changed in the reverse.The examples below show the effects of the Reveal function when moving an edit point.
SELECTION
The current slot is determined by the Play position and the current selected track. You can however select multiple slots. E.g. to remove multiple shots at once, to start a drag drop action or to create a Collector node. To select multiple slots you either click additional nodes by holding down the Ctrl-key or by starting an area-drag by holding down the Ctrl-key and starting a drag between two tracks and dragging the pen across a section of the Edit panel.
To remove a multiple slot selection you click anywhere outside the selection..
DRAG DROP SLOT
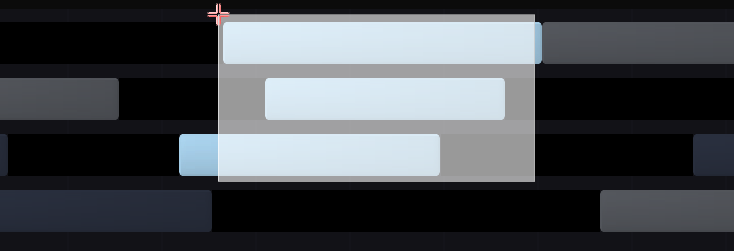
You can pick up a slot by clicking it and holding down the mouse momentarily. Make sure the Enable Drag Edit-mode is switched on. Once attached to the pen you can drop a shot at any position. The green line that appears while dragging an item indicates the drop position and timecode at that position. The drop overlay indicates the location / length of the element being dragged.
The drop behavior depends on the Drop Edit-ode: Insert vs. Overwrite. The example below shows the difference.
When Insert Mode is set - the current slot at the drop position is split and the drop slot is inserted in between.
In Overwrite mode - the doped slot just overwrites whatever is there as from the drop location.
DRAG DROP SHOT
When you are dragging a shot from the Fetch or Load function - the Replace mode determines the behavior of the Drop action.
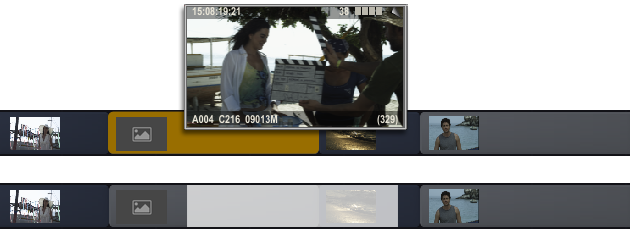
If the Replace mode is enabled the slot that you are hovering over will turn yellow, indicating that SCRATCH will replace the shot that is in that slot with the shot attached to the pen. If Replace mode is disabled SCRATCH will use the Insert mode and insert the shot into the timeline over the full length of the shot. This is indicated by the white overlay display that is sized to the actual shot length.
When Replacing a Placeholder shot the framing and grade of the Placeholder are copied over to the new Shot, unless the shot already has a grade applied.
DRAG DROP TRACK
You can also drag and drop a complete track to a different position. By holding down the mouse on a Track Selector it will attach itself to the pen. You can then drop it above or below another Track selector to move it to that position.

Note that you can not change the position of the main track or move any sub-track before the main track. Also note that the numbering on the Track selectors remains the same - as that always uses sequential numbering.
DRAG DROP COPY
All drag actions started in the Edit Panel are by default a move of the element. However, if you click the Copy button in the Video menu while dragging an element the original element will remain when dropping the item.
Note that you can also use the Copy button to attach the current slot (selection) to the pen.
NOTES
Using Quick key: N while hovering over a shot in the editor will pop-up the Note Editor for entering and reading annotations.
IMPORT AND FETCH
Using the Import or Fetch buttons you can get a reference to a new shot which you can drop in the desired location in the editor. Use the Fetch button to get an already loaded shot from a timeline in the project. The Load button opens the file browser to select a new shot from disk. Note that when you pick up shot it will use the local in- and out-points to determine the drop-length.