GENERAL
The Viewport is the same across the different tabs and provides a number of elements to manage specific views, comparing views and navigating your timeline and composites.
Note: When interacting with any User Interface elements, playback does not need to be stopped. The User Interface is always kept live.
VIEWPORT CONTROL BAR
The Viewport Control Bar gives access to a variety of Players functions discussed below.

PREVIOUS / NEXT
SCRATCH maintains a navigation-list with timeline positions and composite elements. Every time you move the Player timeline position or navigate to an element in the current composite, SCRATCH adds an entry to this list. Using the (Arrow) Previous and Next buttons you can quickly step through that list to switch between positions and elements. The navigation-list is only extended when you manually navigate to a different position or element in the Player - not on regular playback.
SCOPES
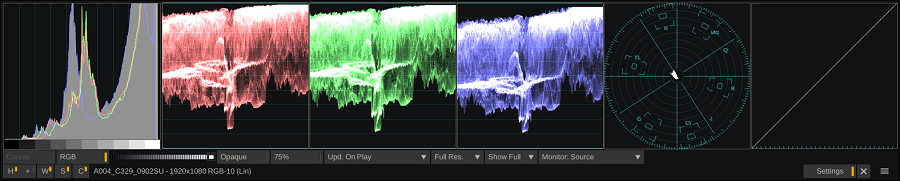
The Scopes button opens a panel provides a set of tools for monitoring different characteristics and statistics of the current image that is displayed in the Player: a Histogram, a Waveform monitor, a Vector scope and a set of RGB curves.
|
o Quick Key: Ctrl + 1
|
» Show statistics panel
|
Note: The Statistics panel uses GPU - OpenCL processing in order to be able to constantly refresh when playing while at the same time posing very little impact on overall performance. Most modern graphics card support OpenCL. However, when the graphics card used does not support OpenCL, SCRATCH will revert to the CPU version of the Statistics panel. The CPU version will by default only refresh the statistics after stopping the player or after each manual reposition of the current frame.
The video scopes are intended to monitor your source signal and can be used to legalize your image and prevent clipping on the source signal. They are not meant to replace any external scopes; the statistics are not based on the SDI signal and neither is a Monitor LUT taken into account (if used). Illegal color values are signaled in the panel by orange clipping lines appearing at the right or left axis of the Histogram, top or bottom of the Waveform and the circle edge of the Vector scope.
Depending on how you entered the Player either the complete or just part of the image is included in calculating the statistics. In case you loaded a single clip (or Output node) into the player, the entire image is used in the calculations. However, when you entered the Player with a Construct, the format / resolution of the primary Output node of that Construct is the base for the calculations. This means that when you are playing a clip with a different (bigger) format than the primary output, only part of the image is included in the calculations.
Using the buttons on the bottom row of the Statistics panel you can switch the different statistics on and off. On the far right side of this row there is a Gripper to move the position of the Statistics panel, a button to close the panel and a Settings button that will reveal more settings for the panel.

The Curves button will switch on / off the display of the RGB curves in the Histogram. The RGB button toggles the Waveform monitor in separate channels or as one overall luminance channel. With the Grey-scale you can set the intensity of the scope displays. The Opaque button controls the transparency of the Statistics panel.
Note: All the colors used in the Statistics panel can be adjusted; see Chapter - Customizing SCRATCH on how to change the interface colors.
With the 75% button you can control the legal range for the Vectorscope. If switched on, the Vector scope will indicate illegal values if any of the colors in the current image is over 75% saturated.
The Update On Play button overrides the default continuous refresh of the Statistics and only updates while not in playback mode. Displaying the Statistics does take a certain amount of system resources that can not be used for regular render and playback. When enabled, the statistics are only updated after stopping or manually repositioning the play position. If your system does not meet certain requirements this setting will be enabled by default. To further cut down on system requirements you can render the Statistics in either Full- or Half Resolution with the corresponding option button. Finally, the Show button allows you to scale the statistics panel to half or double it default size.
With the Monitor button you select which image and potential extra transforms to include in the statistics:
- Source: the current image without any display LUTs or transforms.
- UI: the image in the main UI screen plus any display LUTs / transforms you set in the Settings - Monitor menu.
- SDI: the image as it is send to the SDI output / dual head plus any display LUTs / transforms you set in the Settings - Monitor menu for that view.
Histogram [H][+]
The Histogram display provides a visual representation of the balance of color and luminance in the current image. The horizontal axis of the Histogram is the range of values from 0 to 1.0. The vertical height of the histogram at any point along the horizontal axis represents the amount of that value present in the image. The higher the histogram, the more prevalent that value is. This allows you to quickly evaluate the balance of an image. For example, a very dark image would have a high peak in the histogram on the left side, as in the example below. This indicates that there are a high amount of pixels with values in the darker ranges.
You can resize the Histogram by toggling the [+]button. The smaller version can be useful as it will continue to be refreshed while playing even if SCRATCH is running on hardware not supporting full panel refreshing.
Tip: You can adjust the scale of the full histogram y-axis by using the Quick Key: Mouse-Wheel.
Note: When working with Log images, vertical lines will appear on the Histogram, showing the location of the legal black level (95) and legal white level(685). These reference marks will not be displayed on Linear images.
Waveform monitor [W]
The Waveform monitor displays the black, gray, and white levels in the current image in the Player. Each white dot in the scope represents the luminance, or gray-value, of a pixel in the image. You can toggle the Waveform display by the RGB button in the settings row of the Statistics panel. If the button is enabled, the Waveform will show each red, green and blue channel separately. If disabled, the Waveform shows the overall luminance levels of the image.
The position of the reference lines in the Waveform scope depend on whether the source material is flagged lin or log, similar to the legal lines in the Histogram. For log material the reference lines are on the legal black and white levels. For linear footage the reference lines are based on legal SDI levels. When the image that is being monitored is flagged as HDR (with a PQ or HLG transfer function), the waveform is automatically displaying a nit (cm/m2) logarithmic scale with a maximum of 10000 nits. In addition, the nit reference level that you set as project HDR metadata is also displayed as separate line in the monitor.
Vectorscope [V]
The Vectorscope shows the colors of the current image in two dimensions: the shade / hue of the color, represented by where the color falls around the circle and the amount of color / saturation,represented by how far the color is out from the center.
Color Curves [C]
The Color Curves displaying on the far right of the Statistics panel provide a visual reference of how each color channel is being modified by the primary grade and secondary grade (excluding Canvas and Qualifiers).
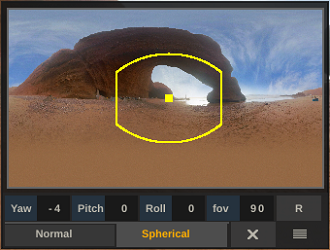
PAN ZOOM
The PanZoom tool has 2 tabs. On the first you can see and control the position and zoom factor of the image in the ViewPort. On the second tab you view and control the view in a 360 spherical projection.
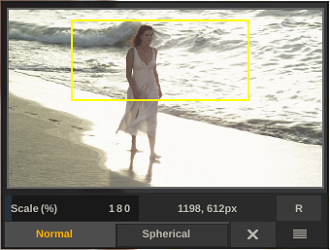
Normal
The yellow outline shows the part of the image that is currently visible in the Viewport. If you click on the proxy image in the PanZoom tool, SCRATCH will make that position of the image center in the Viewport. You can drag over the proxy image to adjust the position in the Viewport.
The Scale numeric control can be used to enter a specific scaling. Use the R button to reset the scaling to 100% and center the image. The numbers next to the Scale control indicate the pixel coordinates in the image the mouse is currently over. The left bottom corner is considered 0, 0px.
360
With the Yaw, Pitch and Roll controls you can adjust the view direction in the 360 spherical projection. This direction applies to all views in SCRATCH: the main view, split view and second monitor/output. Besides adjusting the controls you can also click and drag inside the proxy image. This will adjust the Yaw and Pitch controls and the viewing position.
The proxy image in the PanZoom will always show the flat projection of the image, whether it is an Equirectangular image, a Cubic or a stereo variant. In case of an Equirectangular source the yellow outline indicates which part of the image is currently showing in the spherical projection. In case of a Cubic source the PanZoom will only show the yellow dot, indicating the viewing center. If the source is an over-under stereo image (which has not been wrapped in a stereo node), the outlines are only shown on the top (left) part of the proxy image.
In case a headset with motion tracking is connected (Oculus Rift or HTC Vive), SCRATCH will automatically use the motion control from the headset and the Yaw, Pitch and Roll display in the PanZoom are automatically adjusted.
The Field Of View (fov) control value can be adjusted within a certain range. Note however that this only applies to the various views but not to a headset that is connected. The R button will reset all the controls. In case of an active headset the reset will mean that the headset re-orients itself - making the current direction "front".
MANAGE STEREO
On the Manage Stereo panel you control how a stereo node is shown in the main view, which color settings are active and you can easily synchronize the color settings between the left- and right-eye images of a stereo shot.
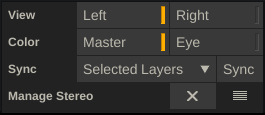
When you wrapped the left- and right eye of your stereo media in a Stereo node and play that in the Player, the Manage Stereo panel becomes active. In this panel you control which eye is showing in the main viewer, which grade is active and how to sync color grades between left- and right eye.
View
When viewing a Stereo Node, the main view of SCRATCH either show the left or right eye. Unlike the split view or second monitor, it will never show a stereo pattern like anaglyph or over/under. Showing a stereo pattern in combination with working with layers and displaying the overlays of layers or plug-ins on screen becomes too complex. If you do need to view stereo on your main monitor you should switch to split view.
Color
When working with a Stereo node you are might have to deal with 3 grades: the grades on each eye or the overall grade on the stereo node itself. To be able to switch between the various grades easily, you toggle the Master and Eye buttons in the Manage Stereo panel. When selecting Master, the active grade is the one on the Stereo node itself. When selecting eye, the active grade you are working on is the grade on the left or right input of the Stereo node.
Note that the view is always rendered with both grades: you are not drilling down in the composite tree as if you were selecting one of the eyes in the Source stack.
Sync
With the Manage Stereo panel you are effectively always working on one of the eyes of the stereo pair. To easily replicate changes you made on one eye to the other the panel has a synchronization function. This function copies grades from one eye to the other without affecting any convergence you applied to the grades already. There are three ways to synchronize grades:
- Sync Primaries: this will simply copy the primary grade of the current eye over to the other eye. Framing is not included.
- Sync Selected Layers. This option will check if a Layer with the same name already exists on the other eye. If not, it will copy the full layer to the other eye. If a layer with the same name already exists on the other eye, SCRATCH will copy only the color grade over but will leave all the geometry (canvas / position) intact.
- All Layers. This option applies the same strategy as for the Selected Layers but then for all Layers on the current selected eye.
The Sync option is only applicable when the Color option is set to Eye. The Master grade already applies to both eyes.
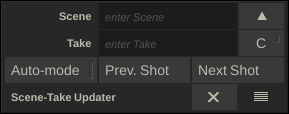
SCENE-TAKE
The Scene-Take update panel offers a efficient way of checking / updating the Scene and Take metadata information of the shots in your timeline. The Prev. Shot and Next Shot buttons navigate to the corresponding shots in your timeline. Use the scene and take text inputs to update the metadata for the current shot. Use the C button you to enable / disable the Circle Take metadata for the current shot. When you click the Arrow Up button, the scene value is incremented, even if the last character of the Scene is an alpha numeric character. The real power of the Scene-Take update panel however lies in the Auto-Mode. When enabled it will automatically update the the take value of the next / previous shot you navigate to (when using the corresponding buttons).
LAYERS
Layers are discussed in more detail in Chapter - Layers.
MEMORY
The Memory panel gies quick access to a series of grades. The functionality is discussed in more detail in Chapter - ColorFX, in the paragraph on Trays and Memories.
AUDIO
SCRATCH's Audio Panel tool is discussed in more detail later in this chapter.
COLOR SAMPLING
Clicking on the Color Chip in the center of the Control Bar activates the color picker and opens the Color Selection Palette. The cursor changes to the color picker icon and you can sample the RGB values of any area of the image. The RGB values are displayed on the Color Chip.Clicking and dragging on the image continuously samples the RGB values. For more information about using the Color Selection Palette, see Chapter – Getting Started.
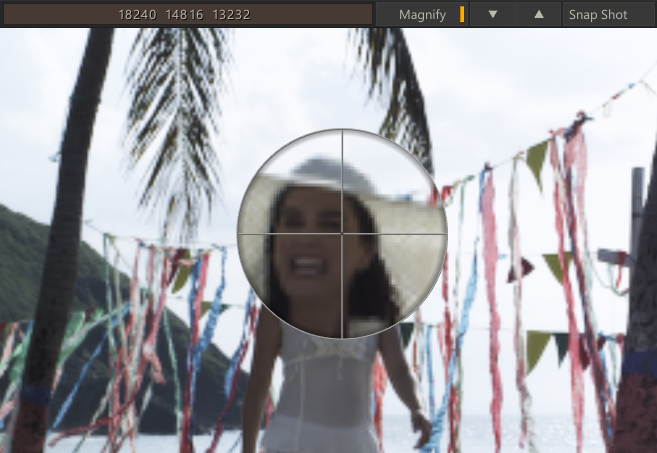
MAGNIFY
The Magnify button opens up the Magnifying Glass interface. The Magnifying Glass can be dragged around the shot to provide a detailed view of that particular part of the frame. You can control the zoom level by clicking on the Up and Down buttons next to the Magnify button.
SNAPSHOT
The Snapshot button can be used to create JPG or TIF images from the current shot in the Viewport. In the User settings (see Chapter – The Startup Screen) you determine the type of image and the default location. The image created will include any flip/flops set as well as any rotation - in steps of 90 degrees. Note that when viewing a timeline shot - the snapshot will not include any framing set in context of the timeline. To include that in the snapshot you either select the View Output option from the Viewport toolbar (discussed later in this paragraph) or explicitly select the output node from the Output Stack.
When clicking this button while holding down the control-key, SCRATCH will popup the file browser so you can select an alternative location to store the image.
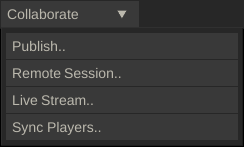
COLLABORATE
This opens a pull-down menu with a series of options to share your SCRATCH media and collaborate with others: Publish, Remote, Live Stream and Sync Player. These functions are discussed in detail in Chapter - Collaboration Tools.
HEADSET CTRL
This option is available if SCRATCH has detected a supported VR headset (see Chapter 11 - Customization for more details on headset support). Activating this will display the Player controls as an overlay in the headset: Play / Pause, Next / Previous Shot, etc., as well as the mini-timeline. You can use the mouse while wearing the headset and operate the controls and browse the timeline. While you are in Headset Control-mode you can not click any of the options in the regular SCRATCH interface. The Viewport will show a message that it is in Headset Control-mode.
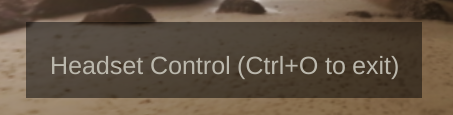
To exit the Headset Control-mode, use Quick-key: Ctrl+O. Note that your license needs the VR extension for this feature!
PLAYBACK PERFORMANCE MONITOR
Using Quick Key: Ctrl + F1 toggles the Playback Performance Monitor at the top of the Viewport. The Performance Monitor displays information showing the speed at which the system is performing certain operations.

FPS
This is the average frames per second over the last 0.25 sec. The color of the FPS text identifies how the player is currently managing the refreshing of the screen:
- White = refresh locked to every V-sync interval
- Green = locked with a swap-interval, for example, 72Hz display, Refresh every 2 V-syncs
- Red = unlocked – refreshes the display on a timer; some tearing may occur
The green graph to the right shows a running history of the average frame rate.
PRC
This is the average time it takes to build up the Shader, LUT and geometry for rendering. Generally, this is an indication of how hard the processor is working to create a displayable image.
GL / GFX
This is the average time it takes the graphics card to render a single frame.
TX
This is the average number of Megabytes transferred from main memory to the graphics board during the last second. The second statistic is the total amount of texture memory allocated.
IO
This is the average number of Megabytes read/written to the disk sub-system during the last second. In some cases the figures are displayed in yellow. This indicates that the read/write was done not directly in SCRATCH; some third party plug-ins or QuickTime do their own disk-IO. In that case SCRATCH gets the statistics from the operating system. Please note that these figures might not be exact as they can also include traffic from other applications that are active on the OS.
Note: Running SCRATCH with the –perf command-line option adds more detailed information about individual processor core performance. See Chapter - Customization for more information about SCRATCH command-line options.
VM
The amount of Virtual Memory in Use.
GM
The amount of Graphics Memory in use.
VIEWPORT TOOLBAR
MAIN TOOLBAR
With the Viewport Toolbar you determine and manage the view in the Viewport.

1. Lock / unlock the current view
In normal operations the view in the Viewport will change with a change in selection: switching to a different track in a multi-layered timeline or when selecting an element in a composite. By locking the current view you can switch to another node for updating while maintaining the current view. Note though that the selected node MUST be part of the current view, otherwise the lock is automatically removed.
2. View the full context / main Output node
This option is a shortcut to view the main Output node that includes all tracks and underlying composites, while you can remain working on one of its underlying nodes.
3. VR 360 mode / Spherical projection
This option switches the Viewport into 360 mode to show a spherical projection of the current shot. To show the proper projection either the Projection Type metadata item of the shot must have been set to any other value than 'normal' or you need to set an override in the Player-Settings-Monitor menu in the 360 view format option.
Once the Viewport is in 360 mode it will no longer show any overlays of the layer vertices or plug-in nodes in the shot menu. You can change view direction by holding down the mouse and dragging the pointer across the screen in any direction or alternatively use the PanZoom tool.
4. Grading Bar-code
The bar-code that displays whether the current shot in the Viewport has a grade applied to it. The barcode works identical as the barcode on a thumbnail image, described in Chapter 4 - The Construct. Clicking the bar-code will toggle the display of the grade of the shots in the Viewport on/off. When switching off the grade, the bar-code is shown grayed out.
5. Shot info
Clicking this section of the Toolbar will open a popup menu with predefined display options: Shot name, Reel-id, source or record timecode, frame numbers, filenames or (current) Construct name.
6. Shot Index
The shot position within the timeline.
7. Proxy Timeline
Toggles on/off the display of the Proxy Timeline.

The Proxy Timeline can be used to visually navigate the timeline; clicking a proxy will move the play position to that shot. You can also drag/drop gallery items on the proxies to quickly apply grades. Note that the proxy selection will update while in playback mode, while the proxy images do only update when not in playback mode in order to limit system resource usage.
Furthermore, pressing the Quick Key: N will open the note editor for the shot that is currently under the cursor position. This gives you a quick way to view or update notes without having to navigate to the shot.
8. Previous / Next Proxy
Toggle the display of the proxy images of the previous and next shots in the timeline on/off.

The proxies displayed also include any secondary grade if applied.
9. Dual View and Over Mode Switch
Switch between different possible views in the Viewport: Single-,Dual- and Over. Dual- and Over- view are discussed in more detail later in this paragraph.
10. Image Re-size options
- Zoom out on the image – this always zooms around the center of the image.
- Zoom in on the image – this always zooms around the center of the image.
- 1:1 – set the image to a 1 - to - 1 resolution with the native screen resolution so that one pixel of the image is represented by one pixel of the display screen
- Fit – fit the shot into the current Viewport, taking into account floating tool panels and Media Stacks currently being shown.
11. Overlay toggle
Show or hide Scaffold or Plug-in overlay controls in the Viewport.The underlying element is still active but the on-screen interface is not visible. This is useful when e.g. you want to see the effect of a secondary grade without any visual interference. In the Editor the Overlay button will toggle the Editor Overlay mode, showing proxy images of the previous and next shot. For more details see Chapter - The Editor.
12. Color Channel Toggles
To turn on and off individual color channel representations.
- R, G and B: Select between each of the Red, Green and Blue channels.
- M: Displays a particular color channel as a Monochrome (Black and White) image instead of the default, which uses the color of the channel selected.
- L: Displays only the Luminance of the image.
- A: Displays the Alpha channel of the image, if the current file format supports alpha channels
13. Mon.
Toggle the use of a color space transformation for the display Monitor on / off. See the paragraph on Monitor Settings later in this chapter about setting a color space transformations for your main and reference monitor. The toggle applies to both Monitors.
14. Grid
Toggle on/off a display grid in the Viewport. The grid can be used for alignment of different elements in a composite.
VIEWPORT PAN CONTROLS
Panning an image is done by holding down the SPACE BAR, and then clicking and dragging the left mouse button in the Viewport area to change the position of the image within the Viewport. Zoom and Pan controls use the following Quick Keys:
|
• Quick Key: Alt
|
» Zoom in and out by left-clicking in the viewport area and dragging up or down, or using the mouse wheel
|
|
• Quick Key: +
|
» Zoom in to the cursors current position
|
|
• Quick Key: -
|
» Zoom out to the cursors current position
|
|
• Quick Key: Alt + Home
|
» Zoom image to fit display
|
|
• Quick Key: Home
|
» Toggle display to the home and current position
|
|
• Quick Key: Control + Home
|
» Toggle display to current/fit image size
|
|
• Quick Key: Shift + Home
|
» Toggle display between full screen/fit image size
|
|
• Quick Key: End
|
» Zoom image guide to fit the display
|
|
• Quick Key: Spacebar
|
» Pan control
|
|
• Quick Key: F
|
» Adjust image framing with the mouse
|
Note: The M Quick Key adjusts the scale of the image in the Shot Framing settings. This is not the same as simply zooming in on the image within the ViewPort area. The M Quick Key will alter how the shot is framed within the current Construct resolution. The changes to the scaling of the image can be seen in the Process menu.
DUAL-VIEW TOOLBAR
With the View selector in the main Toolbar you can switch the Viewport to Dual view. In Dual View a second image and corresponding toolbar become available. Note that the right view in SCRATCH is ALWAYS for viewing / comparing only. You can not grade / composite or adjust the right shot in any way directly.

You can also use the Quick Key: D to open the Dual View mode.
|
• Quick Key: D
|
» Enable Dual View
|
15. Use Current Left View
This option moves the current left view over to the right view. This option allows you to virtually compare any combination of shots: if none of the short cut options contain the right view you need, just navigate to it and select this option. after that - navigate back to the shot you want to work on.
16. Right View Selector
Shortcuts to select a specific right view:
- Current - show the current node on the left also in the right pane. Optionally you can add a slip to the right view for comparison. See the section about the dual view Slip Control later in this paragraph.
- Tray - Show the current selected shot in the Project Tray. In order for this option to become enabled, you must make sure a shot is actually selected in the Project Tray. When clicking a shot in the Project tray while in dual view will automatically update the right view.
- Custom - this option will shows the node that was last selected with the Use Current Left View option.
- Output - the same as using the show Main Output node option in the first row of the Tool Bar.
- Reference - if the current Construct has a reference node assigned (Editor) then this option will show that Reference shot.
- All Versions - this option will create a Video Wall shot with the current shot and all its versions in the Version Stack as inputs.
An alternative way to set the right view is to drag and drop a shot onto the right view.
17. Link views
Both the left and right images can be zoomed and panned independently by placing the cursor over one of the images and using the standards zoom and pan keyboard controls or using the zoom controls on the corresponding Toolbar. By enabling the Link button you link the two images together so that the zoom and pan keyboard controls will affect both images.
DUAL VIEW SLIP CONTROL
When you are in dual view, the Slip Control is shown between the two toolbars. With this control you can set and adjust a slip between the two views. In addition by clicking on either the left or right part of the control you can toggle on/off whether the respective view is linked to the transported controls. This way you can play one view and pause the other and determine / set a slip value.

 both left and right view are played with zero slip for the right view.
 the right pane is paused and the slip has amounted to 146 frames
Note that when the right view is a shot from the Project Tray - the slip value that you set will be stored with that Tray shot. When you switch back and forth between different Tray shots, SCRATCH will restore the last slip value used with that shot.
OVER MODE
Next to Single- and Dual View there is the Over mode option in the main Viewport Toolbar. This option displays two images over each other for comparison. When this mode is selected the Over Mode Toolbar at the top of the Viewport becomes available. There are two states for the Overmode; A/B (superimposed) and A-B (subtracted). In case of the A/B state the tool bar controls the display of the Wipe associated with this view:Horizontal position, Rotation and Transparency.

The Opacity level determines the level in which the A image is shown more /less opaque. The Wipe position can also be controlled directly in the Viewport by clicking and dragging the control overlay that become available.
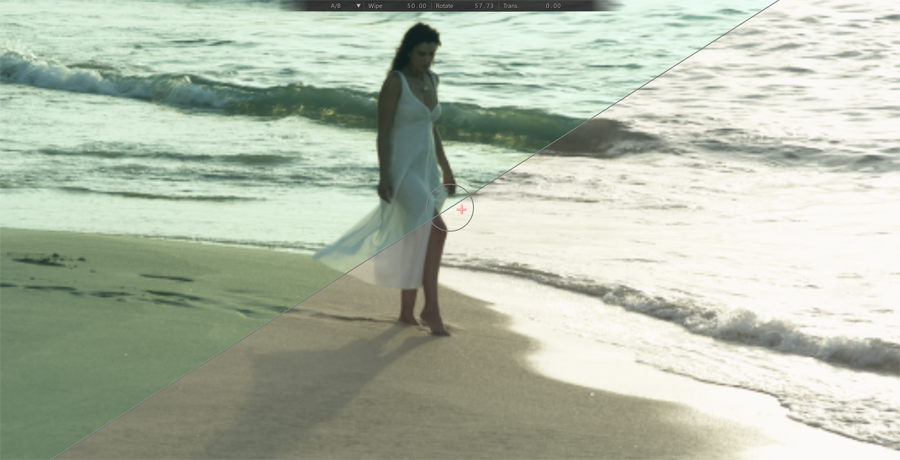
When you first enter the Over mode the Wipe overlay will show. When you hover the mouse over it and away from it the overlay will disappear until you hover the mouse back over the Wipe position. You can pick up the overlay anywhere to move it horizontal / vertical. By picking the overly up at the middle circle you can rotate the wipe.
In A-B mode (difference view) there is no Wipe but you have an additional Gain control to highlight any differences between the images.

Lastly, you can also popup the Over Mode A/B by using Quick Key - S.In that case the Viewport shows you superimposed the current image and the current image in the trim buffer; the image with a prior grade. The Trim buffer is discussed in more detail in Chapter - ColorFX.
MAIN MENU BAR
The Main Menu Bar divides the Viewport and the lower menu panel.

SETTINGS
Open the Player Settings menu for managing the Player and monitor(s) output. This menu is discussed in detail later in this chapter.
TRAYS
Open the Trays view - discussed later in this chapter.
ANIMATE AND NAVIGATION MODES
The Animate button opens and closes the Curve Editor to manage animated parameters. This topic is discussed in detail in Chapter - ColorFX. The S button next to it, toggles between the different navigation modes that determine the behavior of the Previous  and Next
  buttons (discussed below). There are three modes:
- Slot Navigation: the Previous / Next buttons jump from slot to slot over the timeline.
- Note Navigation: On the mini timeline the positions of all shot notes are marked as colored bars. The Previous / Next buttons jump from note to note.
- Keyframe Navigation: When selected, the keyframe positions for the current shot and current animation channel are displayed on the mini timeline. The Previous / Next buttons jump between keyframes.
The images below show the appearance of the mini timeline with Notes- and Keyframe Navigation selected.

As mentioned - Animation and Keyframes are discussed in more detail in the ANIMATION section in Chapter 7.
PLAYBACK CONTROLS
The main transport controls are located in the center of the Menu Bar.

The function of each button is as follows:
 |
Play repeat options
|
 |
Jump to the first frame
|
| |
Jump to the previous shot in the timeline or jump to the previous note or keyframe, depending on the navigation mode.
|
 |
Jog backward one frame at a time, or play backward if held down
|
 |
Play backward
|
 |
Pause/stop playback
|
 |
Play forward
|
 |
Jog forward one frame at a time, or play forward if held down
|
| |
Jump to the next shot in the timeline or jump to the next note or keyframe, depending on the navigation mode.
|
 |
Jump to the last frame
|
 |
Mark IN point
|
 |
Mark OUT point
|
 |
En- disable audio
|
Open the Quick Keys overview panel (use Quick Key: h) to see the available quick keys for the various Playback options.
PLAY REPEAT OPTIONS
Initially, the Play Repeat setting is set to Play Once, as indicated by the  button at the left of the play controls. Clicking on this button cycles through these options:
Play once only – the default option
 Repeat play in either direction; Playback repeats in the same direction once the end of the sequence is reached
 Ping-Pong, or bounce play
In addition when you hold down the Control key while clicking this button you can change the Playback speed to 2x, 4x, 8x, 10x, 20x, 50x.

When holding down the Shift key when clicking playback speed reverts back to normal.
MINI-TIMELINE

A mini-timeline is displayed underneath the Play Controls. You can scrub through the timeline by clicking and dragging inside the mini-timeline window. When multiple shots are loaded, the mini-timeline alternates between light and dark blue to show each individual shot. The number slates to the left and right of the mini-timeline display the frame number of the IN and OUT marks. By default, the IN and OUT are set to the first and last frame of the sequence, unless changed by pressing the IN and OUT buttons.
RANGE CONTROL
You can adjust the range of frames that are played back in the Player by using the RANGE button. With no IN and OUT marks selected, and multiple shots are loaded into the Player, the RANGE button automatically focuses the Player on the current shot. All playback is limited to this range of frames until the RANGE button is un-selected, at which time the Player returns focus to the entire clip or timeline.
When a range is defined, the mini-timeline and all frame indicators are updated to reflect the current range. The IN and OUT buttons 
 are used to define a range manually. Once set, the RANGE button adjusts the Player to focus only on the frames between the two marks. Un-selecting the RANGE button returns the Player focus to the entire clip or timeline again.
The IN and OUT marks can be set during playback; or, they can be set manually by entering values into the text boxes to the left and right of the mini-timeline.
SOURCE MODE
When you entered the Player with a complete timeline you can not directly view before and after the in / out points of an individual shot. By enabling the Source mode the Player timeline shows you only the current shot including its handles. By default a Range is set from the In to the Out point of the shot.
SCRATCH will automatically switch to Source mode when you select an input of a composite. In the Editor switching to Source mode allows you to edit the timing of all inputs of the current composite shot directly and in context.
FRAME INDICATORS
To the left and right of the play controls are two text boxes. The left text box is the current frame counter. This shows the current frame count from the beginning of the timeline, shot, or marked range.
The right text box is a percentage indicator. By increasing the value in this box, you can determine the amount of handles added when focusing the range on a single shot.
A value of 100, for example, adds half the duration of the shot as handles to the beginning of the range, and half to the end of the range. When RANGE is turned on, the value in this text box updates to show the total length, in frames, of the range.
AUDIO TOGGLE
Toggle audio on/off. If there is no audio available with the current clip - the button is greyed out. Audio is discussed in more detail later in this chapter when describing the audio panel.
UNDO, REDO AND RESET BUTTONS
On the right side of the Menu Bar are the UNDO, REDO and RESET buttons. These buttons are present everywhere in the Player, allowing you to undo a previous operation, redo an operation, or reset the current menu page.

METADATA STACK
On a right Swipe action in the Viewport or by using Quick Key: Q - a panel appears that holds a number of tools; the Version-, Layer- and Staging- stack as well as the Metadata Stack.The first three are discussed in more detail later in this chapter as they more used for navigation. The Metadata Stack allows you to view as well as edit the metadata of the current shot. The Meta Data Stack is also available in the Construct. To display the Metadata grid use the corresponding tab at the bottom of the panel.
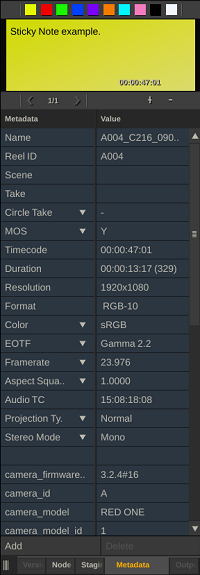
Current Shot Proxy
At the top of the Metadata Stack the proxy image of the current shot is displayed. Through this proxy you can also display and edit any Annotations with the shot as described in Chapter - The Construct. Use Quick Key: A - to open the Annotation for editing.
Fixed Metadata Items
The top rows (until the first empty row) of the the Metadata grid always contain the same standard items (name, reel-id, scene, take Circle take, MOS, Timecode, duration, format, color EOTF, Framerate, Aspect, Audio timecode, Projection type and Stereo Mode of the current shot. Most of these items can be updated (except for Duration and Resolution) but none of the items can be removed. Clicking the timecode or a numeric metadata row to switch it to edit mode pops up the Calculator.
Extended Metadata Items
All the rows in the Metadata grid below the fixed metadata items are the extended properties of the current shot. The properties present mostly depend on the media format of the shot. You can add, remove or update items. Note though that removing an item will not remove it from the physical underlying media and the item might return when reloading the project.
Editing Metadata
You can update the metadata by either clicking on the value column of a selected row, or by using Quick Key: E. After updating the value the text will be displayed in yellow. All changes are saved when either moving to another shot on the timeline or when exiting the player. Before the data is saved you can use the Reset button to clear all changes. The Add button will add a new row at the bottom of the grid. In this row you can adjust both the Item name and value. The Delete button will remove the selected item; as mentioned - you can not remove any of the Fixed meta data items and removing any of the Extended properties does not update the underlying media.
Note: When Adjusting the Timecode property, SCRATCH takes into account the current position of the shot in the Player.
PLAYER COMMAND MENU
A right-click anywhere in the Player pops up the Command Menu. This menu has one of two potential looks; Square and Circular. The look can be set in the User Settings - see Chapter – THE STARTUP SCREEN.

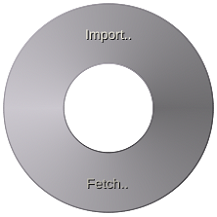
By default the menu contains three options discussed below. However, you can also add your own functions to this menu by creating custom commands. See Chapter - Customization for more information about Custom Commands.
Fetch Clip
This option replaces the Viewport section of the screen with the Construct view of the current timeline to allow you to select a clip from the timeline. After finishing the drag-drop action on the selected shot, the Construct view often closes automatically. However in some cases you need to close the view explicitly. When opening the Construct-view the Close button appears on the main Menu bar on the far left side and is highlighted in blue.
Import Clip
This opens the SCRATCH file browser to open a media clip and starts a drag action. From there you can drop the clip where needed: e.g. in the Editor or applied as a fill in a composite shot.
Color Node
This creates a so color node that is often used as an element in a grade or composite. The details on color nodes can be found in Chapter - Node Types and Plug-ins.
Keep & Gripper
The Keep button forces the Command Menu to remain visible at all times. When SCRATCH is run for the first time, the Command Menu is on-screen at all times. By deactivating the Keep button, you can clear the Command Menu by swiping off the screen. The Keep button is only available on the square Command Menu. Next to the Keep button is a Gripper section that you can use to drag the Command Menu to a different position.