GENERAL
The Tools menu has options for importing and exporting project metadata and executing external applications or scripts through the use of Custom Commands.

PROJECT METADATA
REPORT
The Report button opens the Report dialog panel, where you can select one of the available reports and enter the settings for that report.
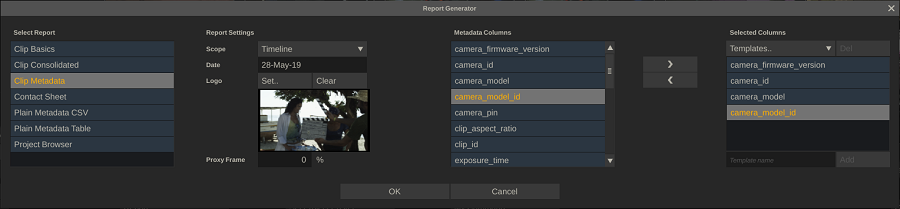
SCRATCH comes with a series of pre-defined reports. However, you can create your own custom reports as well. In Appendix B you can find more information on creating your own (xslt) reports or customizing the pre-defined reports.
The left side of the panel lists all available reports. In the right side you can enter settings for the report generator. The available settings depend on the selected report. Note that customized reports might include additional settings not displayed here. In that case an extra tab control (Misc) is displayed at the top of the settings list where you can enter values for those settings.
Scope
The scope determines which shots to include in the report. Possible values are: Project, Group, Construct or Selection. The last one only includes the selected shots in the current Construct.
Date
Enter a report date. By default, the current date is displayed.
Logo
Most reports allow you to add your own logo image. Since the Report output is an html file that is opened in your web browser, the logo image must can only be in a web supported format. Furthermore, the size of the image should be limited to fit in the report and the images might be scaled automatically. SCRATCH will remember the selected logo image with a report for the next selected report. The Clear button removes the image reference.
Poster Frame
Certain reports need a poster frame per clip. With this option you control which poster frame to take from the underlying clip. 0% means take the first frame. 100% means take the last frame of the clip. Setting this to 50% will take the middle frame.
Metadata Columns
Fro certain reports you can select additional metadata columns. The first list has all available metadata items for all the clips within the selected scope. Using the < and > buttons you can select / deselect columns. With the controls above and below the selected list you can create and apply template selections of metadata columns. To create a new template enter the name of the template and press Add. That save the current list as template. Using the dropdown at the top you can apply a template. The Del option remotes the template from the list.
OK: Web browser / pdf
When clicking the OK button the report is generated it is opened in the default application that corresponds to the report format; most reports are generated as html file and opened in your web browser. However a report might also produce comma separated (csv) data and open in a spreadsheet application.
Note that your can still adjust some of the (html) reports after they have been generated and opened in your default internet browser: enter / change values in the report header just by clicking next to the header label and typing in new values. Note though that these values are not saved with the report. They are only available while the report is opened in your web browser. To save the full report you can print the report to a pdf printer. The resulting saved pdf file will contain the additional information.
EXPORT A Construct, GROUP OR PROJECT
With the Export function you can save project data in either a
proprietary binary format or a XML format to an external file. With the
option button next to the Export button you can select what project data
you want to export; the current Construct, all Constructs in the
current selected Group or all Constructs in all groups. When pressing
the Export button a SCRATCH file Browser is opened for you to navigate
to the appropriate folder. By default it will point to the Construct
sub-folder in the project folder of the current project. If you save
project data in the binary format, the file will have a .dsk, .grp
or.prj extension, depending on the export level you choose. The binary
file will include all the metadata regarding editorial decisions, color
grades, notes and any other information that has been added or
modified.If you export in a the XML format, the file will contain the
basic project and timeline setup and limited grading information. The
XML format is primarily intended for use within workflows utilizing
third party systems and SCRATCH's XML scripting capabilities which are
discussed in detail in the Appendices of this manual.
Note: If
Auto-Export is enabled in the Project Settings menu, an XML output file
is automatically created in the specified directory every time a
Project is exited. This ensures that any external programs that are
parsing the XML output file are always using the most current state of
any Project.
IMPORT A Construct, GROUP OR PROJECT
The Import button opens a SCRATCH Browser where you can navigate to a
(previously exported) SCRATCH file, either in the proprietary
binary.dsk, .grp or .prj format or in a valid XML format. Opening the
file creates either a new Construct in the current Group or one or more
new Groups and Constructs in the current project. By default importing a
file does not overwrite an existing Construct, unless you used the XML
scripting syntax, explained in more detail in the Appendices of this
manual.
PROJECT MEDIA
PROJECT POSTER
On the Startup screen SCRATCH displays a poster image with each project. If a project does not have a poster frame, SCRATCH will create one
automatically when you exit a project. It will take the first shot on
the last selected Construct, using the first frame of that shot. With the Set Project Poster option you can override the poster frame. The option is only available when a shot in the Construct is selected. Clicking this option will create a new project poster from the current frame of the selected shot. Note that you can change the frame position in the shot by dragging to top part of the proxy control.
Construct CONSOLIDATE
This opens the Construct Consolidate dialog. From there you can consolidate the underlying media of the current selected Construct.
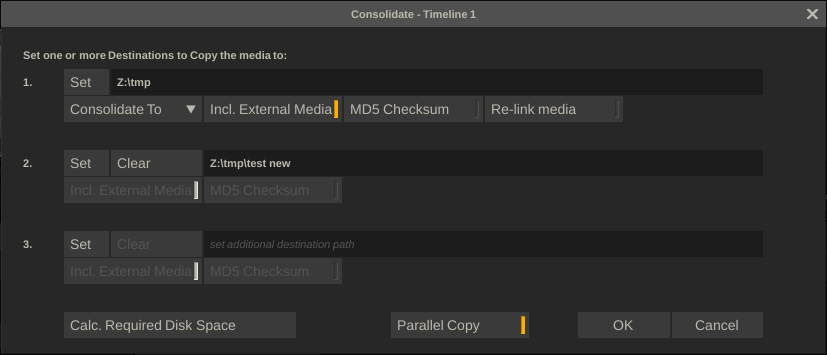
The Construct Consolidate function is similar to the Project Consolidate, discussed in the previous chapter. The main differences are:
- the Construct Consolidate is limited to the media of the current Construct. There where the Project Consolidate is e.g. used to archive a complete project, can the Construct consolidate be used more fine grained to e.g. manage the media production of a single day in an on-set environment.
- the Construct Consolidate is executed as a background process. This means that you can exit the Construct, the project or even SCRATCH while the process will continue. The process is managed from the Process Queue, which is described later in this chapter.
- the Construct Consolidate can only copy media - not move. Since you are inside a project and the media is being used, it can not be moved to a different location as with the Project Consolidate which is started from outside a project.
SET PATH
Set the destination path for the consolidate. You can set up to 3 destinations at once. This can be useful when you want to make multiple copies of your dailies at once.
CONSOLIDATE VS MAKE LOCAL
- Consolidate - make a copy of the media to the destination folder
- Make Local - copy media that is currently not in the Project Media folder to the Project media folder. When selecting this option there is no need to set a consolidate path.
INCL. EXTERNAL MEDIA
When enabled - the consolidate will also include media that is currently not inside the project media folder. You can disable this option if you are e.g. using stock media that used in multiple projects and stored in a central location.
MD5 CHECKSUM
This option will calculate and validate a check-sum on the underlying media file(s). Not that this will increase the processing time as SCRATCH will calculate the check-sum while copying the files and then validate that by reading the data back from the copy. The check-sum itself is added as a meta data item to the shot - as is the total size in bytes.
Note that the meta data is updated through XML scripting: when the processing of a shot is finished, the background process will add a so called project-init-xml file in the project folder. Once the project is refreshed / re-entered the xml is processed automatically and the meta data is added to the project database and visible in the meta data stack. You can monitor whether new project-init-xml is available for the current project by watching the Project name at the top of the left-swipe Project Tree panel - which will turn green. More information about XML scripting can be found in the Appendices of this manual.
RE-LINK MEDIA
This option will relink the shots in the Construct to the media in the new location. Note that the re-link is also done through project-init-xml as described in the previous paragraph on the MD5 check-sum. This means that only after re-enter / refresh of the project the shots are actually updated and reading from the new location - not while you are still in the current project.
CALCULATE REQUIRED DISK SPACE
This option will calculate the total bytes to be copied - given the options set - and display that with each destination. If the destination does not have the required disk space, the number is displayed in red.
START
As mentioned above, the Construct Consolidate is processed as a background process, independent of SCRATCH. After clicking the Start button, SCRATCH first compiles a so called job file and stores that in the ..\Settings\Jobs folder. There it is picked up by the Background Job Processor. The Background Job Processor is a separate executable that will continue to run - even if SCRATCH is closed.
You can monitor the status of the job through the Process Queue Manager (discussed later in this chapter). The Process Queue Manager will show all the jobs of the Background Job Processor: all active jobs, jobs that were started in the past or from different projects. The Process Queue Manager allows you to remove old and finished jobs and stop / start active jobs.
Note that all jobs presented to the Background Job Processor are executed in parallel (rather than sequentially). This means that the processor might take up a substantial amount of system resources when presented with multiple jobs at the same time - which might impact your normal operations in SCRATCH.
COLLABORATION
Publishing Media is discussed in detail in Chapter - Collaboration Tools.
CUSTOM COMMAND BUTTONS
The right section of the Timeline Commands menu is available for Custom Command buttons that can link to external applications or scripts, instantiate a plug-in directly on the Construct or open a webpage while providing metadata to the web server. Custom Command buttons are created through the System Settings - Preferences menu. See Chapter - Customizing SCRATCH for more detail on creating your own Custom Commands.