General
The Multi-Node module ties multiple Live FX systems together and is intended:
- For distributing performance when e.g. the size of a LED volume (number of walls / total resolution) becomes too high to be serviced from a single Live FX system.
- To distribute user roles over multiple systems instead of taking turns at a single console: LED wall operator, color grading, compositing, managing stage lights, recording, etc.
The multi-node module ties systems together in a master-client configuration, where media / project selection, grading, compositing and playback are controlled from a single system. Note though that each client is a full system on its own that needs to be setup: system settings, display selection, etc. need to be done on the system itself ahead of a multi-node session and are not controlled from the master system. As such, any client system is not just a headless system but needs easy access to ensure proper setup. Also, media synchronization between master and client systems is not part of the multi-node module. There are excellent third-party tools available cover this, independent from the Live FX software.
Multi-Node Panel
The multi-node module is only available with Live FX (Studio) and is available from the startup screen and from the Tools drop-down menu in the Player. From the multi-node panel you setup and start a master-client session.
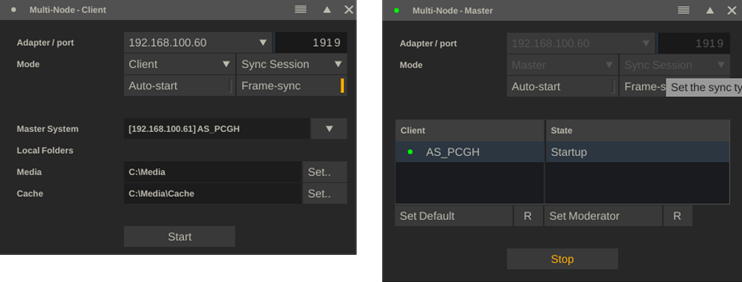
Adapter / Port
It is recommended to use a wired network connection rather than Wi-Fi between the systems in a multi-node setup. In case of systems with multiple network adapters, make sure that all systems use the same network. The port number can be adjusted from its default but needs to be the same on all systems in the multi-node setup.
Master / Client mode
A system either acts as master or as client in a multi-node setup. Although not common, but you can have multiple sets of master-clients within a single network. Any system can however only be part of one single setup at any time.
Sync Mode
There are 3 levels of synchronization to choose from:
- Sync Player. This only synchronizes the playback position and mode (start / stop / forward / backward) from master system to (all) clients. Master and client(s) operate independently for project / timeline and shot selection. Only when both are in the player, the play position and mode is synced to the master. This means that on the client system, you manually navigate to the desired timeline. Also, the media on the client does not necessarily has to be the same media as on the master system.
- Sync Project. This level requires that master and client system(s) have access to the same project databases: either all systems point to a shared network drive for the project database(s) (System Settings – Project path), or a copy of the project database(s) from the master system is made to the local project folder on the client systems. All navigation through the projects, timelines, shots and playback on all systems is controlled from the master system. Note though that changes (grade adjustments, edit adjustments, etc.) are not replicated from the master to the clients. This level is mostly intended for a live-event playback, where all creative decisions have been made – and only synchronized playback of specific media is required. Any changes made (on the Master system) are stored in the project database – and in the case a shared project folder is used, will be visible on the clients once the project has been refreshed. Finally, all clients do require access to the same media and have the same relative media-path as the master-system. This can again be a local copy or access to shared storage.
- Sync Session. This sync level allows for synchronized playback as well as realtime replicating of grade and composition changes across all nodes. Each time the master node enters the player, the current timeline of the master is passed on to all clients. No need for copying the project database. When the master exits the player, all client nodes exit back to the startup screen. While in the player, the play position and mode, the version selection and any grade adjustments are replicated to the clients. Note that the clients do need access to the same media as the master – either a local copy or through shared storage.
In most cases, the master and client nodes operate in the same mode – but this is not required. A client can potentially operate in a ‘lower’ mode as the master node. This makes it e.g. possible to have a master and client in a Sync Session and have a second client to operate in Sync Player, if it has its own timeline / composition shots (e.g. for Stage Lights sampling) and only need to start / stop playback with the main projection setup.
When using a shared project folder between master and client(s), then normally the master will always be the first to open a project database and any client will try to open it after that – which it then automatically opens in read-only mode. Although not required, it is recommended to switch client systems into default read-only mode through the corresponding setting in the System Settings panel.
Note that in a Sync Session, the clients can take a moment to load and sync a timeline with the master. It is recommended to switch off the Auto Start Playback option in the Live FX - User Preferences. Especially when Frame-Sync is enabled (see below).
Auto Start
When enabled, this automatically starts the multi-node module when the software is started. When set as Client, the system will automatically try to reconnect to the last selected master system. At startup as well as when the master system was temporarily offline. This setting can potentially be combined by placing the Assimilate app into the Windows Auto-Start, so it automatically opens and reconnects when the computers starts.
Frame-sync
This option is available when the system contains an Nvidia RTX Pro Sync solution, to frame-sync the output over multiple displays on one or more systems. For frame-sync output, both the master and the client need the Nvidia RTX Pro Sync setup. However, note that clients without the hardware sync solution, can still connect and be included in the master-client node setup.
Master-Mode
When in master mode, the panel displays the list of connected clients:
- Client name. The name that is set in the System Settings panel of the client, which by default is the computer name.
- Client State. The current module of the client: startup, construct, player. Frame-Sync state: no sync (no Frame-Sync enabled or no Nvidia RTX Pro Sync active), partial sync (not all displays of the client have the correct sync state), full sync. Default client or not. Client is current Moderator in Session Sync.
- If the Master system does not get any state information from the client system, the color of the client bullet will change from green to yellow and then to red.
The Set Default button tags all current active clients as ‘default’, which means that at any time the master starts it will list these clients – whether they are active or not. That way, it is easy to see if all clients in a setup are active or not. The Reset button clears this list, and only active clients are shown. Note that if a – non default – client has not been active more than half a minute, it is removed from the list.
The Moderator option is used with the Sync Session mode – were another system than the master system can be appointed as the moderator of the session. The Moderator controls all grading and compositing on the shots in the timeline as well as the play position and mode. The Reset option returns the Moderator role back to the Master system.
Client-Mode
When in client mode, the panel displays a drop-down with active master systems in the network. If a master system was connected in a previous session, this master is displayed by default. If the master system is not active at the time, it is shown in red.
When not using the Frame-Sync option, a Latency setting is available to compensate for the time it takes for master messages to be processed by the client and as such to set the correct play position. The Latency is set in frames and needs to be determined manually.
Depending on the Sync mode, there are additional options available. With the Sync Player mode, you can set a Master Offset, which is the number of frames that the client will offset from the frame position that the master system is at. The JamSync (JS) button uses the current client and master positions (when not actively connected) and sets the difference between the positions as offset.
In case of Sync Session, you need to set the media path to be used with the shots in the timeline that the master system passes. The path should give the client the same virtual root folder as the project media path on the master system.
Start
Only after explicitly clicking the Start button does the system start as master by broadcasting its state or connect as client to the selected master system. When connected, the title bar of the panel will show the state of the connection(s): green, yellow (warnings) or red (error).
Note that when connected as client in Sync Project or Sync Session, you cannot just switch timelines or projects manually, as the client will continue to attempt to sync with the master system. Press Stop first to e.g. navigate to the System Settings and adjust certain settings. At any moment you can press Start again and return to where you left off.
Workflows
The multi-node module opens a new range of possible workflows – next to a standard single master projection system + one or more clients to service larger volumes. Some examples:
- Add a separate grading console. The grading system connects as client to the master system in Sync Session mode. The grading system is set as moderator to grade the projection setup. This way it becomes easier to split different roles on set: pure projection setup and color grading. The grading system can even be a much more lightweight system as it is not responsible for realtime playback for the full volume.
- Export all Stage Light functionality to a separate system, which has its own copy of the timeline / projection shots. It uses the Sync Player function to stay in sync with the main projection setup but at the same time can manage its own compositions and grades for IBL sampling, without any of the latency that having a separate live feed from the master system would introduce.
- Future workflows will include Live Assist recording option and the exchange of metadata.
Shared Gallery
The Shared Gallery is a tool to easily exchange compositions and grades between separate systems without having to deal with manually copying files. The Shared Gallery is like the Local Gallery with the difference that the Local Gallery is tied to the User profile that is used and as that all gallery items are stored in the local user-folder. The Shared Gallery however can point to a (network) folder from multiple systems.
The Shared Gallery has a Refresh option, in the Misc dropdown menu, to check for updates in the shared folder.
Also new as of v9.9 for both the Local and Shared Gallery is the option to store a complete composition, rather than only the grade on a root node. This allows to replicate e.g. a full projection setup with a single click. Both the Add and Apply functions with a Gallery, now have the option to cover just the grade or the full composition. Gallery items that include the full composition are displayed with an additional icon to distinguish them from pure grade items.
Do note that if the source media is not available on the system or available in a different relative path, that the source nodes need to be relinked.