General
The Assimilate Product Suite supports the following outputs:
- Primary User Interface GPU output. By default, this is the main monitor of the OS. When there are multiple GPU outputs available on the systems, the output used for the UI can be adjusted with the ‘UI Display Device’ option in the System Settings – Advanced tab.
- Dual Head GPU reference output. By default, this is enabled if more than a single display is connected. The Dual Head can be enabled from the System Settings – General tab. In the case that there are more than 2 outputs available, the specific output for the Dual Head can be set with the ‘Dual Head Display Device’ option in the System Settings – Advanced tab.
- VideoIO output, reference image output through:
- SDI / 2110 - VideoIO card. Support for Blackmagic or AJA
- NDI v5. IP based video streaming.
- GPU output. New in v9.9 - support for any number of GPU outputs.
- Live Streaming to an HLS or RTMP server – available from the Player – Tools dropdown menu (outside scope of this doc).
Dual Head vs VideoIO GPU output
Before v9.9, the Dual Head monitor was the only GPU reference output option. In v9.9 the Dual Head is still available (System Settings) but is mutually exclusive with the use of the new VideoIO GPU output. By default, the Dual Head is enabled if the system has more than one monitor attached, but when enabling GPU output through the VideoIO module, the Dual Head is automatically disabled. The Dual Head will become obsolete in future versions.
VideoIO
The VideoIO settings are available through the corresponding buttons on the startup screen and the VideoIO button in the Settings menu in the Player. This opens the VideoIO Device panel. This panel lists all detected VideoIO devices on the system: GPU outputs, SDI devices and a (default) NDI device. Depending on the hardware configuration this might also show certain USB devices like a webcam.
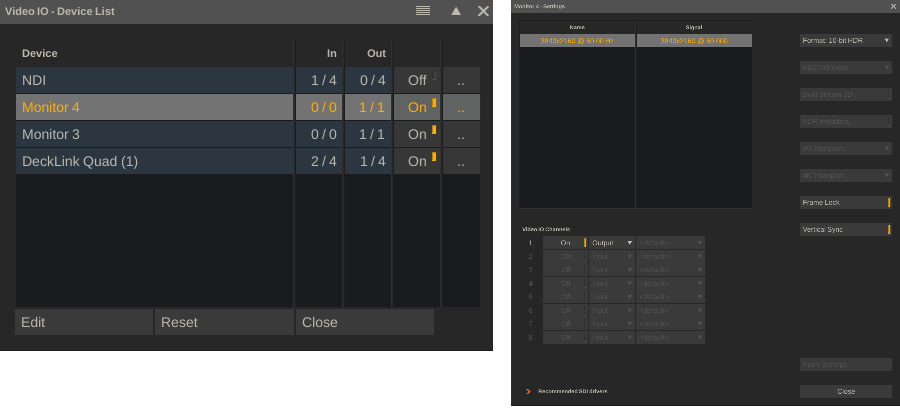
In the panel:
- per device the number of input and output channels that are available with it and how many of them are active.
- toggle the device on/off. When toggling the device on, device properties panel automatically opens. Alternatively, you can also click the last button in a device row, to open that panel.
- to customize the device name, click the name column or the Edit button. The default device name is often generic. Customizing names makes managing a potential long list of devices easier. The Reset option reverts the customized device name back to its default.
The content of the Device properties panel depends on the specific Device.
Signal Format
Set the resolution and framerate for the device output. This applies to all output (channels) - not to any input / capture channels. The available formats depend on the device type:
- SDI. Available formats determined through the BMD / AJA hardware card / SDK.
- NDI. The list of formats shown, is the standard format list in the application. You can add custom formats through the System Settings – Formats tab.
- GPU. Single available format available, determined by the connected display device (monitor or e.g. LED processor) or potentially set through the OS.
Data Format
This specifies RGB / YUV, bit depth / chroma subsampling for the output. The available options depend on the specific device.
Note that for GPU outputs:
- The 8- and 10-bit options do not involve any color adjustment only adjusting the bit-depth.
- The HDR options are meant for using local HDR mode. For more about this, see the section on color management below.
Colorspace Matrix
Internally the application uses RGB values. To convert RGB to YUV, a colorspace matrix is required. Note that this is not a colorspace conversion. The matrix set on the output side should be the same as the matrix used / supported / expected by the receiving side. Using a Video Range matrix rather than a Full Range means that the RGB values are scaled into a YUV legal range.
Dual Stream
Used for stereo 3D output with the left and right image on separate streams. Availability depends on the specific device capabilities.
HDR Metadata
Include the HDR project metadata with the images sent over the HDMI output of the device. When enabled with a Blackmagic device, this also sets the Rec2020 VPID (video payload identifier), independent of the colorspace that has been set for the device display output.
3G Transport
Transport method for 3G bit rate: Dual Link, 3Ga, 3Gb. (AJA only)
4K/8K Transport
Transport method for high resolution images over one or multiple streams.
Frame Lock
GPU only. Enable frame-sync option to include the display on frame-sync playback. Only available when the GPU on which the display output is part of, is connected to an Nvidia RTX Pro Sync (Quadro Sync card). For more information, see the paragraph on synced playback.
Vertical Sync
GPU only. This setting works in combination with the Vertical Sync settings in the Player – Settings – General menu. Setting the latter option, triggers to use the vsync for each of the GPU displays that have the local vsync option set. Vertical Sync synchronizes rendering with the refresh rate of the display to prevent tearing.
Multiple displays might have different vsync intervals, in which case the longest interval determines the maximum framerate that footage can play back.
IP range
NDI only. Set one or more Ip-addresses (comma separated) to scan for available NDI streams. Available streams are listed in the dropdown with an input channel.
Video IO Channels
Devices can have multiple input (capture) and output channels, which need to be explicitly activated.
- SDI. Depending on the particular device, there are a fixed number of inputs and outputs available or there is a flexibility to set each channel either as input or output. With each channel a colorspace matrix can be set which overrides the default selected matrix for the device.
- NDI. By default, 4 output and 4 input channels are available. With each input channel a source stream is selected. The app automatically scans for available streams on the local network and optionally scans for streams on specific Ip-addresses.
- GPU. Always just a single output channel.
The content of all input / capture channels of the device is displayed in proxy images in the lower right corner of the device window (after Applying any changes made).
Multi-display vs Mosaic
In older versions than 9.9, the only way to use more GPU outputs than the main UI and the Dual Head, was to create an (Nvidia) display mosaic where you combine multiple physical GPU display outputs to create one (virtual) display that could be used as the Dual Head output. Creating a mosaic is done through the Nvidia utilities, which is outside the Assimilate Product Suite software. For more information on this technology, how to use it and its limitations (especially over multiple GPUs):
As of v9.9, the Assimilate Product Suite offers to use multiple individual display outputs. However, it is still possible to use an Nvidia mosaic – either instead or in combination with other display outputs. Pros and cons for Nvidia mosaic vs multiple individual display outputs:
- An Nvidia mosaic does not require an external sync (Nvidia RTX Pro Sync) to ensure frame-sync between the displays that make up the mosaic. Using individual display outputs does require Nvidia RTX Pro Sync to ensure frame-sync output.
- Spanning a Mosaic over GPUs can be problematic as any outputs that are not part of the mosaic are no longer available. This means that you would need at least 3 GPUs to ensure output for the main UI. Also, the total horizontal or vertical resolution of any mosaic is limited to 16k.
- A mosaic (setup) often can get lost (after reboot/driver update/other) and then needs to be re-created. Even though it is not overly difficult, it does take time (also note though that a possible way to overcome this is through so called Edit spoofing, where you fixate a display configuration).
- Using individual display outputs provides a bit more flexibility when mapping the LED walls in a volume to specific outputs in the Stage Manager of Assimilate Live FX.
Player Sync
Before going into synchronizing displays with each other, let’s look at the different methods that the Player uses for timing media playback at a specific framerate. The sync option for the Player is available in the Player-Settings-General menu.
- Automatic. See below
- Timer. Use computer’s high-resolution clock.
- Audio. Use the timer from audio device. Only available when the media has audio.
- Video In. Use the (first) VideoIO input / capture channel – timing based on arrival of new incoming frames.
- Video Out Timer. Use the hardware time of the first active VideoIO device that has a hardware clock (usually AJA or Blackmagic cards).
- Video Out Blocking – Output images as fast as possible to fill all the device buffers and then time based on the device processing the frame buffers. This potentially gives a bit more stable background than using the Video Out Timer but also adds a few frames of extra latency to the output stream.
Normally this setting should be left to ‘Automatic’. In that case the app will try to select the best method automatically in the order of: Video Out Timer, Video Out Blocking, VideoIn, Audio, use the vsync if it is enabled and the playback fps higher or the same as the refresh rate of the GPU output then use the vsync, use the computer Timer.
Note that when a VideoIO output is enabled, that playback speed cannot exceed the refresh rate of the particular device. Playback can be at a lower rate though, which means that not every refresh cycle on the display also gets a new frame, aka frames are repeated. The exception is using GPU output without a vsync (such as main UI output). This does not limit playback speed.
Note that the above might also be the reason why the Free-run option in the Player (to playback media as fast as possible – to learn about the capabilities / performance of the system), does not work and caps of at a particular display speed. An option is to temporarily disable all (reference) outputs by toggling the Enable Outputs button in the Player-Settings-Monitors menu (far right side).
Multi-display synchronized output
First a couple of definitions
- GenLock – reference signal to refresh the displayed frame, does not dictate which frame.
- Frame-sync – ensures that multiple displays not only refresh at the same time but also ensures the same frame is shown at any time.
- Vertical Sync (vsync) – synchronise the GPU graphics output to the refresh rate of the connected display device.
Genlock and vsync are needed to prevent flickering and tearing of the image. When displays are close or tied together (e.g. single LED wall driven by multiple processors) then frame-sync is required, otherwise seams could be visible across the display(s) when not all are showing the exact same frame. In the case when displays are not tied together or in case of showing a still-frame / low-action clip, frame-sync is less crucial as a single frame difference is less noticeable by the human eye.
GPU output
The main advantages of GPU output are that is has very low latency since all image data is rendered and maintained on the GPU. The sync requirements depend on the setup.
The case of a single display output, whether a single physical output or a virtual one with an Nvidia mosaic, only requires vsync. This should be enabled in the Player – Settings – General menu, as well as in the VideoIO settings for the display device (for the Dual Head, this is automatically enabled). In an LED volume the camera and the LED processor would be genlocked and the LED processor provides the vsync for the GPU output. The refresh rate of the display should preferably be the same or a multiple of the media playback framerate, to prevent stuttering.
In case of using multiple individual display outputs, either from a single GPU, spread over multiple GPUs in a system, or from GPUs over multiple systems, the Nvidia RTX Pro Sync (Quadro Sync) hardware is required to ensure frame-sync playback across all outputs.
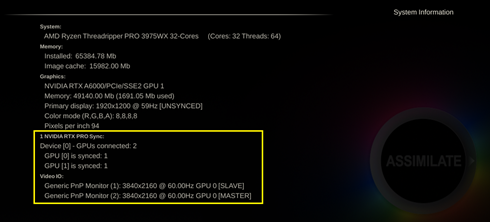
A complete description of the RTX Pro Sync setup can be found here: nvidia-rtx-pro-sync-user-guide.pdf. Each of the GPUs used for output, should be connected to an RTX Pro Sync. When spread over multiple systems, then each system should have an RTX Pro Sync, which are then interconnected. Each display involved should have the Frame-Lock option enabled in the VideoIO properties panel. Note that the main UI display of the app does not have to be part of the RTX Pro Sync setup.
In an RTX Pro Sync setup, either one of the included displays acts as the main / master timer or an external timer is used. In an LED volume context, this timer can be the genlock signal that also feeds into the camera / LED processor. But one of the LED processors can also be set as master timer directly.
The status of each display in relation to the RTX Pro Sync setup is displayed on the info-overlay on the startup screen (click once in the upper part of the startup screen to open the overlay). The status is also written to the standard log file. It is important to check if all display outputs used (except main UI) have the proper Sync state – either as Slave or Master.
When the RTX Pro Sync and all setup displays have been configured, the app will synchronize output when starting playback. On first playback after startup or after switching between applications – this synchronisation takes a moment. A clear ‘Synchronisation..’ message is displayed on the main play-bar in the Player.
Note that frame-sync is only possible if the media that is being played can be played back in realtime. If for whatever reason the system was unable to maintain realtime playback, playback should be restarted.
SDI output
The advantage of SDI is that it is very stable, reliable and proven technology. The downside is that it adds additional latency to the signal, compared with GPU output, and that because the video must be read back from the GPU, it demands more resources of the system to process.
To sync multiple SDI outputs, the VideoIO card should take in a genlock signal. For all AJA devices and all BMD that support ‘Synchronized to Playback Group’ (see standard log) this means that the single device is also frame-sync. For BMD devices this means that outputs over multiple devices are also frame-sync. Note that certain BMD devices, like the DeckLink 8K Pro, automatically sync output channels on a single device even without a genlock.
There is no option to frame-sync SDI devices over multiple systems. With a multi-node setup where each node outputs one or more SDI signals – often the streams appear in sync, but this cannot be guaranteed and should not be trusted. Genlocking all systems to prevent flickering works as expected.
GPU Affinity
The app can make use of all display outputs on a system with multiple GPUs. However, all image processing always takes place on one dingle GPU. The final image is then transferred over to the other GPUs of which display outputs are used. This data transfer is relatively slow, and it is important to minimize the amount of data that needs to be copied. This is done by setting the GPU affinity – appointing the main processing GPU – through the “NVIDIA GPU Affinity” setting in the System Settings – Advanced tab.
By default, this is set to Auto-select. With the ‘Display’ option, it is set to the GPU with the output for the main UI. The index in the other options correspond to the GPU ID as it is displayed on the info-overlay on the startup screen and in the standard log file.
The GPU that outputs ‘the most pixels’ should be set as main processing GPU. That way the number of data / pixels that need to be transferred is the lowest. Note that this includes the main UI output. E.g. in the case of 2 GPUs and GPU 1 outputs only the main UI display and GPU 2 outputs 4 x UHD to LED Processors, GPU2 should be the main processing GPU. This also indicates that it is preferable to use up all display outputs on a single GPU rather than spreading them out over 2 or more GPUs.
Finally, it is theoretically possible to use different types of GPUs in a single system – with e.g. the main UI on a more lightweight GPU and all processing and reference outputs on a stronger GPU. It is however preferable to use a single type of GPU in a system to exclude any potential incompatibilities at the graphics driver level.
Color Management and HDR output
In the Player–Settings–Monitor menu, the target colorspace and EOTF for each display output is set. When a colorspace and EOTF is selected (instead of leaving them to <Source>), each image in a different colorspace is automatically converted to the display’s target colorspace. In the same panel where you set the colorspace, you can also add an additional LUT transform, e.g. a camera-LED wall calibration LUT.
For GPU display outputs there is an additional HDR pipeline available where the local Operating System / Graphics drivers generate the final signal. To enable this pipeline, the display’s colorspace and the VideoIO format need to be set to specific values. The implementation differs a bit for Windows and MacOS.
Native HDR on Windows
For native HDR output through the (VideoIO) GPU:
- Tag the display as HDR in the Windows display settings panel.
- In the app set the monitor colorspace in the Player-Settings-Monitor menu to Rec2020 + PQ.
- In the VideoIO panel, set the Format to HDR (10 or 16bit).
With these settings, the app passes images over in a specific floating-point format to the OS/graphics driver, which generates the HDR output. The advantage of this native HDR is that the output includes metadata so that the receiving display or TV automatically detects that it gets an HDR signal. Also, depending on the receiving display/device, the native Windows HDR output can be 12bit, whereas the VideoIO output is always limited to 10bit.
Note that the 10bit option vs 16bit option for the VideoIO HDR format is implemented for performance reasons: to save on the amount of data that is processed and e.g. needs to be copied between GPUs, in case of multi-GPU setups.
To enable the HDR pipeline for the main UI display or the Dual Head monitor:
- Enable the “Extended Dynamic Range for UI / Dual Head” option in the System Settings, Advanced tab.
- Set the colorspace of the particular display to sRGB + Scene Linear in the Player – Settings – Monitor menu.
Native HDR on MacOS
On MacOS there are also two format options with a VideoIO GPU display for native HDR.
- 16bit REC2020 + PQ. Just like on Windows, set this format in combination with the setting the colorspace of the display also to Rec2020 + PQ. The app passes the Rec2020 image to the OS, which converts it to the native colorspace of the display.
- 16bit EDR (extended dynamic range). Set this format in combination with setting the display colorspace to the native colorspace of the display (P3, Rec2020) and the EOTF to Gamma 2.2. The app passes floating-point values to the OS.
Similar as on Windows, the HDR pipeline for the main UI and Dual Head can also be set through the “Extended Dynamic Range for UI / Dual Head” options in the System Settings, Advanced tab. On MacOS however, the display colorspace in the Player-Settings-Monitor menu is set to the native colorspace of the display.