GENERAL
The Media Menu has various functions for conforming a new timeline, managing notes and slots and a series of specialized utility functions for the current selected timeline.
CONFORM BUTTONS
Functions for importing or exporting an external edit-list.

LOAD CONFORM
The Load Conform button opens a SCRATCH Browser where you can navigate to the folder where the edit list or metadata file is located and set the type of file you want to load - either AAF, Final Cut XML, EDL or ALE. Depending of the type of file a different Conform Dialog Window opens with edit events or meta-data. For more details of the different conform options later in this chapter.
EDIT CONFORM
After loading a file all edit events or metadata are displayed in the Assemble dialog. You can close a dialog and reopen it again later by using the Edit button. This allows you to stop working on the edit events or metadata temporarily, e.g. navigate to another timeline and re-open the dialog again. Note that exiting a project will discard any changes you made to a loaded conform.
EXPORT EDL / ALE
The Export EDL / ALE button creates either a CMX-formatted EDL file or an ALE (Avid Log Exchange) file for exporting metadata outside SCRATCH in ASCII format. The EDL file contains the setup of the current timeline: the source time code and the record time code of each clip. The record timecode starts at the offset that is set on the timelines’s main Output. The ALE is a tab delimited file containing clip name, source- and record-time codes, clip length, reel ID and slot number and more metadata items. On export of an EDL or ALE there are two additional options you can use:
- The +Ext. Metadata button will for an EDL include the annotations of a shot as comments in the EDL. For an ALE all metadata name-value pairs will be added next to the default columns in an ALE, such as clip name, reel ID, source- and record time code.
- The +CDL button will add ASC Color Decision List information to both the EDL and ALE. The formatting in the ALE is in line with the 'ASC CDL Avid Workflow' specification.
Note that if CDL compatibility is required only a limited set of grading parameters should be used in SCRATCH. For more details on the translating of ASC CDL information to and from the SCRATCH color pipeline, see the section about EDL Conforming later in this chapter.
PLACEHOLDERS
This button opens the Match and Replace Placeholders dialog. All of the EDL, AAF and XML assemble functions have the option to insert Placeholder nodes if the media for a conform-event is not available (yet). That way you can already assemble your full timeline and easily update the missing pieces at a later moment. The Match and Replace Placeholder dialog shows you a list of Placeholder in the current timeline and the functions to match them against media elsewhere in the project of on disk. The various functions are covered later in this chapter.
SHOT NOTES
This section allows you to manage the notes on all selected shots.
EDIT
Opens the note editor for the first selected Shot
ADD
Adds a note to all selected shots - using the text from the text slate below the button and the status/color selected next to the text slate.
CLEAR
Remove all notes from all selected shots.
SLOT MANAGEMENT
SORT
The Sort function will let you change the order of the shots in the Construct based on four different criteria: Source Time Code, Name, Scene & Take and Shot Length. The [Original] option will reverts to the original order before any of the other sorts were executed. The original sort order is maintained over sessions and is in fact the order of the slots – including slot length and transitions.
REMOVE EMPTY SLOTS
All Slots without clips are removed from the current timeline.
FIT SLOTS
The Fit Slots button modifies the length of the selected slot to match the length of the In and Out marks on the lowest clip in the Slot.This is a quick way of setting the slot’s duration to match the marked duration of a clip. If the All button is selected, all slots in the timeline are modified at once.
FIT IN/OUT
The Fit In/Out button modifies the In and Out marks of a clip to the duration of the Slot in which it is located. This is a quick way of setting the duration of a clip to match the Slot. If the ALL button is selected, all clips on the bottom row of the timeline are modified at once.
LOCK TIMELINE
The Lock Timeline button locks the timeline so that no modifications to the slot duration, shot timings, or transitions can be made.
Note: If a locked Timeline is loaded into the Edit module, the parameters for adjusting the edits will be grayed out in the Edit Menu.
UTILITIES
PASTE GRADE
This option opens the Paste Grade Dialog to copy over grades from one series of shots to another series of shots. The steps involved are:
- Select and copy all or a range of shots using the regular Copy button in the Construct.
- Go to the target Construct where you want the grades to be pasted and either select a number of shots or leave all shots un-selected - in which case SCRATCH will consider all shots in the current Construct.
- Select the Paste Grade option.
In the Paste Grade dialog you set the matching criteria and what aspects of the source shots should be copied over to the target shots.
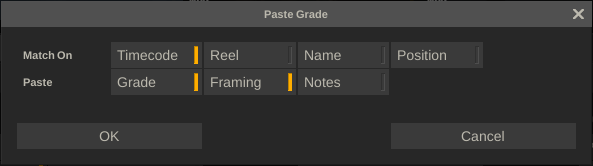
Match On - Criteria
- Timecode - ensure that source and target clips have source timecodes that overlap taking into account the in- and out-points of the shots.
- Reel / Name - ensure that source and target clip have the same reel-ID or name.
- Position - compare the slot (index) position of the source and target clips.
Note that SCRATCH will always try to find the best match. Even if you have not selected Reel or Name, if SCRATCH finds two target shots with the same timecode overlap, it will continue checking the Reel and Name.
Paste Options
- Grade - copy the full grade from source to target
- Framing - copy over the framing settings that might be present on the source
- Notes - copy any notes from the source to the target which will overwrite any notes already on the target node.
GENERATE TC
This function (re)sets / adjusts the time-code of all shots on the timeline in the Construct. Selecting the button opens a dialog to set the parameters for the function.
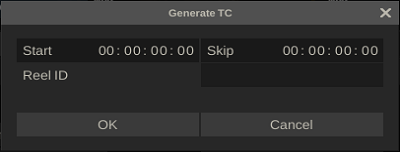
The time-code for the first clip will be the Start time-code set and for each subsequent shot the length of the prior clip plus an (optional) Skip-interval.The interval is combined with the length of the prior clip so that the time-code of each clip is set to a whole rather than a fractional number of intervals and as such can be set to start at a whole minute or second. Optionally you can also update the Reel-ID of all the clips.
MATCH SLOT TC
This function aligns the in-point to out-point range of all the version shots with that of the timeline shot in all the slots on the timeline. That way you can quickly adjust apply an edit change to all versions.
DE-Construct
The De-Construct function creates a stripped version of the current Timeline for more efficient processing. Selecting the button opens a dialog to set the parameters for the function.

The De-Construct function will:
- add additional n Handles to each shot.
- Make Unique removes shots that are used more than once in the timeline while adjusting the in- and out-point of the remaining shot so that all media used is covered.
- the Gaps parameter determines when to consider a shot unique compared to another shot that points to the same underlying media but has no overlapping in- and out-points. If the number of frames of the out-point of shot A and the in-point of shot B differ less, SCRATCH considers A and B the same shot (and will also include some of the non-used frames). The default value is 0, meaning A and B only be considered the same if using the same underlying media track and having overlapping in- and out points.
- you can create the stripped timeline in the current Construct or create it in a New Construct.
Note: The Unique option ignores and does not compare grades, SCRATCH only considers the time-code and underlying media to determine if two clips are the same.
STEREO SETUP
The Stereo Setup function wraps source shots inside a Stereo Nodes which in turn can be used in a Stereo Workflow. The Player recognizes a Stereo node and the Manage Stereo tool becomes available where you can work on either the left eye, right eye or stereo master-grade and easily replicate anything you did on one eye to the other without breaking the convergence between the two eyes. Also, for displaying or rendering out a stereo pattern you first must wrap the source media in a Stereo node.
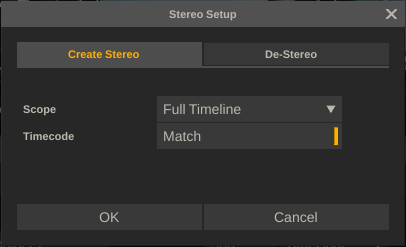
Scope
The Scope determines which part of the Construct SCRATCH will try to wrap in a stereo node; the full timeline, the current slot or - if there is a selection - the selected slots.
Timecode
When enabled, SCRATCH will compare the timecodes of the left and right eye shots and if different add an offset to the right eye to align the two.
Execute
Depending on the Scope set, SCRATCH processes each slot. If the slot contains:
- 2 shots, it will create a stereo node and add the bottom layer shot as left eye and second layer shot as right eye.
- 1 shot, it will assume an over-under stereo source shot and as such create two references of that shot and first wrap them in a Nest node with half the height of the source shot and the left eye having an y-offset applied. Next, use the two nest nodes as inputs to the Stereo node.
- A stereo node, it will not process the slot so nodes are not double wrapped.
You can view the composite / setup of the Stereo node in the Source Stack.
Drag-Drop
You can also select one or two shots, attach them to the pen and then click the Stereo Setup button. SCRATCH will then also create a new stereo node and attach that new node to the pen so you can drop it in the correct location on the timeline.
Compatibility
Note that as of version v8.5 the Stereo workflow within SCRATCH changed and with that the type of Stereo Node used. Older projects can still be loaded but Stereo nodes from older projects are no longer recognized as Stereo nodes as of that version and as such do also not trigger the Manage Stereo tool or allow you to render out stereo patterns.
De-Stereo
In some cases it can be useful to disassemble a stereo setup into its underlying parts.
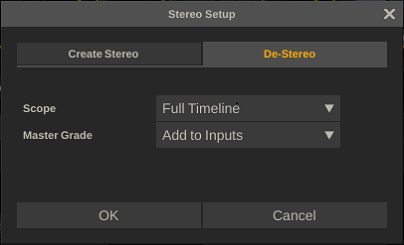
The Scope option for this is the same as when creating a Stereo Setup. The additional option here is to choose how SCRATCH should deal with possible grading that has been applied to the Stereo node (rather than the underlying left / right eye source shots). There are two options:
- Add to inputs, in which case SCRATCH will add any layers that were added to the Stereo node to the individual eye shots. If the Stereo node also has a primary grade, SCRATCH will add that to the individual eye shots only if those shots do not yet contain a primary grade.
- Discard the grade on the Stereo node.
Note that also the drag/drop options also work for de-stereo; if you drag a Stereo node onto the button, SCRATCH will automatically perform a de-stereo on it.
STITCH 360
This function allows you to easily wrap multiple source shots from a 360 camera into a Stitch-node which produces an equirectangular image.
[img]
You start by loading all the all the source media in such a way that each slot contains all the source shots of a single 360 camera shot.
Note: Please remember that by using the Multiple Shots and the Depth parameters in the File Browser you can control how shots are loaded into the Construct and placed in separate slots.
Below, the various options are discussed to create a Stitch-node. In Chapter 9 - Process and Plug-ins the Stitch-node itself is discussed in more detail.
Scope
This setting determines which slots to process: the current (Selected) slot(s) or all slots in the Construct / Timeline. Note that if SCRATCH encounters a slot that already contains a 360 Stitch node, it will skip that slot.
Sync
Using this option SCRATCH will check compare the timecodes of the source shots and apply an offset when adding them as input for the new Stitch node if they differ.
Output
By default the Stitch node will get the resolution of the main output node of the Construct. However, you can adjust the resolution of the main output node of the Construct and with that automatically the resolution of the new Stitch-node. The dropdown contains a number of predefined 2:1 resolutions. If you do need another resolution than available from this list then you first need to adjust the Output node resolution in the Output menu before running the Stitch 360 function. When you adjusted the Output node then use the first option in the list: Maintain Current Resolution.
Template
This option allows you to load an external template with the stitch details: source camera positions and lens information. The template can be a SCRATCH proprietary template file (*.pls) or a template or project file from other stitch software. Currently SCRATCH supports AutoPano project files (*.pano / *.kava), Hugin projects (*.pto) and PTStitcher scripts (*.kava).
De-stitch
When the current slot already contains a Stitch-node, the Stitch 360 dialog will automatically select the De-Stitch tab. When that is selected SCRATCH will decompose any Stitch-node encounters and place all the inputs of the stitch node in the slot.
SDI LIVE VIEW
The Live View option will instantiate the SCRATCH Live View plug-in in the Player to capture and display the SDI input signal via AJA/BMD video-io for live review and grading of the signal. This function is only available under a special license. More details of this function are described in Chapter 9 - Process and Plug-ins.
FILLER
From this option list you can either create a Color Frame- or a Placeholder-node. For the Color Frame you select one of the specific colors or patterns; Black, White, Linear or Log, Color Bars, Gradient or Zone plate. The created shot is attached to the cursor and can be dropped in any slot / position. By default the shot is a single frame long but the length can be adjusted in the Editor. The settings of the Color Frame can be adjusted in the Player in the Shot menu in the Matrix module.
ZCAM
A series of specialized options for use with a ZCam 360 or 160 camera. Discussed in more detail in Chapter - Customize SCRATCH and only available with a proper license.
WRAP
- Burn-in: wrap each selected node in a Burn-in node which allows to display text overlays in any available font and size, displaying metadata of its input shot, display subtitles using an external file or displaying guides.
- Nest each selected node in a new Nest node. The Nest Node allows you to adjust and animate the size and position of the input shots as well as providing a shielding layer on the underlying composite.
- Videowall: Add all selected nodes as inputs to a new Videowall node (see Chapter - Node Type and Plug-ins).
COLLECTOR
A Collector node can be viewed as a 'timeline in a node'; it encapsulates multiple shots including the transitions from one shot to the next. This way a Collector node adds another dimension to the Construct.
Note: When entering the Player with a single Collector node and navigating to the Edit module, you can edit the underlying timeline; editing transitions, length of slots and remove existing or add new nodes into the Collector node.
A Collector node can be created by selecting multiple shots on the Construct and then clicking the Collector Node button. The collector node will by default get the name of the current Construct with a 'CLT' prefix.

How a selection of shots is processed into a Collector node depends on a number of factors
Dragging vs Construct selection
If a series of Shots is dragged onto the Collector Node button, a basic Collector Node is created with no special transition options set.The newly created Collector node is attached to the pen and can be dropped anywhere in the current Construct or on another Construct.
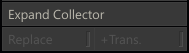
When the Collector Node is created from a selection on the Construct there are two additional options available.
Replace
This option is only available if all selected shots are in consecutive Slots and on the same layer. Enabling this option will remove all the Slots where the selected Shots reside from the Construct;virtually collapsing the slots. A new Slot is created in which the Collector node is placed. Any Shots in the slots involved that are not part of the main selection, are placed in the new Slot, on top of the Collector node.
If this option is disabled or not available, the new Collector Node is attached to pen and can be dragged and dropped elsewhere in the project. All the Shots in the selection and the Slots they reside in remain untouched.
Note: The Collector Node contains references to the selected shots, not copies! This means that if the selected shots remain on the Construct, editing them will also change the Collector Node.
+Transitions
When this option is enabled all the shots of the selection are added to the Collection node including the (Slot) transition settings: Slot length (if set explicitly), any Dissolves or other transition settings.This option is on by default if all the Shots in the selection reside in consecutive Slots and on the Timeline layer. In other selection you need to explicitly enable the option.
Mini-Timeline
The Collector node is similar to any other node; it can have its own grading, In & Out points, used in a composite, etc. A Collector Node can be recognized by the mini-timeline that is displayed in the top bar of the Shot proxy.

Expand Collector
When selecting a single Collector node on the Construct you can extract copies of all the underlying shots by using the Expand button, When the Collector node is dragged onto the Expand button, the extracted Shots are attached to the pen and can be dropped elsewhere in the project. When the Collector node is on the Timeline layer, copies of underlying Shots are extracted and the first Shot is placed in same Slot as the Collector Node resides with every next Shot in a new created subsequent Slot. If the Collector Node is not on the Timeline layer, all shots are placed in existing Slots on the same layer as the Collector node. In both cases the Collector node itself remains available on the Construct.
Note: Any grading, animations or other adjustments applied to the Collector node are NOT copied onto the underlying nodes when expanding the Collector node.