As of SCRACH version 8.5 the 3D stereo workflow has been improved. The driving force behind the update is VR where 3D stereo is often the standard. This overview discusses the ingest of 3D stereo media, playback options, the tools to grade and composite 3D stereo and lastly how to output stereo - rendering or publishing to SCRATCH Web.
Note: the new stereo implementation in v8.5 is not fully compatible with the prior setup. All stereo projects created in prior versions need to be finished in the older SCRATCH version or re-created from the source in the latest version.
Ingest of stereo media
3D stereo media can either come in as two separate media streams or file sequences - one for the left eye and one for the right eye - or as a single stream where left and right eye are pre-wrapped in standard stereo patterns such as over/under or side by side. Depending on the source material there are two different workflows you can choose from: maintain the single image stream throughout the pipeline or wrap the media into a stereo shot.
Maintain a Single Image Stream
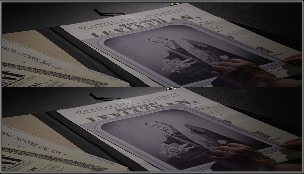
When the source media is already wrapped in a single stream stereo pattern, such as over/under or side by side, you can decide to leave it as such and just handle stereo as if it were regular 2D images. In that case you will just see the stereo pattern on you main-, dual- and reference view. In case your reference monitor or projector is capable of processing the particular stereo pattern you can view the stereo with stereo 3D glasses.
When you are processing 360 stereo media and are using a headset (e.g. an Oculus Rift) you can also use this approach but then you do need to set the Stereo Mode meta data property of each shot. In some cases this meta data is read directly from the source file. In other cases you need to set this manually through the meta data stack or the Media Browser in SCRATCH. When the Stereo Mode meta data item is set to over/under or side by side and the Projection Mode is set to Equirectangular - SCRATCH will automatically send a separate left and right eye image to the Headset to generate the stereo view.

This is an easy and straight forward way of dealing with 3D stereo media. However the disadvantage is that you cannot make use of the advanced stereo tools that are available in SCRATCH. When grading an image you will need to duplicate the grade on the single image for each eye yourself. There is no (automatic) convergence between left and right eye - other than what you implement yourself by offsetting layers.
Creating a Stereo Setup
To be able to use the various stereo tools that SCRATCH offers, the first setup is to wrap your 3D source media in a so called Stereo node. This was already available in prior SCRATCH versions but the available options have been enhanced:
- Wrap a single stream that is in an over/under stereo pattern into a Stereo node. As opposed to wrapping two separate streams into a single stereo shot.
- Selectively create stereo nodes, rather than the all or nothing approach in the prior versions.
- De-stereo option, to unwrap existing stereo nodes into their components.
The Stereo Setup function is available from the CONstruct Media menu, in the Utilities section. In the Stereo Setup dialog you set the scope for the function: process the full timeline or just the selected slot(s). Note that alternatively you can also drag/drop shots onto the Stereo Setup button to just process that shot.
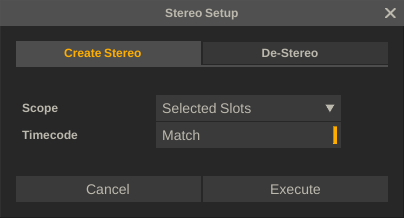
If a slot contains 2 shots, SCRATCH will wrap them in a stereo node as left (slot bottom shot) and right eye. Optionally SCRATCH will compare the timecodes of the shots and set an offset on if not the same.
If the slot contains just 1 shot - SCRATCH assumes that the shot already contains a stereo pattern and splits that pattern up in a right and left eye and uses those as inputs for the stereo node. Currently, the only pattern SCRATCH accepts in this way is over/under. What SCRATCH actually does is that it takes the source node and wrap it in two Nest nodes - each with a resolution half of the source node and with an offset to select either the left of right eye. These two Nest nodes in turn serve as inputs for a new Stereo node.
Note that if SCRATCH encounters a stereo node within the timeline or selected slots that it will not re-wrap that into a new stereo node. This way you can easily insert new shots anywhere in your timeline and create stereo nodes from them in one go.
The De-Stereo option allows you to "unwrap" existing stereo nodes into its source components. The function allows you to determine what should happen with the master-grade the stereo node might contain: either discard it or copy it over to the individual eyes. Any primary grade is only copied over in case the source node does not contain a primary grade yet.
Playback of Stereo Media
If you play a Stereo node in SCRATCH, you control the various views through:
- The new Manage Stereo panel, available from the top menu bar in the Player. Through this panel you can toggle SCRATCH to display the left- or the right eye of the stereo shot in the main display. This panel is discussed in more detail below.
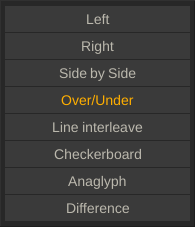
- In the Player-Settings-Monitor menu you set the stereo pattern to be displayed on the right part of your dual-view and the pattern that you want to see on your reference display.
Note: You can not show any of the stereo patterns in the main working view of SCRATCH. Since this view also needs to display overlays associated with layers or plug-ins - this cannot be properly scaled and adjusted within the various stereo patterns. If you do not have a second monitor but do want to see a specific stereo pattern (or e.g. the 'difference' option to compare left/right) you should use the Dual View option and setting the proper pattern in the Settings-Monitor menu.
Furthermore, note that in case of a dual link SDI setup SCRATCH will automatically send each eye to a separate channel, no matter what stereo pattern has been selected.
Grading Stereo Media
When you wrapped your source media in a series of Stereo nodes, the Player offers the tools to make working with 3D Stereo almost just as easy as working with regular 2D media.
Framing
First step are the Framing tools in the Matrix - Config menu. When you are dealing with a stereo node, two additional options are available here: Link Stereo and Convergence. The Link option will cause that any offset that is dialed in is applied to both left and right eye. The Convergence option causes any offset that is entered to be applied in the opposite direction for the right eye.
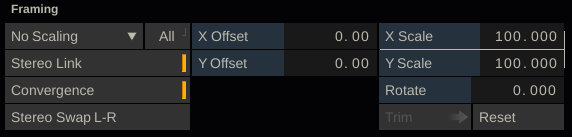
Note that framing in the context of 360 media does not exist and this only applies to traditional stereo.
Managing Your Grades
In the new Stereo workflow you are always working on either the left or the right eye in the main Viewport of the Player. In the new Manage Stereo panel you can easily switch between the two eyes. Now, even though you are always viewing and working on one eye, there are actually three sets of grades:
- the grade on the left eye
- the grade on the right eye
- the master grade on the Stereo node
You control the view and active grade you are working on from the Manage Stereo panel. This panel is available from the top menu bar in the Player.

When a Stereo node is active in the player and you select to view the left eye in the Manage Stereo panel, the stereo node outputs the left eye with both the left eye- and master color settings applied.
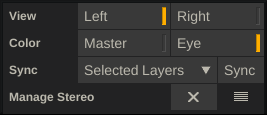
The Manage Stereo panel also lets you select which set of color settings are active in the Matrix menu. When selecting Master, the master grade of the Stereo node is active. When selecting Eye, the grade of whichever eye you are currently viewing is active.
This setup allows you to quickly switch through the main parts of your Stereo setup without having to navigate the Source stack and maintaining the context of the timeline.
Synchronize Your Grades
Next to selecting the view and what grade set to work on, the Manage Stereo panel also allows you to easily synchronize grades between the left and right eye without affecting the convergence you applied to the grades. There are three ways to synchronize grades:
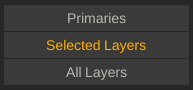
- Sync Primaries: this will simply copy the primary grade of the current eye over to the other eye. Framing is not included.
- Sync Selected Layers. This option will check if a Layer with the same name already exists on the other eye. If not, it will copy the full layer to the other eye. If a layer with the same name already exists on the other eye, SCRATCH will copy only the color grade over but will leave all the geometry (canvas / position) intact.
- All Layers. This option applies the same strategy as for the Selected Layers but then for all Layers on the current selected eye.
Using the Sync options makes it easy to first fully grade one of the eye, copy this grade over to the other eye and then tweak the stereo convergence and the grade further without having to do a lot of navigating and copy/pasting between left and right eye.
The Camera Menu
The Stereo option in the Camera menu of the Matrix is not new but has an important part in the new Stereo Workflow. In the Camera menu you can define to use two cameras for rendering your Stereo node that are positioned at different angles against the back-plane (image) and the layers in front of it.

The Camera is an excellent tool to setup your left / right stereo convergence for a shot. The downside is that it is applied at the shot-level. If a shot contains multiple objects that are near as well as more distant from the perspective of the viewer - each object has a different convergence.
All the layers in your Master grade are subject to the Stereo convergence that you can set in the Camera menu. If you need to offset certain layers differently then you should place them on the separate eyes, manually adjust the canvas and use the sync option of the Manage Stereo panel to ensure the grading of the same layers in both eyes is the same.
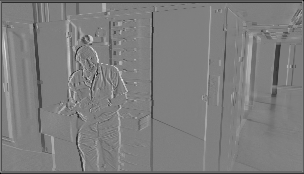
Difference View
A helpful tool for viewing the convergence of the left and right eye is to use the Difference option from the Stereo patterns available. In the Player-Settings-Monitor menu you can select a stereo pattern for your Dual View and Reference View. There you can select the Difference option which will generate an image where SCRATCH subtracts the right eye from the left, showing the difference between the two.
Rendering and Publishing Stereo Media
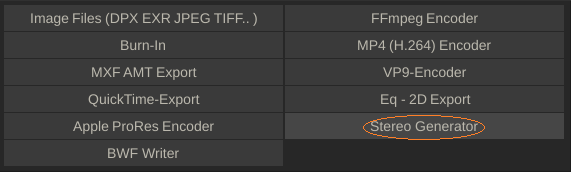
In prior versions of SCRATCH you would select a Stereo Pattern on a standard file sequence output node or even create multiple main output nodes to render out left / right eye separately. In the new Stereo Workflow we introduced a Stereo Generator node. This node can be instantiated directly from the Add Output menu in the Output section of the CONstruct.
The Stereo Generator allows you to select a stereo pattern. By default the node will have the same resolution as the timeline. This means that if you select e.g. an over/under or side by side pattern, the left and right eyes are squeezed into that resolution. However, you can simply adjust the resolution of the Stereo Generator and it will then use that size to place the left and right eye images into it; if you double the height of the node as compared to the timeline resolution - the images in the over/under pattern will no longer be resized and maintain their quality.
To actually render out the images to file you would add another file write node (e.g. H264, ProRes, etc.) behind the Stereo Generator.
The Publisher in SCRATCH will automatically detect when you are publishing Stereo shots and will as such automatically adjust the resolution of the output to double the height and render an over-under pattern. Note that it only makes sense to render Stereo for 360 media that can be viewed in a headset. The normal web-viewer cannot render a stereo stream.
Misc
Certain topics come up in most stereo projects.
- Sub titles. The easiest way to generate sub-titles for stereo is to add a layer on the Stereo Generator and insert the Burn-In node as Texture. Then position two text-items manually in the Stereo pattern image and populate them by loading a sub-title file and populate the text-items with the #subtitle code.
- Floating Windows. Although SCRATCH does not have a specific floating windows function, creating and positioning (animating) a floating window is easy. Just create a (rectangle) Layer on one of the eyes, set the Invert option and dial down the pre-Gain to -1000 (effectively creating black outside the layer). Now you can position that layer, animate the position in any way you need. Make sure you do not Sync this layer to the other eye. In addition, you can use the Canvas - Softness option to create a softer border for the floating window.
- Color Match. SCRATCH currently does not have an automated color match option. However, the Match Grade functions in the Curves menu might be helpful. There you can select colors in the source image (left eye) and select the same position in the target image (right eye) and SCRATCH will adjust the curves so the two colors match.