General
Assimilate Live Looks is a software solution for on-set monitoring and live-grading:
- Unlimited live capture of camera inputs or use of LUT boxes.
- Advanced grading controls to create and manage looks.
- Easy FX / green screen replacement.
- Seamless connection into your dailies and post workflows.
Assimilate Live Assist offers all the functionality of Live Looks with on top a series of video assist functions:
- Recording of multiple inputs at the same time. Either manually triggered or automated based on the camera record-state in the SDI signal.
- Selection of the most widely used edit media formats for recording.
- Single click / instant Replay of the recorded media to any number of monitors or in a video-wall layout.
Both products are part of the Assimilate Product Suite and as such are available on both OSX and Windows. Since Live Assist is a superset of Live Looks - we refer to both as Live Looks in this description and only when referencing to functions not in Live Looks - we mention Live Assist.
Installation, Licensing and Startup
Live Looks is available as a stand-alone products but can also be combined with a SCRATCH license. After installing the Assimilate Product Suite software and starting it the first time, you are requested to enter a license key. If you already have an Assimilate product installed and licensed, you can open the license dialog inside the software for combining and activating license keys.
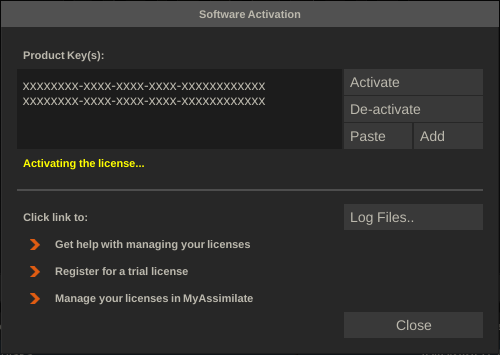
A license key can cover a single product or module or combine multiple products and modules. On the MyAssimilate website you can see what each license key that you own covers. Multiple license keys can be combined on a single system by activating them together. This allows for different setups:
- Single license key that covers both SCRATCH and Live Looks.
- Separate license keys that can be activated on a single system.
When you combined your Live Looks license together with a SCRATCH license, you start Live Looks from the SCRATCH startup screen with the corresponding button in the lower left corner.
Setup
The first time you start Live Looks after licensing the software – the Setup panel is shown. Here you configure the software for your specific environment: set resolutions, framerates and working color spaces, define input channels and route output to specific monitors. Note that next time you start the software, the last used configuration is loaded automatically but you can open the Setup panel at any time and change the configuration or switch to a different configuration quickly.

In case Live Looks \ Live Assist was licensed as a stand alone application the Setup panel contains a License and Log button in the lower right corner. The License button opens the license dialog to activate/de-activate a license key. The Log button opens the folder location where the software stores its log-files, which can become useful when tracing any issues with the software.
New Configuration
The New button allows you to create a new configuration. All other configurations are maintained and can quickly be recalled by selecting an item from the drop down next to the New button. The Delete button will remove the current selected configuration permanently. (The only way to recover a deleted configuration is by restoring a backup of the underlying database. Please see SCRATCH documentation on project databases.)
Project
In the project tab you specify the name, location and format of the configuration.
The Production entry field specifies the name of the configuration and refers to the specific on-set production you are working on. As such, this name is also included in any reports that are generated in Live Looks.
The Output Folder specifies the disk location where all grades, media and metadata for the current production are stored. In addition, you specify an Output Prefix. Any output that is generated by Live Looks includes the Output Prefix in its filename to make it unique and easily identifiable.
In the Format section you specify the resolution and framerate you want to work in. Any input you specify (later) – be it live capture or reference clip - is formatted to these specifications.
The Working Space defines how Live Looks should interpret color gamut and transfer curves from the live captures and related to the grades it produces. There are three options.
- Native. All live captures are interpreted and grade on as is – without any conversion.
- ACES. All live capture are converted to the ACES color space and grading is done on the ACES image. When selecting this option, you also specify whether to work in ACES linear or one of the two ACES log spaces (cc or cct).
- Other. You can also specify a specific color space and gamma space (eotf) to work in (REC709, P3, etc.). All live captures are converted into this color space before the grade is applied.
In general the color pipeline in Live Looks can be depicted as:
SOURCE >> WORKING COLORSPACE >> GRADE >> MONITOR
- All Sources have a color space and eotf assigned to it. This in itself does not trigger any conversion, it merely tells Live Looks how to interpret a source image. You can however also apply a custom LUT on the source to explicitly convert it into the desired color space / eotf.
- The Working Colorspace allows you to unify all sources into a single color space/eotf. If the color space/eotf of the source differs from the working space, Live Looks automatically convers the image. Setting the working space to <native> will not apply any conversion to the source.
- After any potential working space conversions, the Grade you create is applied.
- Each Monitor can also have a color space/eotf associated with it. If this differs from the working space, Live Looks automatically converts the image. If you set the color space/eotf of the monitor to <source>, no conversion is applied. You can also load your own display LUT.
The Color Mode has two options.
- LUT based; all color tools are available for grading. The combined grade of the tools are outputted as a 3d LUT.
- CDL based; you are presented with a subset of color tools as the output of certain tools cannot be captured in a Color Decision List (CDL).
The Storage Model specifies how grades are classified and how the grades eventually can be matched to the source media in a dailies / post context.
- Scene / Take. There can be only one grade per camera per scene/take. Any grade saved with the same scene/take will overwrite the prior saved grade for that scene/take.
- Scene / Take / Version. This allows for multiple grades for a camera per scene/take – each with a new version number.
- Timecode Only. Grades are stored per camera and based on timecode – no scene/take needs to be entered. Grades are never overwritten.
Monitors
In the Monitors tab shows all available outputs and configuration options. By default it will only show two monitors: the (main) Interface monitor and the Split view. If you have a second monitor connected to your system you can activate it by enabling the Dual Head button to the right of the monitor list. From there you can also open the SDI Setup panel for enabling SDI input/output. Note that if you are not using a supported Video I/O interface card or do not have the proper drivers installed, this button shows disabled. Please click the SDI drivers link next to the button to navigate to a webpage with info on supported Video I/O cards and drivers.

Specify in the View column which signal should be passed to the specific monitor.
- Active specifies to show the current channel that you are working on to the monitor.
- Videowall specifies to show all defined channels as a videowall image on the monitor
- Custom tells that you select the monitor with a specific channel so that e.g. the B-Cam is always sent to (SDI) monitor 2.
Note that the main interface monitor always shows the active channel. For the split view you have a quick way of selecting the view directly in the toolbar of the split view and as such it is not needed to be set it in this panel.
You can specify a color space and EOTF for each monitor by clicking the drop down in the respective column. Live Looks will auto convert any image that is displayed on the monitor into that color space. If you select the <source> option from the drop down, the image is not converted and passed on as-is. Alternatively you can also select a Display LUT (1D or 3D) for the monitor. Click the button next to the display LUT column to open a file browser to select the LUT. Use the R button to clear the display LUT or use the A button to toggle the display LUT on/off for quick comparison.
LUT boxes
Alternative to capturing a live image and sending it out again to a monitor, Live Looks can also interface with LUT boxes: for only passing grades to or for also capturing images / timecode from. In this tab you can search / define LUT boxes and specify how grades should be passed on.
Live Looks support the following LUT boxes:
- FSI BoxIO (incl. image capture) or DM-series monitor
- TVLogic IS-mini (incl. image capture)
- Teradek COLR
- AJA ColorBox

Live Looks by default scans for any attached COLR and IS-mini LUT boxes. The BoxIO does not have an automatic detection option and needs to be added manually. By enabling the corresponding Teradek and IS-mini buttons you can enable/disable the automatic scan. The Re-scan button does a new scan in case you connected LUT boxes after the initial scan. In case you do not use any of these LUT boxes, it is recommended to disable them as to not waste time on scanning.
To add a BoxIO LUT box, enter the IP address into the text field and press the Add BoxIO button. Note that once Live Looks has found the BoxIO LUT box, it will automatically search for it on subsequent sessions so that you do not have to enter the address every time again.
Some of the LUT boxes also allow to capture an image from. Since the performance of a LUT box is relatively limited this cannot be a full video stream but rather a series of frame captures. You can specify a general Capture Interval for LUT box captures (in seconds). Note that setting this interval too small might overload the box and get in the way of sending the actual grades to the box. You can optionally set the interval to 0 and then use the manual Refresh button in the bottom right corner of the Grade Controller panel (discussed later).
Just like for display monitors, you can also specify a color space/eotf and a display LUT for LUT boxes. In that case the grade you created is combined with the potential color space transform and/or display LUT, before it is sent to the LUT box. In case you selected the <source> option, no transform is added. The display buttons to load [..], reset [R], toggle on/off [A] for the display LUT work the same as in the Monitors tab.
Metadata
In the Metadata tab you can enter project information that is used in the report function of Live Looks. This includes the option of setting a (company) logo for the report.
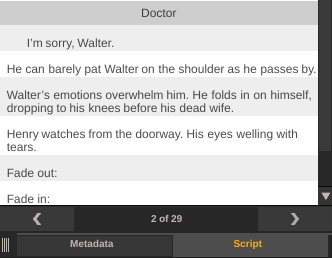
Live Looks also allows you to load in a Final Draft Screenplay. When loaded, Live Looks will display the current selected scene of the script – title, actions, dialog – in the Player and includes the title of the scene in the reports rather than just the abstract scene number.
Record
By default Live Looks allows you to record a live capture to a ProRes file. The Live Assist product however offers an extended set of recording options such as recording all live captures simultaneously in a selectable format, auto start/stop based on the camera record-state in the SDI signal and easy instant replay of the recorded media.
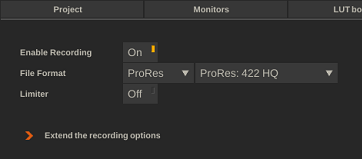
You can disable recording all together by switching the Enable Recording button off in the Setup dialog. In that case the Grade Controller panel (discussed later) will not show a recording or replay option.
By default, all recorded files are included in the default project output folder. However, you can select a different Output drive / path specifically for recorded media. Live Assist will maintain the same sub-folder-structure in that alternative output folder as it does in the folder for storing grades.
Live Assist currently allows for three different recording formats:
- ProRes – select a ProRes codec for image quality.
- H264 – select a bit-rate for image quality versus encoding performance.
- DNx – select the specific bit-rate required.
With the Live Assist module you have the Burn-in grade option to either include the grade you created in the recording or record the ungraded input signal. When recording without the grade – the grade will still show up with the Replay option by default as it will automatically apply the grade set. You can toggle the grade on/off. When the grade is burned-in, you will not be able to replay it without the grade.
The Limiter only applies to manual – single channel – recording and allows to set an automatic recording length to create a series of video snippets.
Settings
The Settings tab contains various miscellaneous settings – some of which apply to all Live Look setups.
If Live Looks has been activated as a stand-alone application, you can select the interface Language or open the Advanced System Settings dialog. This exposes a wide range of advanced system settings which are listed in the appendix of the manual.
For the Videowall output option that you can select for a monitor, you can specify the size of the Border to use between the different channels and to show the active channel with a specific Border Color. The videowall can also display the channel cam-id along with the timecode in a text overlay, which you can toggle on/off with the Show Overlay option.
Live Looks supports various Control Surface devices: Tangent Element, Tangent Ripple, Tangent Wave / Wave2, Avid Artist Color. Each of the devices has a standard fixed set of pre-defined control mappings, specific for Live Looks.
In the LUT Export options you specify the precision of the 3D-LUTs that Live Looks generates. Note that the higher the precision the bigger the LUT file and potential loading times in (other) software.
Channels
A Channel ties to / represents a camera on-set. A channel links a camera capture, a grade and a potential specific output monitor. Alternatively to the live SDI capture it can also use a reference frame, clip or LUT box capture. Instead of outputting a live signal, it can also output a grade to a LUT box.
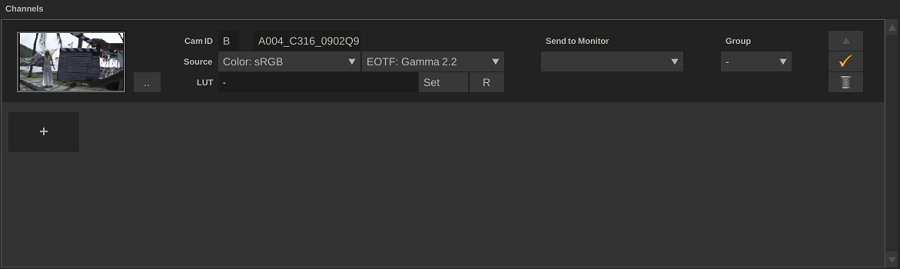
To create a new channel, click the + button and select the input-type for the channel to apply a grade onto.
- SDI Capture. In the Video IO setup panel you can specify one or more input devices. Live looks does not limit the number of simultaneous SDI captures. Rather this is limited by the hardware and potential data throughput of the computer used. Also please note that even though this uses your video IO to capture the SDI signal, you can still assign a LUT box to this channel.
- LUT Box capture. Alternative to capturing the SDI-signal directly from a camera to grade on, you can also capture an image from a LUT box.
- Reference Frame or Clip. If no live-capture and/or using LUT-boxes that do not support image capture, you can also use a static image or your own custom clip to grade on.
Each channel has a – single letter - Cam ID as well as an (optional) name. In case of a live SDI capture you also specify the specific Camera Type of the capture to ensure the correct interpretation of the metadata in the SDI signal.
For each channel you specify the source color space and EOTF. This is used to include in the report and LUT output as well as for any auto-conversion by Live Looks color management: in case you specified a Working color space, Live Looks will auto convert the image from the source into the working color space before applying the grade.
Optionally you can apply an Input LUT on the channel to convert the image into the desired (working) color space (as an alternative to Live Looks’ own color management).
In the Send to Monitor drop down you can specify a monitor or LUT box to output the image or grade of the channel to. Note that if more than one channel sends to the same output monitor, Live Looks will create a video wall, showing those channels side by side.
The Group option allows you to gang channels together: any grade changes of one channel are automatically applied to the other channels in that same group.
With the buttons on the far right of a channel section, you can change the order of the channels, activate/de-activate a channel or remove a channel altogether. De-activating a channel can be useful for when a certain camera is not used for particular scenes and as such also should not be included in any reporting or look creation.
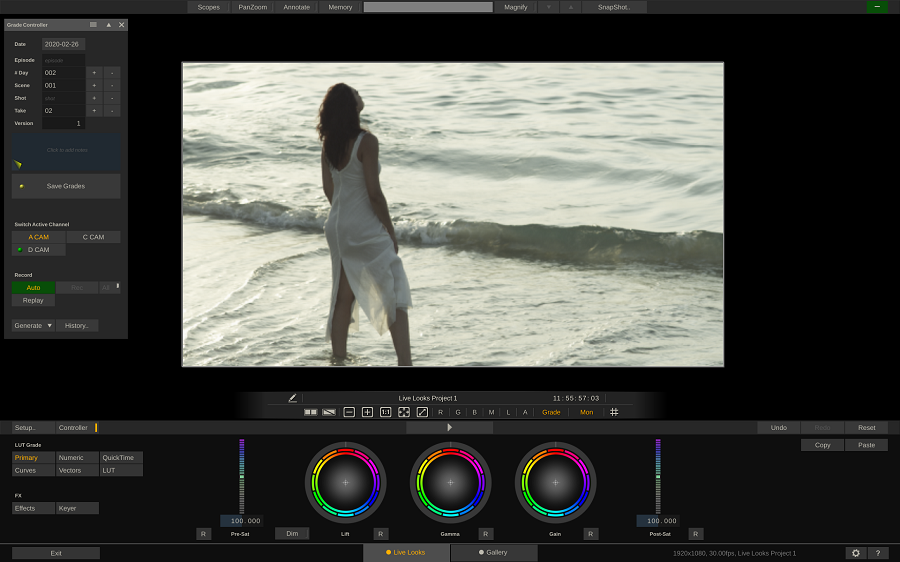
Grade Controller
In the Grade Controller panel you can specify the current scene/take, switch between the channels, enter annotations, save grades, start/stop recording and generate reports.
.png)
Classification
In the top part of the panel you specify the current (production) day, date, scene/take and version. Together these elements make up how a grade is classified and stored. Which controls are available depend on the Storage-model you chose in your configuration in the Setup panel.
- The Date control does not auto-update but will show yellow as a warning if the selected date is not the current (system) date. Note that the date itself is not used for classifying grades.
- The Episode entry field is optional.
- The (production) #Day field is mandatory and a numeric field. Use the +/- buttons to quickly adjust the selected value.
- The Scene field is mandatory. Note that the Take, Shot and Version fields are automatically reset when updating the Scene field.
- The Shot field is optional and usually empty or a single character value.
- The Take field is mandatory.
- The Version field is a numeric value. Click the field to popup the calculator panel to enter a new value. Note that the Version value is automatically incremented every time you save a grade.
Annotations
Clicking the Notes section in the Grade Controller, pops up the note-editor. Here you enter notes that are stored with the current scene. Notes are only stored when actually storing a grade. When switching to a new scene, the note section is cleared.
Save Grades
The Save Grades button stores the grades (LUT or CDL and a proprietary ccr grade file) of all active channels, as well as a series of images: a clean and graded image – each as proxy and as full resolution version. The little bullet LED on the Save Grades button can have different colors:
- Green – current grade has been saved / no changes have been made.
- Yellow – the grade has been changed and has not been saved yet.
- Magenta – you switched back to a prior scene/take, which already has a grade stored. Storing the current grade will overwrite the prior one.
Channel Selectors
Use the channel selectors to make a channel active, which means that you can adjust the grade of that channel. You can also easily switch between channels using the F1-F8 keys on your keyboard. If a channel is an SDI capture, it is displayed with a colored bullet icon - the colors of which are explained below when explaining recording.
Recording
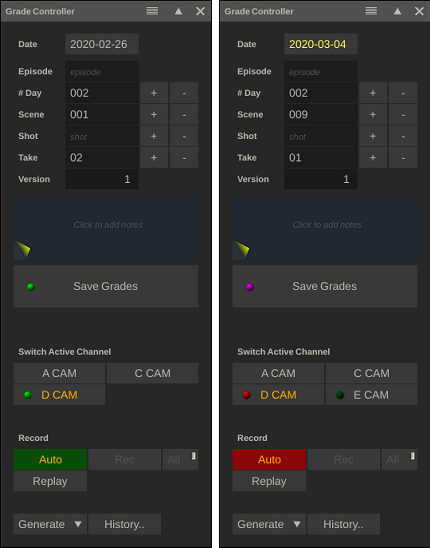
The Auto option is only available in Live Assist and when the software is able to recognize and read the record state of a camera from the SDI signal. The color of the bullet on the channel selectors gives information of the state:
- No bullet: this is not a live capture channel
- Dark green: this is a live capture but no record-state was detected in the signal. As such auto-record will not work with this channel. Possibly check if the correct camera type was selected with the channel.
- Bright green: this is a live capture channel and a record-state was detected in the signal.
- Red: this channel is currently being recorded - either through the auto-option or with the manual option.
- Blue: this channel is currently in Replay mode.
Live Assist also attempts to read the filename from the camera (that is the filename used by the camera itself) and include this in the filename of the recorded clip. Whether the record state and filename are available depends on the camera type, the Video IO card and whether you specified the camera correctly with the channel setup. Currently Live Assist can read SDI metadata of the following cameras:
|
|
|
BMD
|
AJA
(Kona 4 and up)
|
|
ARRI
|
record state
|
N
|
Y
|
|
|
filename
|
Y
|
Y
|
|
|
metadata
|
Y
|
Y
|
|
Sony
|
record state
|
N
|
Y
|
|
|
filename
|
Y
|
Y
|
|
|
metadata
|
Y
|
Y
|
|
RED
|
record state
|
Y
|
Y
|
|
|
filename
|
Y
|
Y
|
|
|
metadata
|
N
|
N
|
|
Panasonic
|
record state
|
N
|
Y
|
|
|
filename
|
Y
|
Y
|
|
|
metadata
|
Y
|
Y
|
|
Canon
|
record state
|
Y
|
Y
|
|
|
filename
|
Y
|
N
|
|
metadata
|
Y
|
N
|
When the record state of a camera changes into recording, Live Assist will start the recording and the Auto button will start flashing.
As an alternative for automatic recording you can use the manual Record option. Enabling the All option will cause all channels to be recorded simultaneously.
Note that the All option is just like the Auto option only available in Live Assist. Manual recording of a single channel is available n Live Looks.
The Replay function allows instant playback of the recorded media. The function replaces the live signals temporarily with the recorded clips. When you replay the clips, Live Assist will also show a scrubbing bar and additional player controls to navigate through the clips.

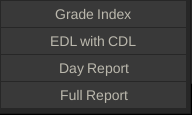
Generate Report
From the Grade Controller panel you can generate the following output.
- Grade Index. This generates an html page with the full overview of all grades created, including (proxy) images, metadata and links to full resolution media. The grade index is by default created inside the project output folder. If put on a webserver, clients can easily navigate through scenes and takes, look at before and after screenshots and download the corresponding LUTs.
- EDL. This option is only available when you have set the Color Mode in the setup to CDL. It will generate an EDL with the CDL information of all the grades of the current (production) #day. This EDL can be used in third party software in a post-production context to easily match and apply the grades that you created in Live Looks to the camera footage. Depending on whether the live capture signal contained reel-id metadata, a single EDL is created or separate EDLs per camera are created.
- Day / Full report. This generates a pdf report with the grades, metadata and images for the current (production) #day or for all days. Note that this report uses the metadata and logo reference that was set in the metadata tab of the setup panel.
History
The history panel gives an overview of all scene/take grades and recordings created as well as the option to retrieve a prior created grade or quickly review a prior recorded clip.
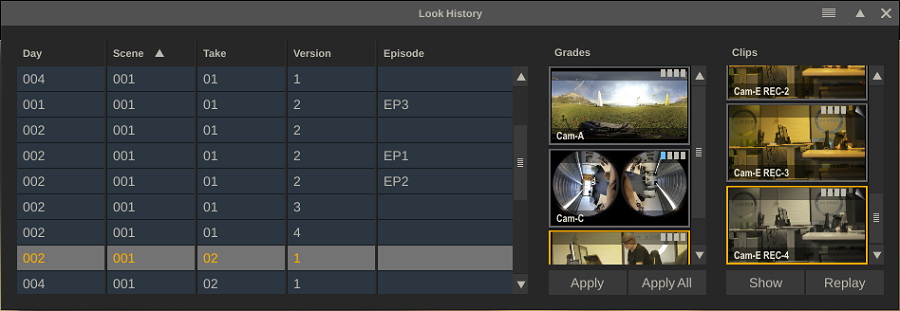
In the left side of the panel you select the day and scene/take or version. This will then show the corresponding grades and potential recordings. Use the Apply button to apply the selected grade to the current channel. Use the Apply All option to apply the grades to each of the channels, based on the Cam-id. The Show option for the clips will open the selected clip in the right view of the player.

Use the scrub bar and range controls to select the portion of the clip that you want to play.
Player
The various elements of the Viewport are explained elsewhere in this manual.
Scopes, PanZoom, Annotate, Memory, Magnify, Snapshot, View Port toolbar: see Chapter 5.
To the right you will find the metadata stack, showing all metadata of the currently selected channel and/or the production screenplay for the current scene.
The various color control menus are discussed in Chapter 7 – ColorFX:
- Primary. Color wheels / sliders. Menu layout depends on the selected Color Mode (LUT vs CDL)
- Numeric. All color primary color tools represented as individual numeric controls.
- Clip menu. This menu only gets displayed if the current channel has a reference clip as source or if the right view is showing a reference clip. The layout of the menu depends on the clip type.
- Curves / Vectors. Only available with the LUT- Color Mode.
- LUT. Load an external LUT: 1D, 3D, CTL. Options for soft-clipping the image.
Effects
The Effects menu contains a series of image texture effects that you can add to the grade of the current channel. Note that these effects do not translate into a LUT or CDL and as such cannot be automatically reproduced in other software. The report that you can generate does however mention the effects, including before/after images. This will make reproducing the effects easier.
Also, all applied effects incl. the Keyer are stored inside the .ccr file, which gets stored with each grade and can be matched and loaded into SCRATCH for Dailies to be applied to the camera footage.

• Grain
• Highlight Bloom
• Diffusion
• Vignette
Click the Add button below the effect to activate the effect. Then use the various parameters to tweak the effects to your liking. Click the Add button again to disable the effect.
Keyer
The Keyer menu allows you to quickly setup a green screen composite.
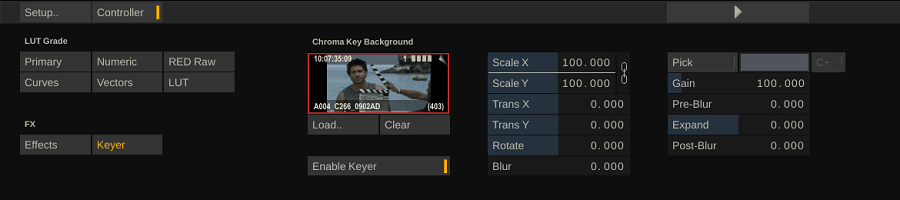
Use the Load button to select a background clip. Live Looks will automatically select the key color. The Clear button removes the background clip / key again, while the Enable Keyer button allows you to quickly toggle the key on/off.
Use the Scale, Trans and Rotate controls to adjust the display of the background clip. The Blur option allows you to better blend the foreground / background or set a de-focus effect on the background.
When you enable the Pick option, you can adjust the key color by clicking directly in the image. By enabling the C+ option the sampled color is “added” to the key, rather than replaced. This way you can refine your key.
With the Gain, Pre-Blur, Expand and Post-Blur you can further refine the keyer to remove any obvious edges. The exact workings of these functions are described in detail in Chapter 8.
Galleries

The Galleries are explained in detail in Chapter 7, although in the context of Live Looks there are subtle differences. In the References tab you maintain reference clips which you can view in the dual view. Use the Add option in the toolbar to select a clip from disk. The clip will automatically show up in the dual view. Alternatively, you can manually switch to dual view and select any of the prior loaded clips in the Reference tab.

The Looks tab is meant for storing and managing generic grades for use in multiple projects. Note that this uses the same grades library than other Assimilate products that you might have licenses for on your machine. This could potentially also mean that you can activate a grade that contains elements that normally are not available in Live Looks and as such do not translate to a LUT or CDL.
Matching Grades
To apply all the grades created with Live Looks easily onto the source media in a dailies or post context – SCRATCH has a match function to find the right grade with each clip.
This matching function can be either invoked from the Clip Import Options as part of loading media into your project or you can use the Live Looks.. option in the Media menu in the Construct tab.

Enable the Match Live Looks option. Select the folder with the grades: to ensure optimal matching, select the (production) #day sub-folder. Next, you can either apply the grade as CCR or as LUT/CDL. A ccr-file is an Assimilate proprietary format with the grade information. Note that this also contains the Effects or Keyer elements of the grade if used in Live Looks. Finally, you have an option:
- To copy the LUT or CDL of the grade to the source folder of the matching clip.
- To copy / consolidate all of the LUT or CDL to a single folder and rename them to the name of the matching clip.
Both options make linking a grade with the source footage in other software easier as both now have the same name, or sit next to each other in the same folder.
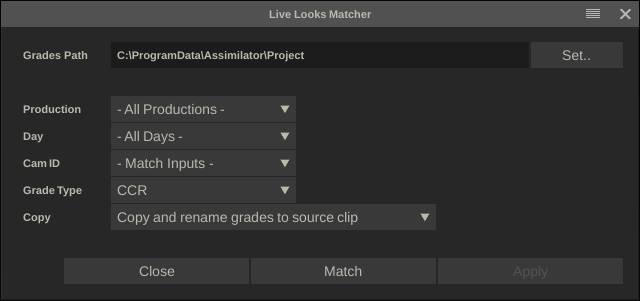
The Live Looks Matching panel has similar options as discussed above with additional options to specify which grades of all the grades in the selected folder to use. Select a specific project/production, #day and/or a specific cam-id. All the shots in the current timeline are included in the matching process.
The matching process is made up from the following steps:
- If the original live capture included the record-state and record-filename then it will first match on that.
- Next, match on scene/shot/take.
- If still no match, use the timecode to find the closest clip to match.