GENERAL
The ColorFX tab has a number of generic functions available from all sub-menus.
COPY AND PASTE
Once a grade has been created on a shot, you can copy that grade into a clipboard buffer; it can then be pasted onto other shots in the Construct.
Note: The copy and paste operations apply to more than just the primary grade. Layers and Shot Framing are also copied into the clipboard so that they can be applied to other shots as well. While this section refers strictly to the primary grade, keep in mind that there is other information that is copied as well. Applying this information is covered in the section on pasting a grade.
COPYING A GRADE
To copy the current grade into the clipboard, click on the Copy button on the right side of the Main Menu. This loads the current grade into the clipboard.
| • Quick Key: Control + C | » Copy a Color Grade into the clipboard buffer |
PASTING A GRADE
To paste a grade you either use the Paste button or you drag and drop a shot on the current shot in the View Port.
| • Quick Key: Control + V | » Paste a Color Grade from the clipboard |
When the Paste button is selected - a dialog is shown where you can set which aspects of the source shot settings and grade should be pasted on the new shot.
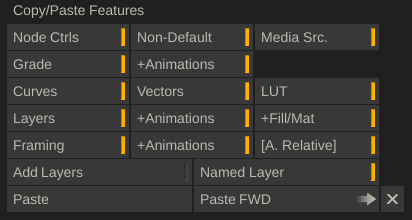
- Shot Ctrls - covers the shot specific controls (plug-in / source media decodes / etc.). The + Non-Default option causes SCRATCH to only copy those settings from the source to the target that have a different value than their default.
- Config - paste any source mode and remapping set on the source shot.
- Grade - covers all of the primary grade set in the Levels, Color and Numeric menus.
- Vectors, Curves and LUT cover the settings from the corresponding menus
- Layers - covers all the secondary grading
- Framing - covers any framing set in the Config menu / Edit module.
For certain selections you also have the option of pasting any associated animation or textures by toggling the +Animation or +Texture button. Enable the [A. Relative] button to paste any Animation Channels relative to the in-point of the shot rather than using the absolute position of the shot in the copy buffer.
The Add Layers option allows you to preserve any existing Layers on the target shot. Any layers from the source shot are just added to the target shot.
The Named Layers option only has effect when the copied item itself is an individual layer. If so and if the Named Layers option is enabled then the paste will only apply the color settings on a layer with that same name on the target shot. This can be useful when you want to update a specific layer that has been used on all other shots. Note that the Named Layer option is not persisted after closing the panel the option is always switched off. This prevents leaving it on by mistake and finding that a paste action from the Memories or the Galleries does not show any action.
| • Quick Key: ALT + Click feature | » Select the feature and deselect all others |
| • Quick Key: CTRL + A | » Select all feature |
| • Quick Key: CTRL + D | » Deselect all feature |
The Paste button starts the actual paste operation.
The Paste FWD button will paste the current clipboard onto every shot from the current shot to the end of the timeline. This is a very fast way of applying the same grade to every shot. You can limit the number of shots processed by setting a Player Range - the Paste will stop at the out-point of the Range.
Note: You can adjust the paste settings in the dialog without actually pasting anything. The Paste button is always available - even if there is no information in the clipboard - by opening the dialog, adjusting the options and pressing the close (X) button.
DRAG AND DROP
Rather than using the Copy and Paste buttons or the corresponding shortkeys - you can also drag and drop any shot onto the current shot in the View Port or click the Paste button while dragging a shot. This functionality is explained in more detail with the Gallery Trays - later in this chapter.
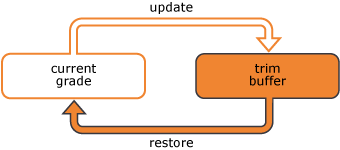
THE TRIM BUFFER
The Trim buffer is a temporary storage area for quickly comparing on a version of a grade to another. The Trim buffer works in conjunction with the current grade so that when you modify a grade on a shot, the previous version of the grade is automatically stored into the Trim buffer.
Note: The Trim buffer is only updated automatically the first time you change a grade on a shot. It will not automatically update as long as you remain on the current shot. You can manually update the Trim buffer using the Update and Restore buttons, discussed below.
The Trim button changes from grayed out to active when there is something saved in the Trim buffer.

You can display the contents of the Trim buffer by clicking on the Trim button. The Viewport will update to show the version of the shot that is in the Trim buffer. The Trim button highlights to indicate that you are viewing the Trim buffer, and not your current grade.

| • Quick Key: T | » Open / Close the Trim Buffer |
You can continue to modify the current grade and compare it with the Trim buffer. At any time, you can either copy the current grade into the Trim buffer, or you can copy the Trim buffer back into the current grade. When the Trim buffer is being viewed, the Update and Restore buttons are visible to the right of the Trim button.
UPDATE
The Update button copies the current grade into the Trim buffer. The grade that was stored in the buffer is overwritten with the new information.
RESTORE
The Restore button copies the grade from the Trim buffer back into the current grade. The current grade is overwritten with the information from the Trim buffer.
Note: The Trim Buffer is only one layer deep. Each time you update the buffer the previous version is automatically overwritten.
Tip: Because the Trim Buffer is fully independent of the usual Undo/Redo and Reset Commands, it can be used as a temporary backup of a color grade – always restoring you back to the state saved with any Update operation. This includes deleting or resetting any Layers or other parameter. Just keep in mind that the Trim buffer is flushed any time you move to a different shot in the timeline.
OVER MODE
You can use the Over-mode view and Wipe function - Quick Key: S - to compare the contents of the Trim Buffer and your current grade. For more details on using the Wipe function see Chapter 5 - The Player.
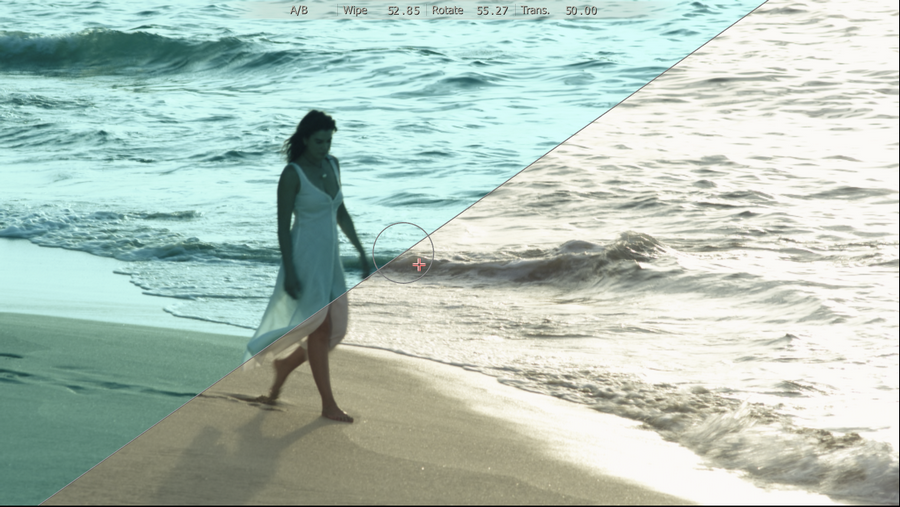
| • Quick Key: S | » Split Screen between current grade and Trim buffer |
AUTO-RESTORE
The Auto-Restore option can be set from the Config/Options menu in the Matrix. This determines how the Trim buffer behaves when color changes are made.
For example, if you are viewing the Trim buffer and Auto-Restore is deactivated, any changes you make to the color adjustments automatically switch the Trim buffer off; this returns the view to the current grade. The adjustments you make are applied to the current grade and the Trim buffer remains as it was.
In the same example, if Auto-Restore is active, and a color adjustment is made while viewing the Trim buffer, then the Trim buffer is automatically restored as the current view; any color adjustments are then made to the newly restored grade. This is the equivalent of pressing the Restore button while viewing the Trim grade, and then making color adjustments.
Note: Auto-Restore is a destructive operation. If any color adjustments are made while viewing the Trim buffer, the current grade will be overwritten by the grade from the Trim buffer without a confirmation. In most cases, this is exactly the desired result. If you make the modification while looking at the Trim buffer, then you are expecting that modification to be made to that image. If Auto-Restore is turned off, then the view reverts back to the current grade and modifications will be made to that image.
PREVIOUS/NEXT COLOR SELECTION
The Previous/Next Color Selection buttons are an extension of the Trim buffer. These controls allow you to load the grade from other shots on the timeline into the Trim buffer of the current shot. When a grade is loaded the Trim buffer is automatically switched on.
You can determine which shot’s color grade is being used by clicking on the Previous  or Next
  buttons. The Numerical Slate between the buttons indicates from which shot the current grade is being applied. Positive numbers indicate shots to the right of the current shot and negative numbers indicate shots to the left. You can also change the shot number directly by clicking on the Numerical Slate and entering a number.
The Previous/Next buttons use the Trim buffer to hold the color grade from another shot and you can use the Apply button to apply the grade you are viewing to the current shot. The Trim buffer is updated with the original grade in the event you would like to revert back.
SAVE, LOAD, FETCH, INSERT
SAVING GRADES
To save the current grade to an external file you use the Save button. This opens a SCRATCH file browser which has the option to save various file formats - each with a different purpose.
- .ccr - full primary and secondary grade in a SCRATCH proprietary format.
- .lut - a standard 1D LUT using the Depth and Size parameters specified in the Matrix Configuration Settings.
- .xml - a 1D LUT format used by the old S2 digital field recorder. This was useful for applying a look on-set using SCRATCH, and then exporting a LUT back to the S2 recorder, which was used for on-set monitoring.
- .3dl / .txt - a 3D LUT.
- cdl - a Color Decision List (CDL) as defined by the American Society of Cinematographers. The parameters in the CDL translate to SCRATCH's primary grading: Slope = Pre-gain (In SCRATCH from 0, in CDL from 1), Offset = Offset, Power = Gamma, Saturation = Color B saturation.
When saving a LUT you can include the current monitor LUT by activating the Include 3D LUT button in the Matrix Setup menu. The monitor LUT is concatenated with the current color grade to generate a single LUT file.
LOADING EXTERNAL GRADES
Pressing the Load button opens a SCRATCH Browser to load any of the following file formats.
- .ccr - a SCRATCH proprietary grade format.
- .cdl / .xml - generic ASC Color Decision List format (as described above). Note that the values in the CDL are normalized values whereas the absolute values as displayed with the SCRATCH controls depend on the source footage.
- .pls - SCRATCH proprietary format holding plug-in control presets.
- 1D / 3D Lut formats.
- .ctl - Color Transform Language - as defined by the Academy of Motion Picture Arts and Sciences (A.M.P.A.S.). SCRATCH interprets and executes a CTL script dynamically.
- .svg - Scalable Vector Graphics format: load an image to be used as texture.
When Loading a LUT using the Load button here - the LUT is loaded as a Layer in the current color grade. You can also load a LUT as part of the primary grade, as covered earlier in this chapter in the LUT menu.
FETCH
The Fetch button Replaces the Player Viewport with the Construct view so you can navigate your Construct to pick up a shot that can be used as input or texture for the current shot. While in this Construct view you can use the Project Tree to switch between Constructs. This will not affect your current Player session. Once you picked up one or more shots you can use the Close Construct button on the main toolbar to show the Player View Port again.
INSERT
The Insert button will open the Plug-in Browser which is discussed in Chapter 9 - Process and plug-ins. The Insert button is not always available and depends on the current selected Matrix sub menu. Also - the way a selected plug-in is applied depends on the location from where the Insert was initiated.
- Inserting a plug-in from the Shot menu will replace the current shot with the plug-in and use the current shot as input for the new plug-in node.
- Inserting a plug-in from the Texture menu (covered in the next chapter) will create a new Layer with the selected plug-in as Front or Matte Texture.
The Insert option is not available from any of the other Matrix menus.