GENERAL
In the Media menu you manage the shot data format, image format, possible source transformations and file references of the shot.

Note: Note that most settings on this page are not reset when using Reset button on the Player menu bar. Only when keeping the shift key down
when clicking the Reset button will the settings in the Source Transform
also be reset.
DATA FORMAT
The Data Format controls reflect how SCRATCH interprets the media of a
shot: Color- and file format, color / alpha channels and color space
(see Chapter 4 - The Construct, in the
paragraph on Output Nodes). For most shots some of the settings are
determined by the underlying media and can not be changed. Other
settings - like e.g. the color space - can be changed and SCRATCH can
not always determine the value from the underlying media and meta data.
The Apply button is available with Output and Nest nodes and when set will
force a color space transformation if the color space of the node's
input differs from that of itself.
IMAGE FORMAT
The Image format settings include resolution-, aspect-, framerate-, filter- and timecode-properties. Each of those shot properties have been discussed in Chapter 4 - The Construct, in the
paragraph on Output Nodes. In case of a media node, the properties have been set from the (meta)data of the underlying file. Furthermore, properties like the Resolution are read-only and cannot be altered in the case of Media nodes.
SOURCE MAPPING
The Source Mapping can be used for a Gamma transformation of the
underlying media before it is used in the SCRATCH color pipeline: use a
standard Linear to Log space or vice versa transformation, set a custom Gamma value or Load your own custom LUT transformation.
SOURCE MEDIA
For media nodes this section of the sub-menu will show the file reference to the underlying media. You can even change the file reference if needed by using the Browse button. In the case of plug-in or an output node you can set the output folder and the file-naming mask of that node. Click the Set button to open the Filename specification panel, which was discussed in Chapter 4 - The Construct, in the
paragraph on Output Nodes.
PROCESS AND CACHE MEDIA
The Render tab contains the main functions for managing timeline output: creating (derived) timeline Output Nodes, adding output nodes to the Process Queue and rendering the queue. All those functions are discussed in Chapter - Render. However, from the Media menu you can also render local shots and / or cache local shots or (part of) the timeline. Caching media can increase playback performance when dealing with complex grading or effect plug-in that require substantial processing. Furthermore, rendering sections of your timeline might save time at the end when you need the full timeline deliverable. The far right bottom section of the Media menu contains a series of render options. The specific option that is available at any one time depends on the type of node that is active in the Player.
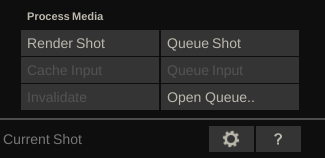
RENDER SHOT / RANGE
When rendering / caching the output of a shot or range, you effectively render the Main Output node of a timeline. The render includes all the grading that is applied to the timeline shot and in a
multi-layered timeline it also includes the track shots. After
rendering, SCRATCH will use the rendered frames for play back instead of the underlying source media. To indicate that SCRATCH is using the rendered version the Player toolbar is highlighted in a copper color. When you change any setting or grade element in a rendered section, SCRATCH will invalidate the render automatically. Play back will then again use the original source media and the grade is actively rendered on top of that.
If you have a range selected the button is relabeled into Render Range. You can also use Quick Key: F12 to render the current shot or Quick Key: Ctrl+F12 to render the current range. If no specific range is set, SCRATCH will start to render the full timeline.
When you start processing, you will be locked out of
the interface. The Main Menu area will become shaded and processing
indicators will appear on either side of the Main Menu. A progress bar
above the mini-timeline will inform you of the progress by displaying
the number of frames processed, the total number of frames to be
processed and an estimated duration to completion.
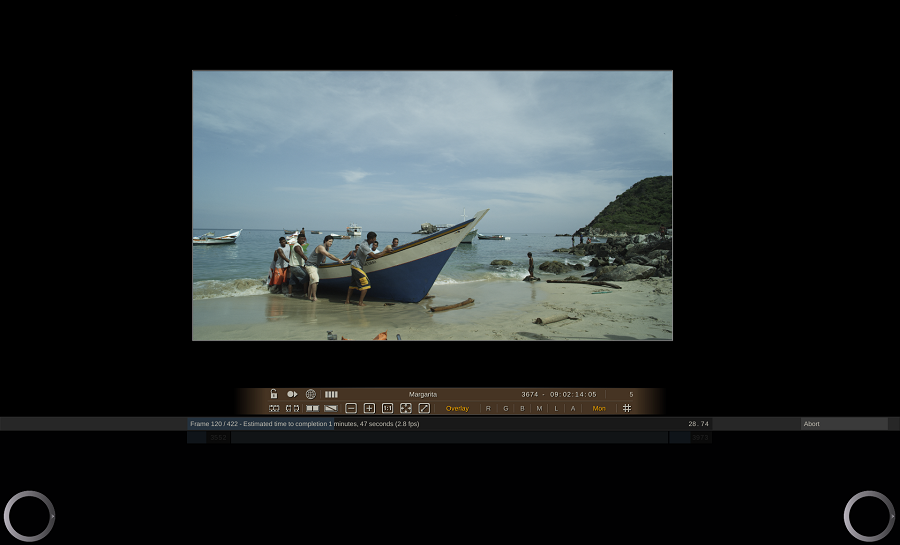
You can abort a processing task at any time by pressing the Quick Key: Escape . Any frames processed up to that point will be preserved.
If the processing is restarted, it will begin at the point where it
left off. This avoids having to re-process frames unnecessarily.
Also be aware that once a shot is rendered this way, SCRATCH will no
longer playback any version shot that you might have. As long as the
main output node is not invalidated, SCRATCH will always use the cached
version of the section of the timeline.
As said, you can render / cache individual shots for better playback. However, when you rendered out many shots while working through your timeline - this working method can also save you time when rendering out any final deliverables. Any output that you created directly after the Main Output node of a timeline will use the rendered files and will not have to revert to the source shots and re-render the grades. This might save in overall render times.
CACHE INPUT SHOT
The option to Cache the input of a node only applies to Nest nodes or Plug-ins. This option renders all the input to the node and any effects of the node itself but not any of the grade that you applied on top of the node. This option helps you to cache complex composite shots or heavy processing plug-ins to increase playback performance, while maintaining the option to grade on top of the shot.
ADD SHOT TO QUEUE
Rather than starting the render on the spot, this option will just add the current shot to the render queue for processing on a later moment.
INVALIDATE MEDIA
This option explicitly invalidates the rendered media with a shot or main output node. Note that SCRATCH will automatically invalidate rendered media when any of the inputs of a plug-in or nest node change or when the grade of a shot underlying the timeline changes.
OPEN QUEUE
This opens the Process Queue panel. The panel was discussed in Chapter 4 - the Construct and allows you to start / manage any queued render jobs.