Introduction
SCRATCH natively supports the Tangent Devices CP-200 ControlSurfaces. These external control devices can be configured to controlmany of the functions of SCRATCH to allow for a more tactile interactionwith the software. There are four different models in the CP-200 line;the BK [Balls and Knobs], TS [Transport], K [Knobs] and S [Selection].You can use any combination of these devices with SCRATCH but a BK panelis the minimum requirement. This document will cover the initial setupand configuration of the CP-200 control surfaces.
Network Layout
The Tangent panels use an Ethernet Interface where each controlsurface is assigned an IP address on the network. This IP addressidentifies the control surface on the network so that SCRATCH cancommunicate with it. This means that you must create a network betweenthe panels and the SCRATCH system in order for them to communicateproperly. The physical connections of this network use standard Ethernetcables. Be sure to use CAT5 Ethernet cables that are configured asstandard Ethernet patch cables. Do NOT use crossover or ‘null’ cables orother cables that have standard Ethernet connectors but non-standardEthernet wiring within the cable. There are two ways to configure thenetwork between the SCRATCH system and the panels, which will dependlargely on the number of Ethernet ports on your SCRATCH system - we do recommend a setup with two ethernet ports on the workstation.
Dual Ethernet Ports
If the SCRATCH system has two separate Ethernet ports, you can set up the panels as shown in this diagram:
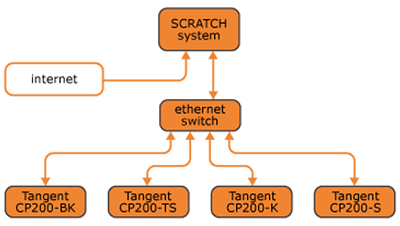
Note: SomeEthernet switches have one port that is the ‘uplink’ port. This portwill usually be set apart from the other ports or may be labeled asUPLINK. The uplink port should be used for the connection between thepanels and the SCRATCH computer.
In this configuration, the SCRATCH system will communicate with theInternet on one Ethernet port and communicate with the Tangent panels onthe other Ethernet port. Each Ethernet port can be configuredseparately in Windows. This is the easiest configuration since theTangent network can be configured completely independent of the Internetnetwork.
Configuring the Control Surfaces
Setting up Windows network
This is the procedure for Windows workstations. However, the procedure is similar on OSX, where you set up all parameters under System Preferences, Network.
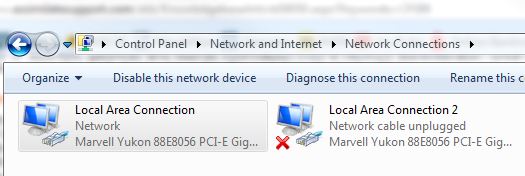
First, go to Control Panel ⇒ Network and Internet ⇒ Network connectionsRight-click the corresponding network adapter and click “Properties”.Inside the pop-up window, select “Internet Protocol Version 4 (TCP/IPv4)” and click “Properties” below that selection list.
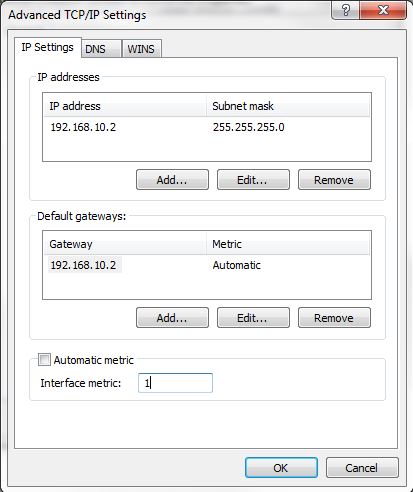
Fill in the information like in the screenshot above. Make sure to setup an own subnet for the panels (e.g. 192.168.10.x) and that IP-address and default gateway are the same.Next, click on “Advanced…” In this window make sure to setup the “Interface metric” from “Automatic” to “1”.
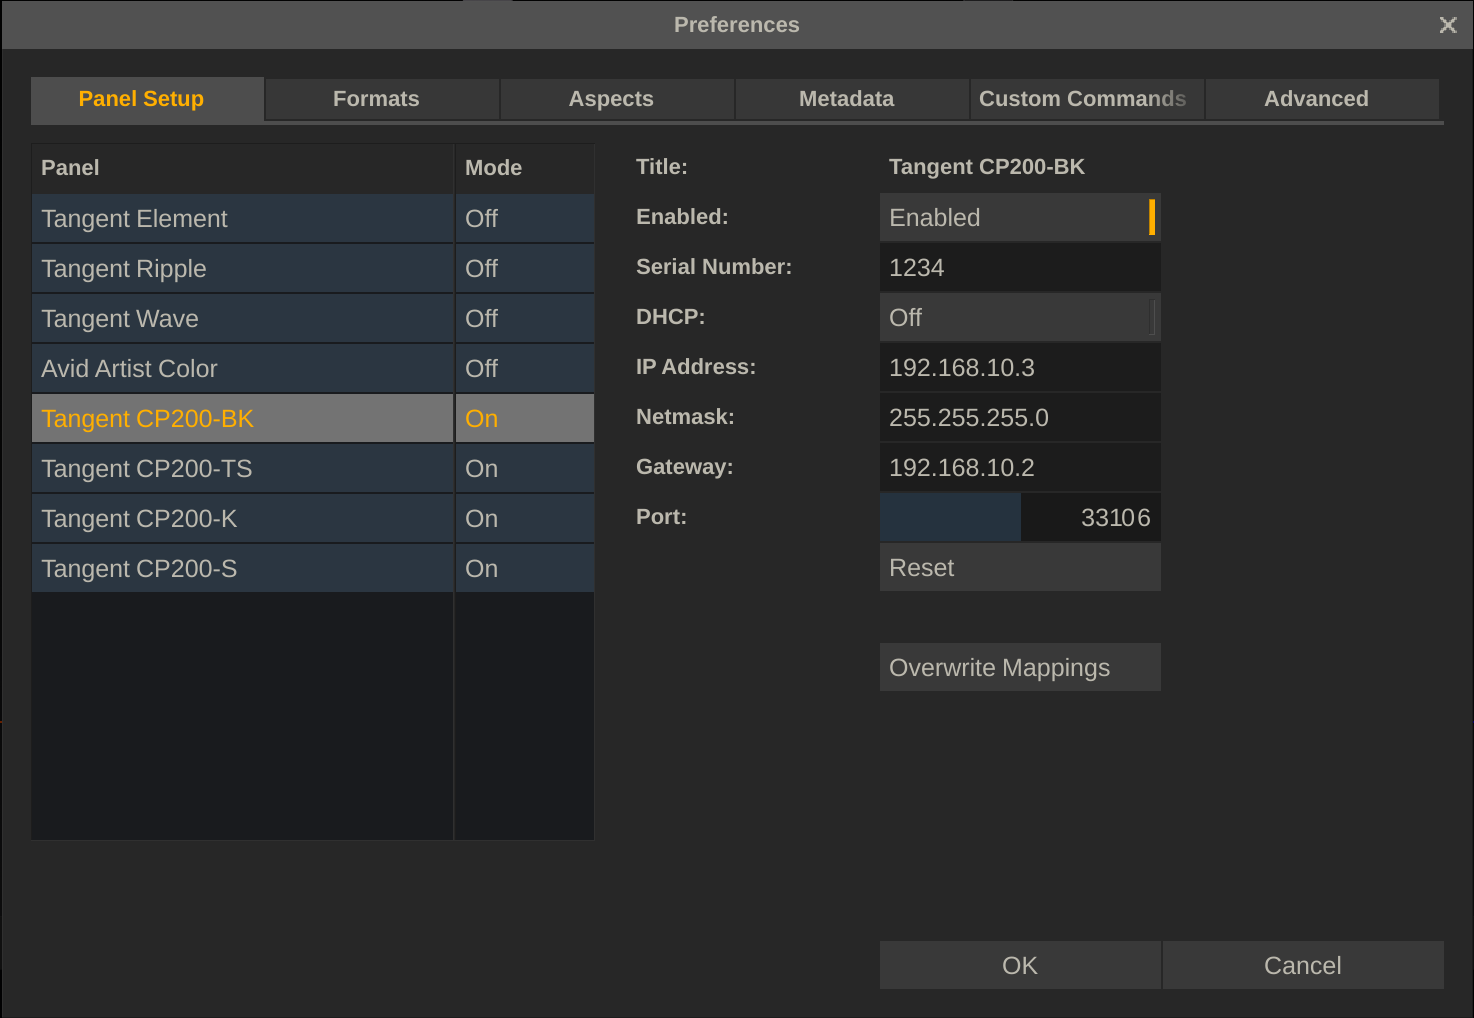
Now click OK and exit all network configuration windows.Reboot your workstation once to make sure network settings are applied. Then start up SCRATCH, go to System Settings ⇒ Preferences ⇒ Panel Setup Tab.If you’re just running the CP200-BK panel alone, just enable the BK-panel. If you’re running any other configuration with 2, 3 or 4 CP200-panels,please in all cases enable all 4 panels in this window.
Tangent Serial Numbers
Then for each activated panel, fill in the serial number - this serialnumber is presented on each panel’s display upon power-up. It is NOT theserial-number on the sticker on the back of the panel! Fill in anindividual IP address for each panel – e.g. if your workstation has theIP 192.168.10.2, your CP200-BK panel gets 192.168.10.3, the CP200-TSpanel gets 192.168.10.4 and so on. Make sure that subnet mask andgateway are the same as we configured on the Windows network adapter.Optionally, click “Overwrite Mappings” on any of the four activatedpanels, if you want to overwrite any previously setup user-definedmapping.This is not needed if this is the first time you setup a panel withSCRATCH. Click “OK” and restart SCRATCH.
Running SCRATCH
Once the computer’s Ethernet ports have been configured, run SCRATCH.The display on the CP200-BK should change to say SCRATCH and show thebuild number. Once you enter the Player, the panel’s displays willactivate and all the controls will be available. You can modify thecontrol surface mapping from the Player’s SETTINGS menu. The CONFIGUREPANELS button is in the lower left corner of the SETTINGS menu. Forinformation on modifying the default mappings, see the Tips and Tricksdocument on Customizing the Control Surfaces.
Troubleshooting Control Surface Problems
If communication with the control surface is not working, check to besure all of the entries in the cs_devices.xml file are correct. Also,be sure the computer’s network settings are set up properly and they areset for the right physical connection. On systems that have twoEthernet ports, remember that each port can be configured separately. Besure you have the Ethernet connection plugged into the proper port onthe computer. Most problems with the Ethernet control surfaces come downto a network configuration problem where the computer and the controlsurfaces have not been configured to use IP addresses from the samesubnet or there is a physical issue between the computer and the controlsurfaces. To check if there is proper communication between thecomputer and an individual panel, you can use a DOS command called‘ping’.
Also check the physical connections; verify that the cables areproper Ethernet cables, be sure you are using the proper Ethernet porton the computer and check that the cables are fully inserted into theEthernet jacks on the computer and control surfaces. It’s sometimesnecessary to reboot the computer for network changes to take effect.Have the control surfaces connected and powered up when you reboot.Finally, be sure you have run SCRATCH at least once. The controlsurfaces will not be properly configured until SCRATCH is running andyou have at least entered a project and gone into the PLAYER.
The ‘cs_mappings.xml’ file will control the initial mapping of thepanels. However, if you make any changes within SCRATCH, a new versionof this file, called ‘cs_mappings.xml’ will be placed in the Userfolder. This file will override the file in the Settings folder. If youwant to remove any modifications that you’ve made, just delete this filefrom the User folder and SCRATCH will revert back to the‘cs_mappings.xml’ file in the Settings folder. You can also take yourpanel mappings with you by copying the ‘cs_mappings.xml’ file from theUser folder onto a flash drive and then loading it into the User folderof another system. Take a copy of the ‘cs_devices.xml’ file as well sothat you have a preset file that just needs the serial numbers changedfor any new Tangent panels.