With the release of SCRATCH 8.5, ASSIMILATE also introduced the SCRATCH VR Suite. This Suite bundles SCRATCH, SCRATCH Web and a series of tools and features for a streamlined workflow for Virtual Reality 360 media - projects. Although the basic viewing of 360 media is available even in the (free) SCRATCH Play version - all the advanced edit, grade and composite tools are only available in the SCRATCH VR Suite which requires a special license. In the remainder of this document the SCRATCH VR Suite will be simply referred to as SCRATCH VR.
This article covers all the functions, features and aspects in handling, processing and (re)viewing 360 media.
PLAYBACK AND VIEWING
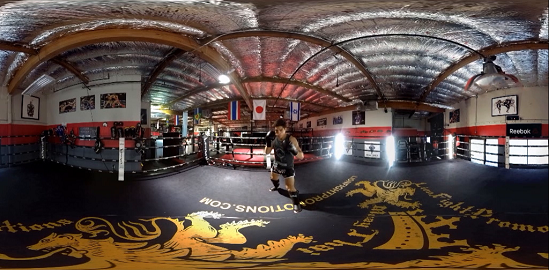
The SCRATCH VR Suite supports playback and navigation of 360 media in a spherical environment: in the main view, in a split view setting, on a reference monitor or projector and with a headset like the Oculus Rift.
360 Media
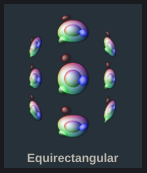
Most 360 media is - once the images of the various cameras have been stitched together - stored in the equirectangular format (https://en.wikipedia.org/wiki/Equirectangular_projection). Optionally, this can be stereo footage in which case it is most often stored in an over/under pattern. There are other formats (like for example the cubicle) being used, but for motion picture, equirectangular seems to have become the standard.
The first step in dealing with 360 media in SCRATCH VR is to ensure that SCRATCH VR can recognize the correct 360 format of that media. In many cases the meta-data in a media file does not contain 360 information and you are forced to enter this yourself. In SCRATCH VR, this can be easily done in one of two ways.
- In the meta-data stack in the CONstruct or in the Player, you can set the Projection Type and Stereo Mode properties of the current selected shot.

- Alternatively, you can set these properties for a whole range of shots at once through the Media Browser. Select all shots and use the Projection Type and Stereo Mode controls on the Base tab of the Media Browser.

When you set these properties and render out the media to .mp4 or .jpg, SCRATCH VR will automatically include the proper meta-data in the file so that other systems (e.g. YouTube) will recognize it as 360 media.
Viewer
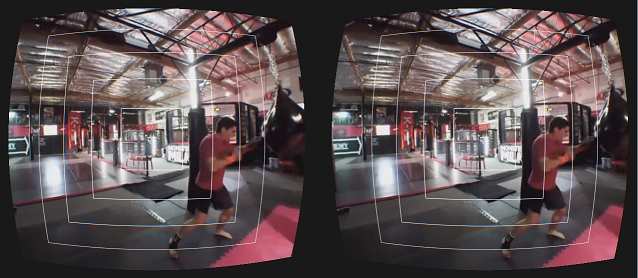
Once the media is flagged as 360, SCRATCH will display it accordingly, either through an Oculus Rift headset, on your primary display, in the split view or on the second/reference (SDI output) monitor or projector.
SCRATCH VR will detect automatically if you have an headset like the Oculus Rift connected to your system. SCRATCH VR will also automatically pick up the motion tracking of the headset and adjust the view. Make sure you a compatible driver for the headset installed - please see the driver chart for the correct versions for SCRATCH VR. Note that currently there are no divers for the Oculus Rift available for OSX.
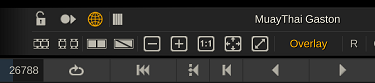
To switch between the flat and 360 projection view on your main- or split view, use the globe-icon on the main Player toolbar.
The image on the (SDI) reference monitor/projector is by default in 360 projection mode, and independent of the selection for the main display. If you want to override this mode, use the 360 View Format option in the Settings-Monitor menu in the Player. By default this is set to Auto, indicating that based on the meta-data of the current shot, SCRATCH VR will use a 360 projection or the normal flat view. The other settings here will force SCRATCH VR to another projection, regardless of the meta-data of the current shot.
If you have a headset connected, that will control the viewing direction of the 360 projection. If you do not have a headset connected you can control the 350 navigation either by dragging the image in the main view with the mouse or pen or by using the Pan-Zoom tool.
Pan-Zoom tool
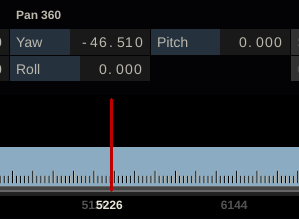
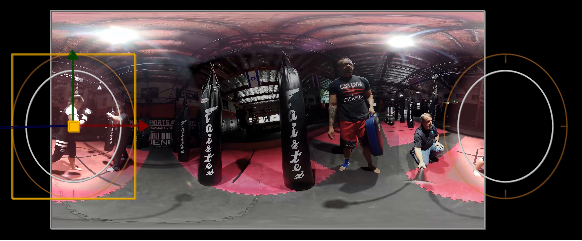
The Pan-Zoom tool can be opened from the top Player Control bar. Besides using it for panning and zooming the image in the Player View Port, the second tab of the tool can be used to control the Yaw, Pitch and Roll for the 360 view as well as setting the Field of View (fov) for the 360 projection. You can either adjust the values of the individual Yaw, Pitch and Roll controls directly or you can drag the proxy-image to change the view. Note that the Yaw, Pitch and Roll controls are also mapable to a control surface.
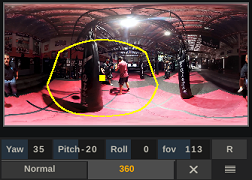
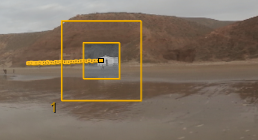
The proxy image of the Pan-Zoom tool shows the flat (equirectangular) image of the current shot. The yellow outline displays the area of the (flat) equirectangular image that is currently displayed in the 360 projection. The dot shows the center location of the current 360 projection on the flat image.
Note that if you drag the mouse inside the proxy image you only change the Pitch and Yaw controls. The Roll and FOV can only be adjusted directly on the control. Note, that you can also map the yaw, pitch and roll parameters to trackballs on your grading panel and control the view through that. Furthermore, when an Oculus Rift is connected the Yaw, Pitch and Roll controls are updated automatically from the motion tracking of the headset. When hitting the Reset (R) button, the Oculus default position is reset to the current view direction.
Headset Playback Control
You can switch playback-control of the timeline to your headset. This means that all the Player controls to browse through your timeline become visible in the headset as an overlay on top of the image. You can then use the mouse pointer to operate the controls while still look in all directions to the image. This way you can start, stop, jump forward / back, and browse your timeline without having to take off the headset or have someone else operate the Play controls. In fact, many colorists are able to operate their color panel blindly. For those, the Headset Playback control allows you to do the basic grade of your production without ever having to take off the headset.
Stereo
360 media is often produced in 3D stereo. Unlike traditional 3D stereo which is mostly delivered as two separate left- and right-eye file streams, does 360 media come pre-wrapped as a single file stream with left- and right-eye in an over/under pattern. SCRATCH can handle both types of ingest but offers two different use models for working with stereo.
If your main aim is to review the media with possibly some basic editing and/or primary grade, then you might consider just tagging the shots properly; set the Stereo Mode metadata item to the correct pattern. You can do this in the Metadata stack or for a series of shots at once in the Media Browser.
Once a shot is tagged as stereo SCRATCH will automatically playback the shots properly in 360 mode - meaning that in the main- or reference view it will just show the left (top) eye of the shot while if you have an Oculus Headset SCRATCH will automatically show each eye correctly.
Note that if you are not in 360 mode, SCRATCH will just show the over/under image. You can grade directly onto this image however when doing more advanced (secondary) grades you are advised to consider wrapping your media into a stereo node.
Advanced Stereo Workflow
As an alternative for just tagging your 360 media as stereo, you can also wrap your media in a so called Stereo Node. The advantage of this is that - after wrapping you can treat the stereo shot just like a standard 2D shot. This means that you can do all your creative work on one eye and easily replicate that to the other eye - while maintaining any convergence between the two eyes. To do this manually on an over/under image will prove difficult when you need to create secondary grades, layers and compositing elements.
For more details on how to work with stereo, please read this article. Although it is not specific for 360 media, it does cover all the aspects you have to deal with in a Stereo project.
ONLINE REVIEW
When you Publish 360 media from SCRATCH VR into SCRATCH Web, the viewer in SCRATCH Web will recognize it as such and anyone with a web browser can view the media in 360 mode. If you have a headset (Cardboard or more advanced) and smart phone, you can also view the media in an immersive environment, like with the Oculus Rift. Here you can find some examples of 360 publications: https://vr360.sweb.media/?fid=0.
Publish
Publishing 360 media into SCRATCH Web is very similar to publishing regular media. Tutorial videos are available about how to do that here: https://assimilate.sweb.media/default.aspx?pid=2281. Note that there are resolution and performance aspects to keep in mind:
- 360 (equirectangular) media should be published in the same aspect ratio as the source: reframing, fitting height / width or letterboxing might break the spherical projection. The Publish dialog has a number of predefined resolutions that have an aspect of 2:1 and are suitable for equirectangular 360 media. Alternatively, you can adjust the resolution of the main Output node of your CONstruct and then use the "Native Resolution" in the Publish dialog. Please note that publishing high resolution media is less suitable for the internet and playback on a smart phone.
- Often 360 media is shot at a high framerate (> 30fps) to enable smoother playback in an immersive environment. However, there is again the trade-off with limited bandwidth and processing power over the Internet. Often you will find that publishing at 30 fps will suit your purposes. To re-time your media, you first need to update the framerate of the Main output node of the CONstruct. Then you add a re-timer plug-in to each shot that you want to publish. In the Player-Shot menu, select Insert and then select the re-timer plug-in. The framerate of that plug-in is automatically set and will re-time to the framerate of the timeline / CONstruct (30fps). Note that you may have to adjust the slot-length of each shot as the total length of a shot (in terms of frames) has shrunk. You can do this manually in the editor and/or use the Fit Slots option in the CONstruct Media menu.
- The Video Quality in Publish, together with the resolution used, determines the actual bitrate (and size) of the rendered media. This setting is a subjective matter as it also depends on the source footage. Often for an internet re-view in for example a dailies context, the Low quality will suffice and help smoother playback on smart phones, with limitations on bandwidth and processing power.
SCRATCH Web 360 Viewer
Once you have published your 360 media into SCRATCH Web, you will see that SCRATCH Web will automatically open the player in 360 mode.
Currently, playback of media in 360 mode in SCRATCH Web is supported on Windows using a Chrome, Firefox or Edge browser, on OSX using Chrome or Firefox, and on Android using Chrome. For each browser applies that you have to make sure that 'WebGL' is enabled in the browser settings: most are by default but on certain systems this might have been switched off. Note that iOS is not supported at this time due to (CORS in combination with WebGL) limitations on all web browsers running on the platform (iPad/iPhone).

You can view 360 media in SCRATCH Web in various modes:
- In a desktop environment, use the mouse to pan around the 360 view, or use the overlay buttons. You can also use the mouse wheel to adjust the Field of View or the projection.
- Use as a magic player on your smart phone. SCRATCH Web will pick up on the motion tracking of your Android phone and adjust the view accordingly. Just move your phone around to pan the projection.
- Get an immersive view with a Google Cardboard or other headset in combination with your smart phone (Android). Click the headset button and the view will split in a left and right eye and use the phone motion tracking to move the view around. This mode also has a VR Setup configuration panel for tweaking the immersive experience based on size of your display, distance of the lenses, and distortion factors of the lenses used.
Note that by toggling the globe button you can switch the view between a 360 projection and the flat equirectangular image.
Headset Setup
When you are in immersive-mode, using a headset and smart phone, you can optimize the experience by entering the VR Setup menu. When you click / tap the screen while in immersive mode, the screen will show a VR Setup button. Click / tap that to open the Setup panel.
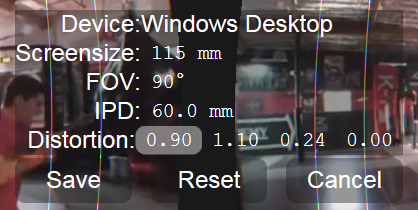
To adjust the values in the panel, select a parameter and click / tap either the left or right arrow buttons to respectively increase or decrease the value. When not touching the panel, it will fade out and leave the view in test-mode - displaying a series of lines and cross in the center of each projection.
This test mode is used to get an optimal experience with the headset. When viewing the image through the headset the lines should appear straight and the cross that is projected in the middle of the left and right view should appear as one single cross in the middle of your view. Also, you should not see the black borders to the sides of the view when using the headset.
- Device: informational purposes only. Displays the name of the current device.
- Screen size: the horizontal screen size of your smart phone in millimeters.
- FOV (Field of View): the default FOV used in degrees.
- IPD (Inter Pupil Distance): the distance between the center of the two lenses in the headset (in millimeters).
- Distortion: parameters to specify the characteristics of the lenses to calculate the so called barrel distortion of the projection.
Creative Tools
The SCRATCH VR Suite contains a series of VR tools for editorial, grading and finishing.
Editorial
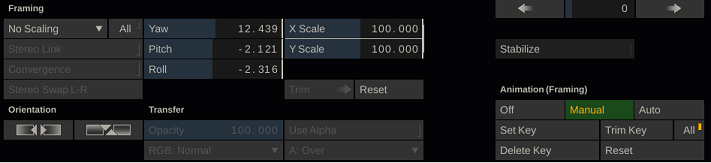
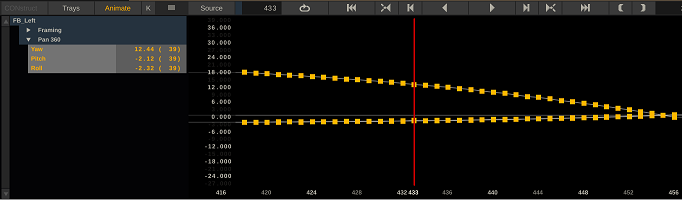
To tell a story in a 360 environment requires you to control the position of the area of attention from one shot to the next. The new 360 Pan controls (Yaw, Pitch and Roll) in the Matrix-Config-menu and Edit-Framing menu allow you to adjust the orientation of a shot. Even though the viewer has 360 degrees of freedom, you can set the default front view; (re-)center the area of attention in the equirectangular image.
Since the 360 Pan controls are animatable you can also use them for:
- stabilizing a shot or replace camera motion to spherical projection offsets.
- creating a pre-defined panning path in the 360 movie. So even though the end-viewer is able to view in all directions, you as a creator can animate a viewing path to guide the viewer.
To stabilize a shot you just open the Stabilizer module from the Config menu in the Matrix, next to the Pan 360 (framing) controls.
In the Stabilizer module you can either instantiate a single point tracker or a 2 point tracker directly on the equirectangular image.
- The data from a one-point tracker is transformed predominantly to the yaw and pitch controls. You would use this option when the motion is predominantly horizontal.
- When using a two-point tracker the tracker information is used to over all vectors: yaw, pitch and roll. This setup will capture and remove all camera motion from the shot.
As said, the Pan 360 controls are animatable. An animation is created either automatically from e.g. stabilization or you can create the animation manually by using the standard animation controls in SCRATCH together with the Animation editor where you can tweak the keyframes.
Grade and Composite
Certain effects like a blur or clarity when used on 360 material will show a seam where the two sides meet. That is because a blur effect is calculated the surrounding pixels and on the far left or right edge of the image there are no neighboring pixels. However, to calculate such an effect SCRATCH will - when media is flagged as 360 - automatically use the pixels from the opposite side, which in the 360 projection are neighboring. Using this 360 wrapping avoids creating a seam where the two sides of the equirectangular image meet.
The same seam issue might occur when using layers that do not cover the full image (circles / free form shapes) to highlight and grade only part of the image. In a 360 projection that part of the view you need to isolate might be split over the left and right side of the 2D equirectangular image. Also, when tracking an object in the equirectangular image, the object might run off the right side and re-appearing on the left side. To cope with these situations, the canvas of a Layer in SCRATCH has a Repeat 360 mode. That causes the shape when it spills over the right or left edge of the 2D image to be drawn / repeated automatically on the opposite side so that there are no seams in the 360 projection. This also applies to layers that are animated or e.g. contain one or more masks.
For all your composite needs - use the Equirectangular-2D effects node to blend any 2D element into your 360 projection.
- Adding text into your projection without showing up bent.
- Adding a logo or an image effect such as a lens flare into a 360 projection.
- Adding an image to the side of a moving element, maintaining position and perspective view in 360.
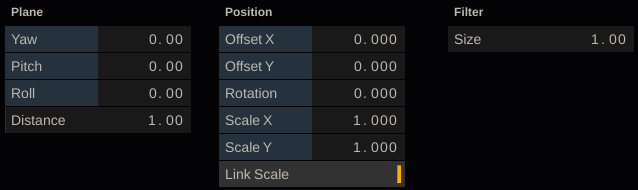
The Equirectangular-2D effect node gives you fine grained control over the position, scaling and skewing of your 2D element in your spherical projection. Applying the node is as easy as applying any other effects plug-in: create your layer, add your 2D element as a fill in that Layer and then insert the equirectangular plug-in in between.
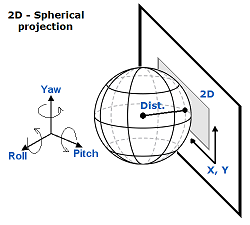
The controls of the effects node allow you to position the 2D element relative to the 360 sphere as depicted in the diagram above. The Plane controls - Yaw, Pitch and Roll - specify the position of the (generic) Plane relative to the sphere, with the Distance control determining the distance between the sphere center and the plane (default 1.0, meaning the sphere intersecting the plane in one point). The Position controls determine how and where to put the 2D element on the Plane. In general, you want to center the 2D element on the Plane as much as possible and use the Position parameters for final tweaking the 360 scene.
Once the 2D element has been positioned, SCRATCH will project / wrap the 2D image onto the sphere. Because this projection can lead to aliasing-artifacts, the effect node also provides a Filter control to counter those.
Finish
From SCRATCH VR you can render the Equirectangular media to a multitude of formats and resolutions. However you can also easily create a 2D cutout of the 360 production: first animate a path through the 360 projection, set the Field of View and then render out the 2D view to your format of choice.
This conversion can be included directly into your output pipeline from the Output menu in the CONstruct: add the VR360-2D node from the available list of outputs. Alternatively this node can also be used to composite part of a 360 (equirectangular) media into your 2D production. In that case, you can just instantiate the node like any other effects node from the Plug-in Browser.
VR Tools - Use Models
- Dailies / Review: With the addition of 360 publishing in SCRATCH VR and the 360 (immersive) viewing in SCRATCH Web, everyone on your team is not required to have heavy hardware to review media. A smart phone and a piece of cardboard will suffice!
- Post & Finish: SCRATCH VR has all the viewing options to manage 360 media in post, from Headsets (like the Oculus Rift) to 360 projections on a reference monitor or SDI projector. Furthermore, additional tools are included to assist you in the creative process of grading and compositing 360 media more easily.
- Live View: Collaborate easily between systems – e.g. hook up the SDI out of your Nuke system to the Live View of your SCRATCH system and view / grade your 360 media while wearing an Oculus Rift.
And more: In many aspects, VR is still a green field with continued pioneering for finding optimal workflows. The flexibility and functional scope of SCRATCH VR will continue to prove very useful and indispensable in that environment.