GENERAL
The Qualifier allows you to isolate a portion of the Layer image, not by its physical location on the image as you do with a Canvas, but rather by isolating portions of the image’s color or luminance range by using color qualifiers.

SCRATCH has several types of qualifiers that you can use. There are a number of qualifier types, available from the keyer type (None/Canvas) pull-down menu, just below the player controls. All of these qualifiers have a number of common elements and some specific elements.
Note: A color qualifier is applied on the shot after any selected Source Transform has been applied. See for details on Source Transforms in Chapter 07 - The Matrix.
COMMON ELEMENTS
The following are interface elements that are common to all the qualifier types.
KEY: TARGET
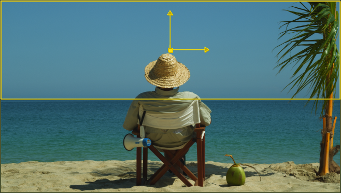
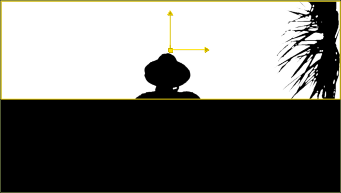
The first step in creating a Qualifier is to set the layer the keyer is be applied to. Even though the image in the Viewport shows the fully graded shot, a Key can be picked from and applied to a specific layer. You can toggle the Source button (discussed below) to the right of the color-pot to switch in the Viewport between the main image and the layer selected for the keyer.
Source
The base image without any grading.
Primary
The base image including any primary grading applied to it.
Recursive
The image including all grading and any (underlying to the current) Layers.
Tx Fill
The fill image used in the Layer
Tx Matte
The Matte image used in the Layer.
Note: When the current selected Layer already has a fill applied to it and a Qualifier is chosen, SCRATCH automatically sets the Target to Tx Fill and enables the Invert button (see below); this allows you to quickly add green-screen image to your shot.
PICK
The Pick button toggles the picking mode on and off. By default, if no Key has been set yet, the picking mode is switched on when entering the Qualifier menu. When hovering over the Viewport the cursor will change into a color-picker ( ). When holding down the Control key, the color-Pot will show the current color under the cursor. Clicking the left mouse button picks the actual Key.
Rather than selecting a single color you can also use an area select by holding down the Control key and clicking and dragging the mouse over a certain area of the image you can select a range of colors which is used to set the initial values for a Qualifier or when the C or S buttons are enabled add or subtract the selected range to the Qualifier.
|
• Quick Key: Mouse Hover
|
» Show color-picker cursor
|
|
• Quick Key: Ctrl + Mouse Hover
|
» Update color-Pot to show current color
|
|
• Quick Key: Ctrl + Left Mouse Click
|
» Pick current color as Qualifier
|
|
• Quick Key: Ctrl + Left Click + drag
|
» Select range of colors for the Qualifier
|
Note: If a key is already present when entering the Qualifier menu, the picking-mode is switched off by default to prevent accidentally overwriting of the key.
Note: While in the Qualifier menu you cannot change the position of the shape overlay of the selected Layer.
SOURCE
This button toggles the image in the Viewport between the current shot and (when enabled) the selected Key layer.
MATTE
The Matte button toggles the image in the Viewport between the current image and a black and white matte view of the key.
Note: The matte shown depends on the Qualifier Source selection
SHOW MATTE
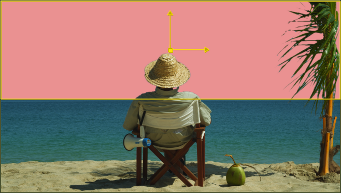
The Show Matte button toggles the on-screen display of the current Qualifier selection (see section about Qualifiers, later in this chapter) using the color designated in the color pot to the right of the button. This on-screen display shows you which pixels in the current image will be affected by the Layer. This Show Matte can also be used by using Quick Key: M.
|
• Quick Key: M
|
» Show / Hide Matte highlight
|
To select a different color for the matte, click on the color pot and use the Color Selection Palette to choose a new color.
MAKE DEFAULT
You can use the Make Default button to set a particular Qualifier configuration as the default settings. To do this, select a Qualifier and set its values to your desired defaults. Click on the Make Default button and confirm you want to replace the standard defaults with the current settings. Now when a new Qualifier is created or the Reset button is pressed, the Qualifier will revert to the new values.
GAIN
The Gain adjustment allows you to boost the value of the key signal generated by the Qualifier. This has the effect of increasing the affected range without having to change the Qualifier settings.
PRE-BLUR
The Blur adjustment allows you to apply a blur to the image as it is processed by the Qualifier. The actual image is not blurred; it’s just the way SCRATCH interprets the image. This is useful for reducing grain noise when trying to isolate particular color ranges.
EXPAND
The expand functionality allows you to make the matte grow or shrink slightly.
POST-BLUR
This button allows you to apply a Blur effect on the Matte of the Qualifier.
INVERT
The Invert button reverses the Qualifier, so that ranges other than the selected range are affected. In essence, it inverts the key signal generated by the Qualifier.
RESET
The Reset button resets the current Qualifier back to its default values.
SPILL SUPPRESSION
When the key target is a Texture (fill or matte) the Spill suppression controls become available.
Range
With this button you set the range around key-color on which the spill-suppression is applied to
Mode
There are three different modes for spill suppression:
- Recover; this tries to restore the original color of the defined range.
- De-saturate; this de-saturates the colors within the range set.
- Color; by selecting this an additional color-pot becomes available for you to select a color that is used to replace the defined range.
Note: By selecting the Color-option and selecting a high-contrast color you can view the defined range in your image.
RGB KEYER
The RGB Keyer is targeted at isolating specific color ranges based on the Red, Green and Blue color channels. When selected, a color selection pot and three color selection sliders appear, which allow you to designate the color range of the RGB Keyer. You can choose the color either by selecting colors directly off the current image, or by using the color selection sliders.
DIRECT COLOR SELECTION
When the RGB Keyer is first activated, a 50 percent gray color is selected by default. To change this color, click on the color pot, hold the mouse button down, and drag over the Viewport. Continue to hold down the mouse button, and as you drag around the image, you will be sampling values for the keyer. The results of this selection are shown using the Matte color. You can interactively drag across the image until you find a proper color. Release the mouse button and that color will be set as the base color for the keyer.
Alternately, you can click once in the color pot. This opens the color Selection Palette, which you can use to select a new base color for the RGB Keyer.
You can use the buttons on either side of the color pot to fine-tune the color range.
-S removes selected colors from the Softness range of the key.
-C removes selected colors from the color range of the key.
C+ adds selected colors to the color range of the key.
S+ adds selected colors to the Softness range of the key.
The Qualifier color can also be controlled by using the following Quick Keys:
|
• Quick Key: Control
|
» Add to the color range
|
|
• Quick Key: Shift
|
» Subtract from the color range
|
COLOR SLIDER SELECTION
In addition to selecting colors directly off the screen, you can also manipulate the RGB Keyer by adjusting the individual Red, Green and Blue color selection sliders.
Each slider has four values associated with it: Low Softness, Low Clip, High Clip and High Softness. These are represented by the four Numerical Slates on the sides of each color selection slider, and also by the four vertical markers on the sliders themselves. The area in between the markers determines the range of each color channel that will be used in the Qualifier.

To adjust a parameter you can enter a new value in the Numerical Slate, or you can interactively drag the markers on the slider. Click on an individual marker and drag it to a new location. You can also click between the High and Low Clip markers to slide the entire set of markers up and down the slider.
HSV KEYER
The HSV Keyer is targeted at isolating specific color ranges based on Hue, Saturation and Value (or Lightness). When selected, a color selection pot and three color selection sliders appear, which allow you to designate the color range of the HSV Keyer. You can choose the color either by selecting colors directly off the current image, or by using the color selection sliders.
The methods for selecting the color are identical to the RGB Keyer described above, except that instead of designating individual Red, Green and Blue color ranges, you designate Hue, Saturation and Value ranges. The color selection sliders represent this difference.

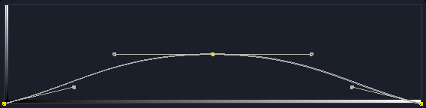
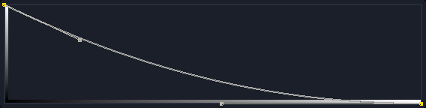
HIGHLIGHTS, MIDTONES AND SHADOWS
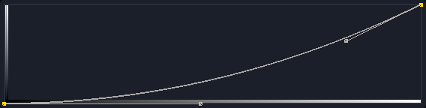
Alternately, a Layer can be Qualified based on luminance ranges, which can be adjusted for precise control. The luminance ranges are defined by the shape of a curve. The area under the curve represents the luminance ranges that are affected by the Layer. There are three options for selecting a luminance qualifier: Highlights, Midtones and Shadows. These three options determine the base shape of the curve used to define the luminance range. This curve is displayed in the Curve Window area along with Tone, Offset and Range controls for adjusting the shape of the curve. You can modify each of the controls and see the effect on the resulting curve. The horizontal axis of the Curve Window represents a complete luminance range from zero on the left to 100 percent on the right.
HIGHLIGHTS
The Highlight curve increases from left to right so that it encompasses more values at the higher end of the luminance scale.
MIDTONES
The Mid-tone curve is symmetrical so that it encompasses values equally in both directions of the luminance scale.
SHADOWS
The Shadow curve decreases from left to right so that it encompasses more values at the lower end of the luminance scale.
TONE
The Tone control affects the amount of curvature the curve will have. Higher values flatten the curve closer to a straight line.
OFFSET
The Offset control adjusts the curve’s position left or right. This has the effect of including or excluding certain luminance ranges from the qualifier.
RANGE
The Range control scales the curve around the zero black point, which is the left edge of the curve window. This isolates the curve to a larger or smaller section of the luminance scale.
CHROMA KEYER
The Chroma Keyer is especially useful for blue/green-screen footage. It isolates a part of the image by comparing its color channels. When you pick a color its dominant primary color is used as the reference channel. The level of dominance over the other channels determines the alpha of the matte. Where either of the recessive colors exceeds the reference channel the matte’s alpha will be zero.
GAIN
The matte’s alpha channel is multiplied by the gain value. When picking a color the gain is set as such that the resulting matte will have full alpha at that color.
SUB SCALE
The sub-scale parameter changes the scale of subtraction. With a sub-scale of zero there is no subtraction and the resulting alpha will be equal to the reference channel for the whole image.
POSITIVE / NEGATIVE
The effect of the positive and negative values is similar to the sub-scale parameter. But these values only influence the subtraction scale of one color instead of both.
DENSITY
The Density setting changes the proportions of the recessive color’s weight.
VECTOR KEYER
Finally the Vector Keyer allows you to isolate a range of colors based on color vectors. You can change the direction of the base vector using the Pick button. The Hue and Saturation of the picked color determine the direction of the vector. You can further define the inclusion area around the vector using the following parameters.
RANGE
The Range parameter is basically an angle setting that defines the size of a selection cone around the base color vector. All color vectors within this cone are added to the selection. When set to zero, only the base color is selected. At ninety all colors will be selected.
SHADOW / HIGHLIGHT
The Shadow and Highlight parameters cut off the darkest and lightest tones respectively. Both values range from zero to one, cutting off none and all respectively.
SOFTNESS
Range, Shadow and Highlight all have a separate Softness value. Using the softness value will result in a falloff for the associated parameter.