CREATING THE CANVAS
The Canvas is the surface on which a Layer operates. You can use the Canvas to affect the entire image or designate a portion of the image to be affected.

By default a Layer has a rectangular shape that matches the solution of the current image. There are two ways to designate the shape of the Canvas: through the Shape pull-down menu just below the player controls or by using the New button.
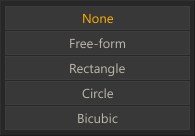
SHAPE PULL-DOWN
The Shape pull-down has five options: Default, Free-form, Rectangle, Circle and Bicubic.
Default
The Default option reverts the shape back to its default rectangular shape.
Free-Form
The Free-form option switches to the Free-form shape creation mode. The SCRATCH cursor switches to a green cross-hair when placed over the Viewport. In this mode, you can click in the Viewport to create control points that define the shape of the Canvas. Each time you click, a new control point is created. To close the shape, click on the first control point again, or click on the Close button in the menu.
Note: The control points can be edited once the shape has been completed. You cannot edit the control points while the shape is being created.
Tip: Once a Canvas shape has been created, SCRATCH interprets it to be a Free-form shape, regardless of how it was initially made. This allows you to use the same editing tools on any Canvas shape.
Rectangle
The Rectangle option automatically creates a rectangular canvas that matches the resolution of the current image.
Circle
The Circle option automatically creates a circular canvas with a diameter that matches the horizontal or vertical resolution of the current image, whichever is smaller.
Bicubic
The Bicubic option automatically creates a rectangular canvas that matches the resolution of the current image. This option differs from the other rectangular option in that the Layer get options for doing a deformation rather than just scaling and resizing. Later in this chapter the Bicubic option and deformations are discussed in more detail.
SEGMENTS
Set the number of segments for a Bicubic shape. Bicubic shapes and deformations are explained in more detail later in this chapter.
Z-DEPTH
The Z-Depth button determines whether the selected Layer is layered using its position within the 3D Camera’s Z space or by its order in the Layer List. With Z-Depth deactivated, the Layer’s order within the Layer List determines the layering priority. With Z-Depth activated, the Layer’s Z position is evaluated with all other Z-Depth-activated Layers to determine layering priority and intersections. Z-Depth can be set for each individual Layer independently.
Note: The Camera Depth must be enabled in the Camera menu in order for Z-Depth to be evaluated.
EDITING THE CANVAS
NEW
The New button removes any current canvas and switches to Free Form creation mode.
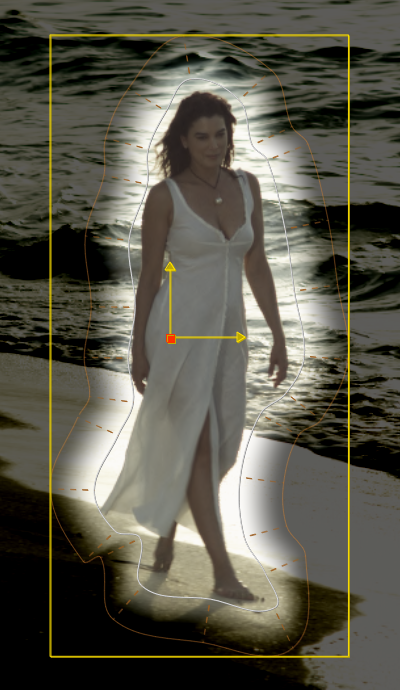
AXIS
When the Axis mode is active, the selected Canvas is surrounded by a bounding box, and a central axis indicator appears within this bounding box. These on-screen manipulators can be used to control the scale, rotation and position of the Canvas. See the section on TRANSFORMATIONS later in this chapter for details about how to manipulate the Canvas.
You can use the Quick Key: E to toggle between Axis and Edit mode.
|
• Quick Key: E
|
» Toggle Edit and Axis Mode
|
EDIT
Activating the Edit mode allows you to adjust each individual control point on a Canvas shape. Each control point has a main point and two handles; these can be used to adjust the curves behavior through the main point. You can click on any of these points and move them.
Note: If a Canvas shape has a Softness value, the control points for the Softness appear in the Edit mode as well. These points can be manipulated independently from the main shape control points. See the section about SOFTNESS later in this chapter for more details.
Tip: When the Edit mode is active, you can temporarily switch to other mode, such as Add, Break and Join by pressing the mode’s corresponding Quick Key. When you release the Quick Key you are returned to the Edit mode.
Note: When a Free-form shape is being created, the Edit button is replaced by the Close button.
ADD
When the Add mode is active, clicking on the Canvas shape curve creates a new control point for the shape. The SCRATCH cursor changes to a green cross-hair to indicate you are in Add mode. Each time you click while in Add mode, you add a new point until the mode is deactivated.
You can use the Quick Key: A to activate the Add mode; keep key pressed to maintain mode.
|
• Quick Key: A
|
» Add Mode
|
Tip: When you first click to add a new point and hold down the mouse button, you can manipulate the point without switching to Edit mode. Once the mouse button is released, clicking again adds a new point.
DELETE
When the Delete mode is active, clicking on a Canvas shape control point, or a control point’s handle, deletes the control point from the shape. The SCRATCH cursor changes to a bright red cross-hair to indicate you are in Delete mode. Each time you click on a point while in Delete mode, the control point and handles are deleted.
You can also place the cursor over a segment of the Canvas shape curve between two control points. This deletes the control points associated with a curve segment, rather than deleting individual points.
There is no Quick Key for Delete mode.
BREAK
When the Break mode is active, clicking on a control point or its handle breaks the tangency and allows each handle to move independently from one another. This allows you to create sharp angles in the Canvas shape.
To break the tangency of a control point, click once on either the control point or a handle. The curve does not change, but the next time the handle is moved, it will be independent of the other handle. You can manipulate control points and handles while in Break mode, without returning to Edit mode. However, each control point or handle you click,will have its tangency broken. Once a control point’s tangency is broken, it remains that way, unless it is restored using the Join mode.
You can use the Quick Key: B to activate the Break mode; keep key pressed to maintain mode.
|
• Quick Key: B
|
» Break Mode
|
JOIN
The Join mode allows you to restore tangency to control points that have had their tangency broken, when using the Break mode.
To join the tangency of a control point, click on either the control point or one of the handles. The curve adjusts so that it connects smoothly between the adjacent control points.
While in the Join mode, you can manipulate control points and handles without returning to Edit mode. However, each control point or handle you click will have its tangency joined.
You can use the Quick Key: J to activate the Join mode; keep key pressed to maintain mode.
|
• Quick Key: J
|
» Join Mode
|
INTERPOLATION
The Interpolation state, represented by the L/C button, allows you to toggle each control point between two states,Linear and Curved. By default, each control point is created as a curved point, meaning that it has handles to control how the Canvas shape curve passes through the control point. Switching a control point to Linear means there are no handles, and the curvature through that control point cannot be adjusted.
You can also place the cursor over a segment of the Canvas shape curve between two control points. This toggles the state of both control points at either end of the curve segment at the same time.
The Interpolation mode remains active until another mode is selected.
Tip: When you click to change the state of a control point, and hold down the mouse button, you can manipulate the point without switching to Edit mode. Once the mouse button is released, clicking again changes the state of the control point.
You can use the Quick Key: I to activate the Interpolation mode; keep key pressed to maintain mode.
|
• Quick Key: I
|
» Interpolation Mode
|
TRANSFORMATIONS
Each Canvas shape has parameters for Translation, Scale, Rotation and Pivot. These values are shown in the Numerical Slates on the Canvas menu.

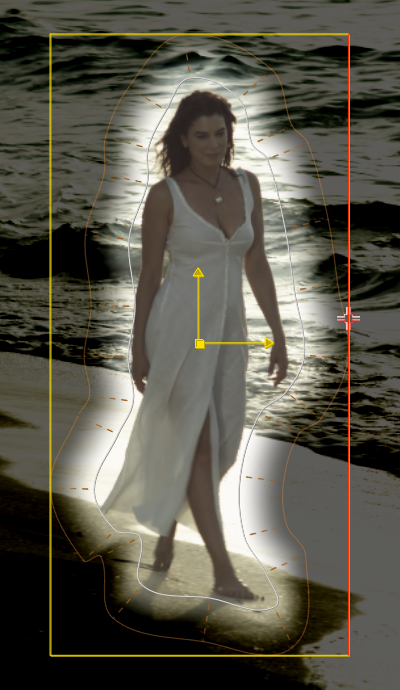
You can adjust the numerical values of any of these parameters at anytime, regardless of which Canvas mode you are in. When the Axis mode is active, the transformations can be controlled through on-screen manipulators. A bounding box surrounds the Canvas shape, and an Axis indicator shows the location of the current Pivot point.
TRANSLATION
Translation is the X, Y and Z position of the Canvas on the image. To change the Canvas position, place the cursor within the bounding box of the Canvas shape. The cursor changes to the translation cursor:  . Click down with the left mouse button and drag the Canvas to a new location. You can drag the Canvas in any direction.
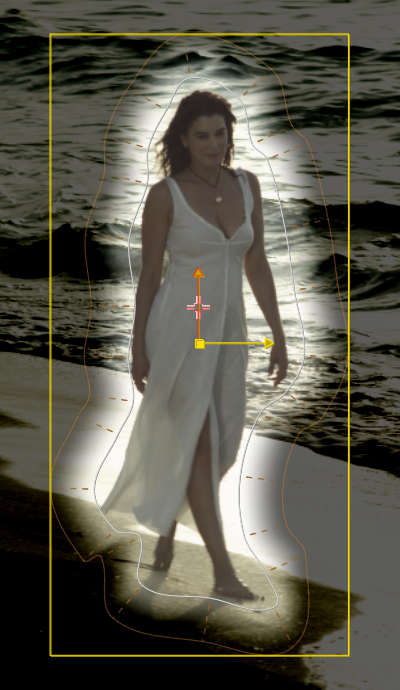
You can also place the cursor directly over one of the arms of the Axis indicator. The cursor changes to the point manipulation cursor;  .
.
SCALE
Scale controls the size of the Canvas relative to its original creation size. To interactively change the scale of a Canvas, place the cursor over one side of the bounding box surrounding the Canvas. The cursor changes to the point manipulation cursor; the side of the bounding box will be highlighted. You can then click and drag to change the scale of the Canvas relative to the side of the bounding box you’ve selected. You can also click on the corner of the bounding box to modify both X and Y scaling at the same time.
Tip: Hold down the Quick Key: Shift before you click and drag to perform a proportional scaling. Proportional scaling is always done using the Pivot point as the center of the scaling.
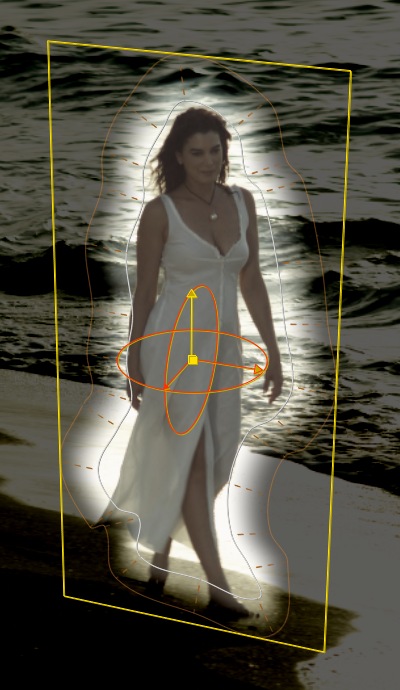
ROTATE
Rotation controls the orientation of the Canvas about its pivot point. You can interactively change the rotation angle by placing the cursor over the tip of one of the Axis arms. A circle appears around the Axis indicator. With this circle present, click and drag to change the rotation angle of the Canvas.
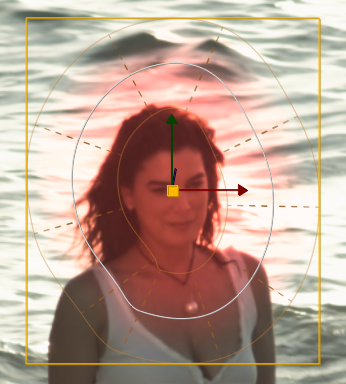
PIVOT
The Pivot point determines the center for scaling and rotation adjustments to the Canvas. The Pivot is also used as the base point for all translations as well. Adjusting the Pivot point by using the Numerical Slates modifies the position of the Canvas. You can also modify the Pivot point interactively by placing the cursor over the center of the Axis indicator. The center point will highlight and you can then click and drag the Axis to a new position. The Pivot and Translation values are both updated to reflect this change, but the overall position of the Canvas is not altered.
Note: All of the Transformation parameters can be animated over time using the SCRATCH Animation functions. See the section on ANIMATION in Chapter 7 for more details about how to animate parameters in SCRATCH.
SOFTNESS
The Softness parameters allow you to create a more seamless transition between the Layer and the image below. By increasing the Softness, you can smooth the edge of the Canvas shape.
SOFTNESS
The Softness parameter determines how far away from the Canvas shape the softness effect will extend. When softness is added, a second line appears around the Canvas shape to indicate the boundary of the softness effect.
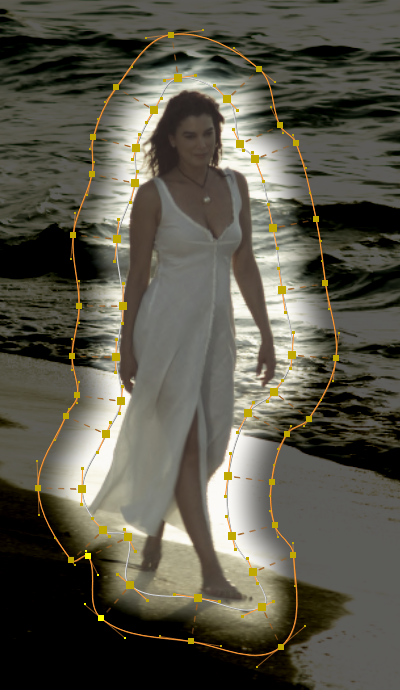
In Edit mode, each control point has an associated softness point. Each softness point is tied to a control point and is added or deleted along with the control point. The softness points can be repositioned independently from the control points while in the Edit mode.
2 SIDED
The 2 Sided option spans the Softness both outward and inward the Canvas shape. This works for any type of shape, however there are different limitations as to how far inward you can go and the effect of extending the inward shape has. For a rectangular shape the inward shape is limited to half the diagonal of the rectangle. For a circle shape the inward shape can be extended all the way to the center of the circle. for Free form shapes there is no real limit, which means that at some point the inward shape inverts on itself.
An important thing to note with free form shapes it that the Softness option might lead to artifacts in case of sharp angles. This is true for both single sided and 2 sided Softness but might occur more often with the 2 Sided because the inward shape vertices are closer together. In certain cases you can get rid of these geometry-artifacts by adjusting the handles of the vertices and as such adjusting the angle a bit. In other cases you might consider use a blur effect rather than softness. The Blur effect (either from the Canvas menu or the Matte Blur in the Texture menu discussed later) are not based on the geometry of the shape but rather on the individual pixel values. As such the Blur operation is also more costly in terms of system performance.
LINK
When Link (softness) is activated, moving a control point on the Canvas shape moves the corresponding softness point by the same amount. This allows you to quickly manipulate a shape without going back to re-position all the softness points as well. Even with Link Softness active, a softness point can be re-positioned relative to the associated control point. It’s only when a main control point is moved that the associated softness point is moved along with it.
SMOOTH
By default the soft-edge filter uses a Gaussian fall-off function to create a more even transition from the Canvas to the image below. The Smooth option button is for backward compatibility. When switched off, the softness function uses a linear interpolation function which was implemented in an older versions of SCRATCH. With the linear function, two additional parameters become available to fine tune the linear fall-off function, by implementing additional gain and gamma to the fall-off.
USE BLUR
If both the Softness and the Smooth options do not yet give you the effect you are after, you can also enable the Blur option. This will apply an additional Blur effect on the pixels in the canvas to push the soft edge a bit further. Note that this is a on/off option. If you want full control over the blur, you can use the blur options in the Texture menu, discussed later in this chapter. Be aware that the pixel based Blur function is a more expensive operation on the GPU processing than the geometry based Softness and Smooth functions.
INVERT
The Invert button switches the Canvas, so that any color adjustments are applied outside the Canvas shape, instead of the default inside the Canvas shape.
OPACITY
The Opacity value determines the level at which a Layer is mixed with the other layers. By lowering the opacity of a layer you, can decrease its visibility. The Opacity control in the Canvas menu can be animated using the animation controls. More information about Opacity and Blending modes for Layers can be found in paragraphs on Layers interactions and Texture, later in this chapter.
RESET
The Reset button reverts all the Transformation values back to their defaults.
DEFORMATIONS
Selecting a the Bicubic option in the Shape drop-down will create a rectangular shape with a raster of control points. The number of control points is set with the Segments button.
When switching the Canvas to Edit-mode the raster and control points become visible and you can deform the image by dragging the points.

Note: The Texture mapping mode for the Bicubic shape is always set to Pinned. Texture mapping modes are explained in more detail later in this chapter.
The same way as with a Free Form shape, you can add and remove control points along the raster, using the Add and Delete buttons.
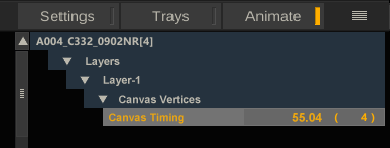
CANVAS VERTICES ANIMATION
Rather than a single animation channel per vertex (as was the case in older SCRATCH versions), SCRATCH maintains a single Canvas Timing channel.
With this you can control the timing, pace and speed of the animation of the Canvas. Settings the y-value to a value greater than the x-value will speed up the animation. Vice verse, a y-value smaller than an x-value will slow it down. To move the animation as a whole you switch to Global mode and move all key-frames along the x-axis. To adjust the absolute position of a vertex you move the Player play position to the specific key-frame and re-position the vertex in the Viewport.