GENERAL
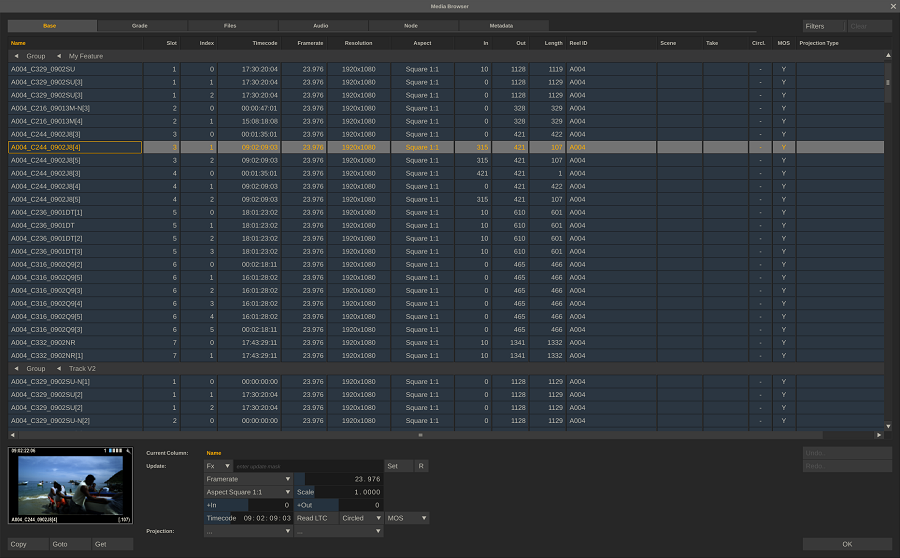
The Media Browser displays a list of all Shots in the current project and allows for easy searching, sorting and filtering of clips as well as the ability to modify the properties of multiple clips at once. The Media Browser is opened with the corresponding button on the main menu bar of the Construct.
The Media Browser has a number of different views which can be selected from the tab-controls at the top of the dialog:
- Base: shot basic metadata and Construct position,
- Grade: information on shot grades and management of source remapping and grading LUTs,
- Files: show shot media path and re-link shots if media was moved ,
- Audio: show audio linked to shot and functions to automatically match and link shots with audio files,
- Node: manage all media-type specific properties - e.g. debayer options,
- Metadata: show and manage all (extended) meta data of shots.
Next to the different views there are a number of common functions that are available from any of the views.
COMMON FUNCTIONS
DATA GRID
The Data Grid displays the list of shots given the active filters and sort. The first four columns shown are the same for all views: Name of the shot, the Slot- and Layer-index where the shot resides and the shot's time-code. Initially, the grid shows all shots in the project, grouped per project-Group and -Construct. This grouping is shown through the raised grid rows (Grouping Bars) with the name of the Group and Construct.
The grid can be sorted by clicking on one of the column headers. The first click will select the columns. A second click will sort the column alphabetically in ascending order. A third click sorts the column in descending order and a fourth click will revert to the original order. Note that any sorting will remove the grouping per Construct.
The Grouping Bars can be used to filter out other shots. Clicking on the Construct name in a bar will hide any shot in the filter that is not on the particular Construct. The arrow on the Grouping Bar next to the name of the Construct will point down. Clicking the Construct name again will remove the filter and show all shots again.
You can resize any of the columns by click + drag in between the grid headers. SCRATCH will remember the size as a user setting.
When a single shot is selected in the Media Browser, a thumbnail image of that shot is shown in the lower left corner of the dialog. There are a number of short-keys to extend a selection to include multiple shots.
|
• Quick Key: Control + A
|
» Select all rows
|
|
• Quick Key: Control + D
|
» Deselect all rows
|
|
• Quick Key: Control + Left Mouse Click
|
» Add or remove row in selection
|
|
• Quick Key: Shift + Left Mouse Click
|
» Select all rows between selected row and current selection
|
|
• Quick Key: Spacebar + Left Click and Drag
|
» Pan through the Event Grid
|
Note that when you open the Media Browser from the Construct, SCRATCH preserves the selection of shots you made in the Construct into the Media Browser. Vice versa, selected shots in the Media Browser will be selected when closing the Media Browser and returning to the Construct (provided that the shots were in the current Construct to begin with).
FILTER AND SEARCH
Next to the basic filter functionality offered through the grouping bars, the Media Browser offers a more extensive filter and search function. Clicking the Filter button at the top right of the dialog will display an additional row of control above the Grid.

Depending on the column type you can enter a value which is used to filter shots. A column with text-values will also allow the use of wildcards (*,?,[]).
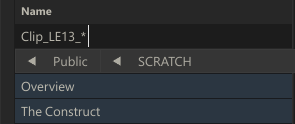
A timecode filter will include a shot when the timecode set in the control is between the In and Out timecode of that shot. Other filter controls take their value from the grid selection; selecting a row will update the value of the control. The filter is (de)activated by clicking the control itself.
The grid column header will show whether the filter on that column is active, even if the filter controls are not visible. The Clear button next to the Filter button in the lower right corner of the Media Browser dialog removes all filters.
EDIT GRID
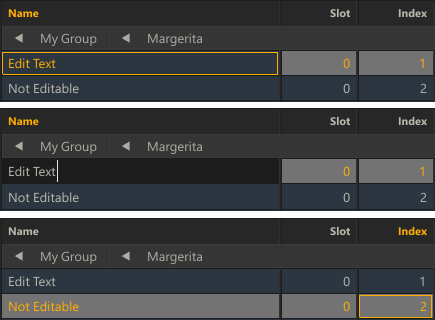
The values in most of the cells in the grid can be edited directly by clicking the selected cell - the cell will then switch into edit mode. Note that clicking the cell in the Timecode column will pop-up a calculator to update the value.
However, not all cells can be edited directly. E.g. the slot position a shot resides can not be altered from the Media Browser. If a cell can not be edited then the background color of the selected cell will remain highlighted - as displayed in the third image below.
To update multiple rows at once you use the controls provided by the different views, under the grid.
OTHER GENERAL BUTTONS
Copy
Copy the selected shots into the SCRATCH Copy buffer. The copied shots can be placed in a Construct with the Paste Shots button in the main Construct menu.
Goto
Close the Media Browser and switch to the Group and Construct of the selected shot in the Clip Grid.
Get
Makes a copy of the selected shots and attaches them to the cursor. You can then close the the Media Browser and place the attached shots on a different Construct/slot.
Undo / Redo
The Media Browser has its own undo-stack. This means any changes you made since you opened the Media Browser can be undone. After closing the Media Browser the changes are permanent. This also means that any changes in the Construct you made before opening the Media Browser can no longer be reverted after you have exited the Media Browser and returned to that Construct again.
With any Undo / Redo, SCRATCH will update the shot selection to show which shots are involved with the undo.
Close
Closes the Media Browser. The current state of the Media Browser is maintained as long as the current project is loaded.
FX
On several views in the Media Browser you can create a so called search / match mask, using an FX button to add #-codes to the mask.

Rather than using a fixed text to be used in a search or matching operation you often can use a naming-mask, which contains one or more #-codes that are translated for the current shot that is processed. So rather than using 'abcd' to update the name of a number of shots I can use '#reelid_#res' which would then translate for each shot differently to e.g. 'A004_1920x1080'.
The FX option drop down presents you with the available #codes. Selecting one will add them to the current position in the corresponding text slate. The available #codes have been listed earlier in this chapter when discussing the Output nodes.
LOOSE MEDIA AND TRAY SHOTS
Typically in a project most shots are placed on a Construct. When opening the Media Browser all these shots are initially grouped based on their location: Group and Construct. However, shots that are used as a texture or matte on another (composite) shot are grouped in a special section in the Media Browser: Loose Media. Also shots that are located in one of the Project Trays (see Chapter 7 - The Matrix) are initially grouped with that Tray. Note that all of these shots do not have Slot and Version index number in the respective columns. For the rest though, these shots are treated the same as shots that are directly placed on a Construct.
MEDIA BROWSER VIEWS
BASE
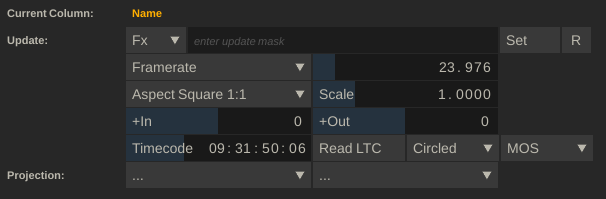
The Base View shows the shot's Framerate, Resolution, Aspect Ratio, In- and Out- points, Length, Reel ID, Scene and Take. Some of these values can be edited directly by clicking the corresponding cell in the grid. Alternatively the values can be adjusted for all selected clips at once using the controls below the data grid.
Mask Update
Using the FX button and corresponding text slate you can update the current selected column for all selected shots (rows) at once. Once you entered an update mask - press the Set button to update the shots. Note that some of values can be reset - using the R button - to their default state which is read from the underlying media. This option is available for the reel-id, scene, take and timecode fields. For other fields only the undo is available to revert a prior change.
Note that the last update mask used will automatically be maintained in the project over sessions. To set a default mask for all projects use the Mask for media browser clips in the Advanced setting.
Other Controls
- The Framerate can be set from the option list or using the numeric control.
- The Aspect ratio has a number of presets. When selecting 'Custom', the Scale numeric control is enabled and can be set to a non-standard aspect ratio.
- The In and Out columns represent the absolute in- and out- frame positions of a clip. The +In / +Out edit controls add or subtract the actual number of frames (rather than in previously versions re-calculate the values to increase / decrease the handles of a shot). If you click an individual In or Out position in the data-grid, the calculator panel will pop up. Note that you can not set the Length value (in the data grid) directly.
- Batch update the Timecode of all selected clips.
- The Read LTC option checks each selected clip for audio and tries to extract the timecode from the first audio channel.
- The Circled and MOS options update the Circle-Take and Mit-Ohne-Sound metadata properties of the selected clips.
- The Projection controls set the image projection (normal / 360 projection modes) and a possible stereo pattern.
GRADE
The Grade View allows you to update the colorspace settings and LUTs used of the selected shots as well as batch export grades of the selected shots

Color space
The Color and EOTF dropdowns update the colorspace and gamma space of the selected shots to one of the predefined values.
LUT Management
The Reset Source/Grading LUT buttons will clear the corresponding LUT references from the shots. Note that only the LUTs applied on the primary grade are removed/reset. Any grading LUT on a layer will remain untouched.
The middle section of the controls allow you to load and apply a LUT onto the selected shots. Using the top drop down you decide to either load a single LUT or grade file and apply that to all shots or to start a matching operation where you try and match a LUT or grading file to a shot based on a search mask.
Using the FX control and the corresponding text slate you create a search mask to be used to match a LUT or grade file with a shot. E.g. if you have a folder with LUT files which are name using the scene and take designation - you can use a '#scene_#take' mask so SCRATCH will match the correct LUT with the correct shot.
With the Apply As option you determine to link the LUT in the Source Mapping section or as a Grading LUT. Note that CDLs or SCRATCH propriety grading files are just processed into the shot color settings and not referenced. Use the Load button to select the specific LUT/CDL or select a folder where to search for matching LUT/CDL files based on the search mask you entered.
LUT Export
The control section to the right allows you to export a LUT or grading file for each selected shots. First you set the export type from the Format options: 1D LUT, 3D LUT, CDL or SCRATCH grade file. Next, use the FX control and corresponding text slate to set the naming-mask to be used to create the filename for each exported file. If you leave the mask empty, SCRATCH will use the global unique identifier of the shot for the filename. Finally, use the Save button to select the folder where to save the export files.
Clean
The Remove Empty Layers option batch processes all selected shots and removed any layers from the color settings that only have a canvas but not fill/matte/color settings tied to them and as such do not add anything to the clip image.
FILES
This View displays the path and filename of the shot's underlying media track and has a number of functions to manage and validate the underlying files of the selected shots: the media (images), the (linked) audio and the LUT files used.
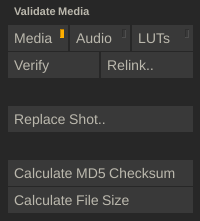
Verify Media
After selecting one of the three media targets (media, audio, LUTs), the Verify function checks if the physical files underlying the selected shots exists. If SCRATCH can not locate the referenced media (e.g. because it has been moved, renamed or the drive is temporary not available etc.) the filename is shown in red.
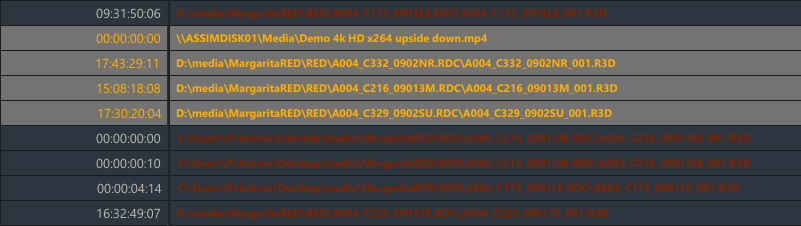
When verifying audio or LUTs, SCRATCH will display the linked files for the current selected shot in the Media Files section under the main data grid. A single shot can reference multiple audio and / or LUTs files. The results of the Verify function for individual shots are displayed in the #Audio / LUT column that shows how many references where found / could not be verified.
Note that Verification is a manual process and that SCRATCH does not automatically verify all the media upon loading the project as this would take a substantial amount of time that would slow down opening a project.
Relink Media
The Relink function lets you repair broken media references of the selected shots. You first select a folder that is used by SCRATCH as a base from where it searches for the file(name) of the referenced media images/audio/LUT). If SCRATCH finds a file with the same name in that folder or sub-folder below it, the media reference of the shot is updated automatically.
Replace Shot
The Replace function only applies for the current shot and allows you to replace the main image file(name) reference of that shot. This can be used when the underlying filename has changed. Note that the underlying file needs to be the same type as the current reference. You can not replace a dpx reference with a QuickTime reference.
Calculate
Calculate an MD5 Checksum or the total File Size and add the values as meta data items to the shot. This data can then be used for e.g. reporting purposes. Note that calculating an MD5 hash can be a lengthy procedure and as such this action is added as an entry to the process queue and performed in the background.
AUDIO
In the Audio View of the Media Browser you manage various audio properties and create links to audio for the selected shots.
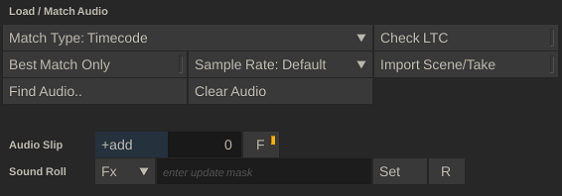
Using the Match Type option you either match audio files with shots based on timecode or on filename. Once you selected the appropriate method, use the Find Audio button to open a Browser to select the folder with
the audio files. After selecting the folder, SCRATCH will start the match
process and update the selected shots. The Clear Audio button will remove any audio reference present with the selected shots.
Timecode matching
Timecode matching only works for audio files that contain a timecode, like Broadcast Wave (bfw) files. If the timecode (plus length) of the audio file overlaps with the time-code (plus length) of the shot, the audio file is considered a match. A slip value for the audio is calculated based on the difference of the timecode of the shot and audio. The matching process has these additional settings.
- The Best Match Only option ensures that only one audio file is linked to any shot: that is the audio file with the most overlap with the shot. If this option is off - any audio that has overlap with the shot is linked to the shot.
- For calculating the overlap / slip of an audio file and the shot, SCRATCH uses the timecode in the audio file which is based on the sample rate used. In certain cases you might want to use a different sample rate for calculating the timecode and subsequent slip. The Sample Rate option allows you to set a sample rate override. Note that in case of a shot with 23.976 drop-frame frame rate, SCRATCH already uses an automatic override. If the audio file indicates a sample rate of 24, 48 or 96 kHz, SCRATCH will automatically use 24024, 48048 or 96096 respectively to compensate for the drop-frame. To switch off this default behavior you can enable the Advanced Preference variable Audio: Disable sample rate override. Also note that this is purely for calculating the audio timecode and slip - not for playback.
- The Import Scene/Take option, when enabled, takes any available scene/take metadata from the audio (BWF) file and applies those to the matching clip.
Filename matching
When selecting this option, you can enter a search mask using the FX control and the corresponding text slate. Similar as explained for LUT files - SCRATCH will translate the mask and match that with any audio file found. Note that when a match is found, SCRATCH can automatically apply a slip based on the shot on-point by enabling the 'Add slip on filename mask' advanced setting. By default the slip is 0.
Audio Slip
The slip control you can adjust the audio slip for the selected shots. Note that the slip control adds a delta to the existing slip and does not set an absolute value. Disabling the F button next to the Slip control will show the slip value in milliseconds rather than in frames; both in the Grid column as for the Slip control.
Sound Roll
Using the FX control and corresponding text slate you can update the Sound roll audio property. This meta data property is just for informational purposes only and is not being use for processing. Both the sound roll and audio timecode are exported / imported with an ALE.
NODE
The Node tab in the Media Browser exposes shot type specific controls and allows you to update properties of multiple shots of the same type at once.
- The particular set of controls that are displayed depends on the shot type in the selected row in the grid.
- If multiple rows are selected - the top selected row determines the shot type.
- When changing a control value - all shots of the same type as the top shot in the selection are affected. If e.g. the top three shots in a selection are r3d but the selection also contains arri shots - only the r3d are affected.
- This section does NOT use the Apply Changes method. Any control update is directly applied on the selection. There are however Undo/Redo options available on the far right of the control section.
- The main purpose of this section of the Media Browser is to have an easy way to update the decoding settings for shots of specific media types like RED's r3d, Sony- and ARRI Raw. The columns displayed in the data grid are related to this purpose.
- However, although the grid columns displayed are fixed, SCRATCH will expose the control of any shot type, including all SCRATCH included plug-in nodes (see Chapter - Process and Plug-ins) or a third-party plug-ins. Be aware though that plug-in properties can not always be updated in batch. For effect plug-ins we encourage you to use the copy-paste forward method - discussed later in the manual - to update multiple shots at once.
- The Reset Selected button on the far right of the view allows you to revert all the control settings to their default for the specific media type.
METADATA
The media from various new cameras contain a lot of metadata. The Metadata view of the Media Browser allows you to view or update this data as well as create additional metadata.

Current Column
Display the current selected column that can be updated using the Fx and Set controls. Note this only applies to the metadata columns specific for this tab (not generic columns displayed 'names' - 'notes'). You change the selected column by clicking the column header or selecting a specific cell.
Position
Change the position of the current selected column to the right or left. Note that metadata columns can not go left of the generic columns ('notes').
Update
Update the current column for all selected shots / rows. You enter the new value in the Update text slate. Optionally you can use the FX control to add #codes and create an update mask. Click the Set button to update the values.
Delete Column
Remove the metadata item for all selected clips and remove the column from the current view.
Shot Notes
the Shot Notes controls are similar to the controls in the Media menu
of the Construct and allow you to add notes to all selected shots at
once.
Select Columns
When opening the view the first time, no metadata is shown in the grid other than the standard columns of the Media Browser. To view additional metadata you click one or more items from the Select Columns list. If you click an item in the list, an additional column is added to the the data grid.
This list displays all the metadata items available with the first selected shot as well as any prior selected items. Note that if that shot happens to be an ARRI shot, the list will show the names of all ARRI metadata items. If the first selected shot happens to be a dpx shot, the list is probably empty as this format does not have any extended metadata items.
The Clear Selection button removes the selection. The data grid will only display the standard Media Browser columns.
Create Column
Next to selecting existing columns, you can also create a new metadata item column. Once you entered the name, click the Add button and a new column is added. Note by this time you have not created any new meta data item with a shot. Only when you enter a value into a cell in that column, SCRATCH will create a metadata (name-value pair) item for the shot.
Save and Load Column Templates
Next to creating a custom column selection every time you enter the Media Browser, you can also use Column List Templates. After you selected 1 or more columns enter a label in the Save Template text slate and click the Save button. The new Template is added to the Load Template pull down list. Next time when you enter the Media Browser you can select a template from the list and hit the Apply button. The Remove button deletes the current selected template in the pull down.
Note that column list templates are also used in certain media Reports that you can generate in SCRATCH.
Reset Selected
The Reset Selected button on the far right will force SCRATCH to re-read all metadata from the underlying media files. All metadata that was added manually is cleared!