GENERAL
Use the Import Clips button in the middle of the menu bar in the Construct to load one or multiple shots at once into the current timeline. Each shot is represented by a thumbnail image and can be interacted with in several different ways.
SHOT THUMBNAILS
The thumbnail image of a shot in the Construct is a real time generated proxy of the original image. As a result, the thumbnail image is always an accurate representation of the original shot.

ACTIVE ZONES
The thumbnails have a number of Active Zones that allow you to interact with the shot.
Shuttle Zone
The very top area of the thumbnail is a shuttle zone that allows you to shuttle through the frames of each shot by clicking and dragging at the top of the shot thumbnail. This displays a silver Shuttle Bar that represents the current shuttle position within the entire clip.
Pick-up Zone
Clicking in the center area of the thumbnail picks up the shot and attaches it to your cursor. Once attached to the cursor, shots can be moved, copied and deleted. The User Interface is not locked out once a shot has been attached to the cursor. For example, you can create new Constructs, Groups, or perform other actions with the shot attached.Some functions in SCRATCH only become active once a shot has been attached to the cursor.
Information Zone
Clicking in the shaded bar at the bottom of each shot opens up an Information Panel that gives you access to the shot meta data. Shot meta data is discussed later in this chapter.
THUMBNAIL OUTLINES
The colored outline around each thumbnail provides you with information about the clip and its current status.
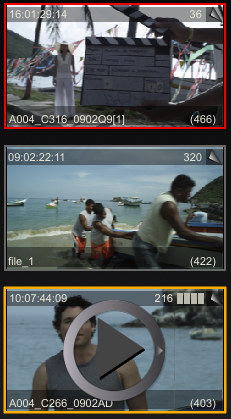
The bottom row of clips - the Timeline clips - always have a white outline around them to indicate that they are the clips that will be played by default. This is an easy way to identify the Timeline clip in a slot that has been slid up or down. Selected clips - whether on the bottom row or not - have a thicker outline using the selection (orange) color.
When you first select a clip a Play icon appears inside the proxy image which will fade out after a few seconds. If you click the shot twice, you open the SCRATCH Player - on that position in the timeline with that shot selected (wheter this is a bottom shot in the slot or a version).
The normal or non-selected outline of a clip indicates whether a clip is Local or Remote. Local clips have a gray outline around them. A Local clip is a clip that has been loaded from within the current Project’s Media Directory. Local clips use the Media Directory as a relative starting point to find the associated media file. They always remain connected as long as the media files maintain the same location relative to the Project’s Media Directory, which can be changed at any time in the Project Settings Menu on the Start up Screen.
Remote clips have a red outline around them. Clips that are loaded from outside the current Project’s Media Directory are considered Remote since they use an absolute path to the associated media files. As a result, if a Remote clip’s media files are moved from that absolute location, the connection within SCRATCH will be lost.
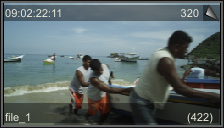
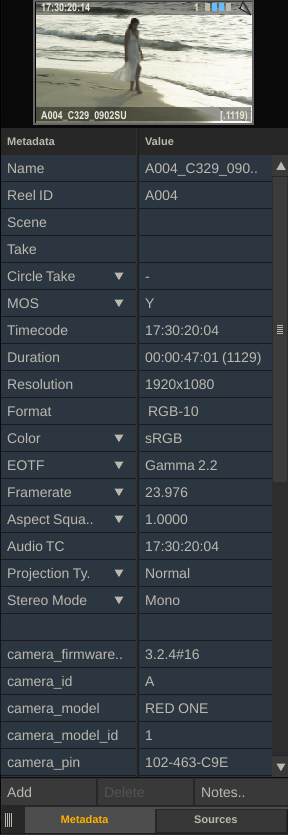
TIMECODE INFO
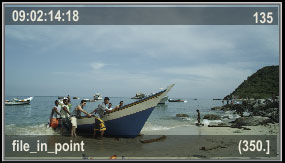
In the upper-left corner of each thumbnail the Timecode of the current thumbnail frame is displayed.
CURRENT THUMBNAIL FRAME
In the upper-right corner of the thumbnail is the current frame counter. This indicates what frame of the current shot is being shown in the thumbnail. This number is an absolute count from the beginning of the shot.
SHOT NAME
The lower-left corner of the thumbnail displays the Shot Name. This is set initially based on the name of the files that are being used as the source for the shot. However, the Shot Name can be changed at anytime through the Information Panel.
TOTAL FRAMES
The lower-right corner of the thumbnail displays information about the IN and OUT points that are marked on the shot. The value indicates the number of frames between the IN and OUT marks. The brackets on either side of the number are a quick indicator of where the IN and OUT marks are located relative to the first and last frames of the shot.
If the IN and OUT marks are at the first and last frame of the shot,the total frame count has parenthesis on either side like this: (403)
If the IN or OUT marks have been moved to a different frame within the shot, either through an EDL conform or manually, then a bracket and dot indicate there are additional frames available either before or after the IN and OUT marks. For example, [.406.]
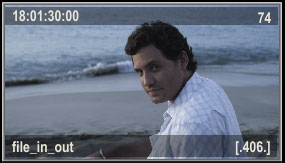
In the image below, the IN mark is on the first frame of the shot, so there is a parenthesis on the left side of the total frame count. But,there are additional frames available beyond the OUT mark, so there is a dot and bracket on the right side. The total number of frames between the IN and OUT marks is 350.
WARNING TRIANGLES
SCRATCH maintains a database of all shots that have been loaded into a project with information about the filename, resolution, frame range,and color space, to name a few. When a shot is loaded, SCRATCH looks it up in the database and compares the values of the shot to what is in the database. If SCRATCH detects an inconsistency in a shot, a warning triangle appears on the thumbnail to alert you.
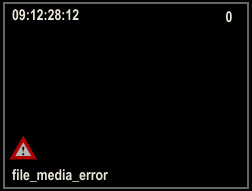
Situations that can cause a warning triangle are:
- Failing to decode an image, which might indicate file corruption or an older of non-functioning decoder.
- Mismatched timecode – For example, the DPX header timecode has a value of 25 for the frame count, but the Framerate for the shot has been set to 24.
- Altered Timecode, Resolution, Frame count, LOG/LIN Flag or Bit Dept.
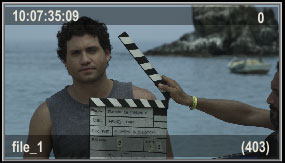
FILM CANS
A Film Can icon is displayed in the thumbnail when SCRATCH cannot locate the source media for a particular shot. This can happen during a Conform when the EDL contains an event for which SCRATCH cannot find a matching source clip, or if source media is moved outside of SCRATCH.

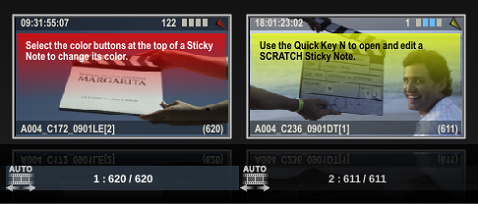
STICKY NOTES/ NOTE TAG
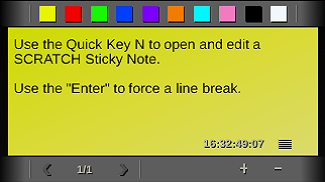
Each shot in SCRATCH (as well as the Group and Construct items in the Project Tree) can have one or more Sticky Notes associated with it to annotate it. Clicking the tag in the upper-right corner opens the Note Editor. Alternatively you can use Quick Key: N while placing the cursor over the thumbnail.
By clicking the colored area in the Notes Editor you can enter text. The annotation is linked to the timecode displayed. The gripper next to the timecode allows you to drag the Editor across the screen.
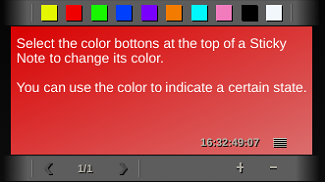
The toolbar at the bottom of the Note Editor allows you to select the color of the current sticky note. Use the + and - buttons to add or remove a note. The left section of the toolbar shows you how many notes there are and what the current note it. Use the < and > buttons to browse through the different notes. Click anywhere outside the Editor or press the Quick Key: Esc to close it - all information is automatically preserved.
By default - if a shot has a sticky notes associated with it this is displayed in the thumbnail as an overlay. If a shot has multiple notes associated with it (of different status colors) the top bar of the overlay will show all the different colors. You can switch off the display of the overlay using the Construct Settings dialog - discussed later.
COLOR GRADE BAR CODE
By default a Bar code is displayed in the upper right corner of a thumbnail. Each of the bars in the Bar code provides information about the state of a specific aspect of the shot, by showing white or colored.
- The first bar indicates the presence or absence of a primary grade.
- The second bar indicates the presence or absence of a secondary grade.
- The third bar indicates the presence or absence of Layers on the shot.
- The fourth bar indicates the use of shot framing.
AUDIO REFERENCE
A Shot can have embedded audio (in the underlying physical file) or can be linked to an audio track. In both cases an speaker icon will be displayed in the top bar of the thumbnail.
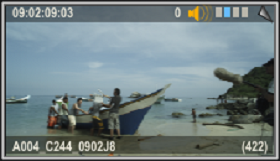
The color of the speaker-icon indicates whether it is embedded (white) or a reference to a separate audio file (colored).
Note: Audio can also be linked to the Timeline as a whole. In that case the individual shots of the Timeline will not show the speaker icon.
MANAGING SHOTS
MOVING A SHOT
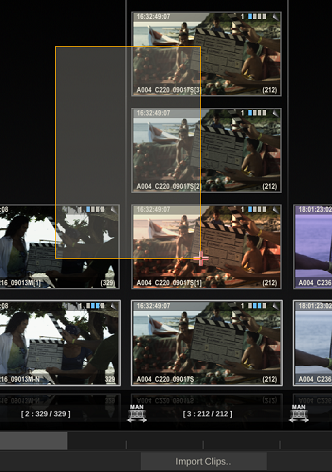
Shots can be moved from one slot to another by clicking in the middle of the thumbnail and picking up the shot. By holding down the mouse button momentarily, the shot thumbnail becomes attached to the cursor. The amount of time it takes before a move starts can be set in the User Settings (see Chapter - The Startup Screen). Also notice that when starting a move action, the original location of the shot is shown by a dimmed thumbnail image. You can then drop the shot into any other slot by clicking over that slot.
Note: A shot can be inserted below an existing shot by clicking in the empty space below the other shot. The shot on the cursor is then inserted below the other shot and all shots above are pushed up in the Version Stack.
Note: You cannot move a shot from one Construct to another. When a shot is attached to the cursor and you navigate to a different Construct a copy is made of the shot automatically and the original is left untouched.
COPYING A SHOT
The process for copying a shot is similar to moving a shot. When you press the Quick Key: Alt when picking up a shot, a copy is created and attached to the cursor. You can drop this copy just like when moving a shot. The original thumbnail image is not dimmed in this case. Alternatively, you can pick up the shot without Quick Key: Alt and then click on the Copy Shot button at the far right side of the Main Menu. The shot that is attached to the cursor now becomes a copy and the original is returned to its position within the Construct (the dimmed thumbnail returns to full). You can drop this shot down anywhere in the Construct.
You can copy single shots or even multiple selections in this way.
Tip: Shots can be copied between Constructs by simply picking the shot up, changing to a different Construct by selecting it in the Project Overview List, and then dropping the shot into a new location on the other Construct. This automatically creates a copy without the need to press the Copy Shot button first.
To copy a shot to the copy-buffer use Quick Key: Ctrl + C or the Copy Shot / Copy Selection button in the right bottom corner of of the Construct menu.
Note: Making a copy of a shot will by default also make a copy of all the inputs of the shot.
PASTE SHOT
When a shot has been copied, the copy remains in the Copy Buffer. The Paste Shot button or Quick Key: Ctrl + V can be used to insert another copy back into the Construct. The shot is pasted into the Construct at the bottom of the currently selected slot. All other shots within that slot are pushed up in the Version Stack; the newly pasted shot is placed at the bottom of the stack, making it the current version.
Note: The current slot is indicated by a highlight in the Slot Information Area. Keep in mind that the currently selected slot may not be visible within the View Port.
When copying a shot SCRATCH also remembers the length of the Slot the Shot was copied from. When Pasting a shot to the bottom of a slot (the Timeline layer), SCRATCH will also update the length of the Slot with that of the source Slot. For more information on Shot vs Slot length - please see Chapter - The Editor.
MULTIPLE SHOT SELECTIONS
You can also select multiple shots to be moved or copied. There are different ways to select multiple shots. One way is to hold down Shift of Control key and drag mouse from an empty section on the Construct over multiple clips. All shots that are (partly) covered by the semi-transparent rectangle will be selected (or de-selected when the status of the clip was selected in the first place).
Alternatively, there are multiple Quick Keys to select more than a single shot:
|
• Quick Key: Control + A
|
» Select all shots in the Construct
|
|
• Quick Key: Control + D
|
» De-select all shots in the Construct
|
|
• Quick Key: Shift + Left Mouse Click
|
» Extend contiguous selection till shot that was clicked on.
|
|
• Quick Key: Control + Left Mouse Click
|
» Toggle selection of shot clicked on (allows for non-contiguous selection)
|
|
• Quick Key: Shift + Left Mouse Click + drag
|
» Add all shots (partially) overlapped by area select to the main selection
|
|
• Quick Key: Control + Left Mouse Click + drag
|
» Toggle selection mode of all shots that are (partially) overlapped by the area selection.
|
|
• Quick Key: Control + 1… 9
|
» Selects all the shots on layer ‘1’ etc
|
|
• Quick Key: Control + R
|
» Selects all the shots in the slot beneath the cursor
|
Once you have multiple shots selected, the Copy button or Quick Key: Ctrl + C apply to all selected shots. Likewise, multiple shots can be pasted into the Construct using the Paste Shots button. The shots are pasted into the bottom row of each slot, starting with the currently selected slot and moving to the right.
UPDATING SHOT PROPERTIES
There is a quick way to copy properties such as handles, vari-speed, and shot framing from a shot to the next. Select a shot by clicking it to attach it to the pen. Then, while holding down Quick Key: Control, click on another shot from which you want to copy properties.
DELETE A SHOT
To remove a shot from a Construct, use the Delete Selected button on the right side of the Construct Menu or use Quick Key: Delete.
Note: Deleting a shot does not remove the original source files; it merely removes that instance of the shot from the current Construct within SCRATCH.
SHOT META DATA
Each Shot in SCRATCH caries with it meta data. All shots have properties like a timecode, framerate, aspect, etc. Next to the fixed meta data items a shot can have any number of extended meta data items - name/value pairs such as Exposure Index, Camera Shutter Speed, etc. You can manage a shot's meta data using either the Information panel or the Meta Data Stack.
META DATA STACK
You open and close the Meta Data Stack with a Swipe action: right in the View Port or Quick key: w. The Meta Data stack displays the meta data of the current selected shot. The Meta Data Stack is combined with the Source stack - which displays the composite hierarchy of the shot and its elements. The Source Stack and the Meta Data stack are also available in the Player and are discussed in more detail in Chapter - The Player.
INFORMATION PANEL
The Information Panel for a shot can be opened by clicking the bottom part of the thumbnail or by placing the cursor over a shot and pressing the Quick Key: i.
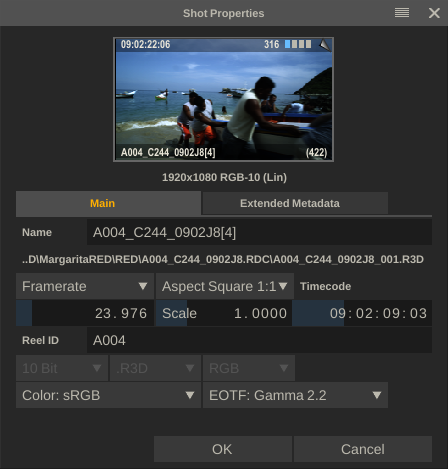

At the top of the Information Panel the shot proxy image and the original X and Y resolution and color space of the shot are displayed.The rest of the information is spread out over two tabs - Main and Extended Metadata. You can adjust most of the main properties using the available controls. In the Extended Metadata tab you can only update the values by clicking the appropriate cell.
Changes to the Information Panel can be accepted with the OK button and cancelled with the Cancel button. Clicking anywhere outside the Information Panel is the same as clicking on the Cancel button.
Note: When you make a change to an editable value in the Information Panel, you must press Enter to accept the change. Once you press Enter, that change is made immediately and does not require pressing OK in order to be accepted. Pressing Cancel after pressing Enter does not revert the value back to its original.
Tip: Multiple Information Panels can be opened at one time by using the Quick Key: I.However, each Information Panel must be closed separately by either pressing OK, Cancel, or clicking outside of the Information Panels. In case of the latter, the panels are closed in the order in which they were opened.
META DATA ELEMENTS
Each shot in SCRATCH has a number of fixed meta data items. In addition to these fixed items, a shot can have an unlimited number of extended meta data items (name/value pairs). Most meta data is automatically loaded from the underlying media files.
As of version 8.2 all shot meta data is stored in the project database.
The first time a shot is loaded in the project the meta data is read
from the underlying media file(s) and stored in the project database.
The next time you open the project the shot meta data is loaded from the
database. Consequence of this is that if the meta data of a shot in the
underlying file changes for some reason (overwritten by newer version) SCRATCH requires you to explicitly reset the meta data of that shot. This can be done from within the Media Browser, which is discussed later in this chapter.
Next to the underlying media files, meta data can also be imported using e.g. an ALE or SCRATCH's own XML scripting or you can add or update meta data directly from within SCRATCH. Note that changing certain meta data will have an effect on how the clip plays back or behaves in a timeline context. The list below covers the fixed meta data items. Note that most but not all are available in the Information panel - but are in the meta data stack.
- Name - in most cases the file name of the underlying media. Changing the name will however NOT change the name of the underlying media file.
- Source Timecode – This is the timecode that is associated with the shot. If timecode is present in the header of e.g. a DPX file, that timecode value is used. For files of a file-sequence where no timecode is present, the frame number of the source file is converted into a timecode based on the Framerate setting. You can manually alter the timecode of any shot by entering a new value into this Numerical Slate. The timecode will be applied to the first frame of the shot and will increment throughout the entire shot.
- Reel-ID - either read from the underlying media file or set when conforming from an EDL that contains a Reel-ID.
- Scene & Take - note that not all media type include scene and take information or pass it under a different name, so that it is available from the extended meta data items.
- Circle Take and MOS (mit-ohne-sound) - metadata properties used in a dailies context, indicating a good take and whether a clip has audio associated with it. The MOS properly changes dynamically if audio is linked to a clip or not. If you set the value manually then linking or un-linking audio will no longer affect the MOS value. It will remain on the manual set value unless you explicitly set it back to Auto.
- Resolution - can not be adjusted, although you are able to scale and resize the image using the appropriate tools in the Player.
- Framerate – this value can be adjusted by selecting a value from the predefined list or entering a new custom value.
- Aspect Ratio and Scale – Select one of the values from he predefined list, which will automatically update the scale value or enter a custom scale value.
- The Format - color space and transfer function are usually determined by the underlying media but can be adjusted. Note that this alters how SCRATCH treats the image data but it will not modify the source file itself.
- Projection Type - indicates the layout of the (360) media and if/how this is to be projected in a spherical view (see next paragraph for more details).
- Stereo Mode - indicates if the shot is a stereo shot / contains a stereo pattern (Stereo setup / nodes are discussed in more detail later in this Chapter).
DYNAMIC PER FRAME METADATA
While most metadata applies to the whole shot, certain metadata only applies to a single frame of that shot. As of version 9.1 SCRATCH can show this per frame metadata. SCRATCH will still read upon first load of the shot all the metadata (from the first frame) and store this in the project database. It however also tags certain metadata items as 'per frame'. When displaying that metadata item in e.g. the metadata stack or when transcoding the shot, SCRATCH reads the value for the current frame from the underlying media again rather than using the value in its project database.
Note that the handling of metadata in this way might have a small impact on overall performance. That is why you first need to explicitly enable the use of per-frame-metadata in the Advanced System Settings of SCRATCH. Currently, per-frame-metadata is only supported for ARRI Raw.
VR 360 MEDIA
For SCRATCH to be able to process 360 media properly the physical layout of the image data of a shots needs to be marked using the Projection Type metadata item. This property tells SCRATCH how the spherical image data is stored in the 2D image file. The Projection Type can be set in different ways:
- certain media files have metadata included that marks the shot as 360. If SCRATCH finds this metadata it will automatically set the Projection Type option.
- you can manually set the Projection Type in the metadata stack in the Construct or in the Player.
- you can set the Projection Type for a whole range of shots at once using the Media Browser - discussed later in this chapter.
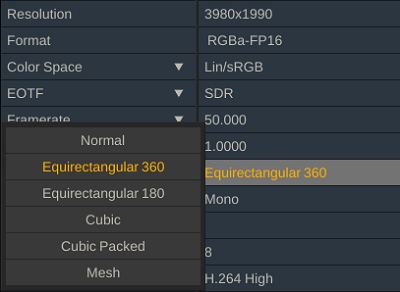
The Project Type can be set to Normal (2D media) or one of three Spherical Projection patterns as shown in the diagram below:
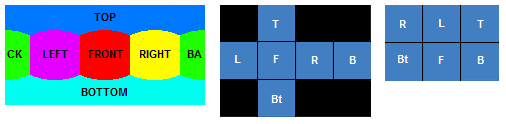
- Equirectangular
- Cubic
- Cubic Packed
Note that both the Equirectangular and the Cubic Packed are also supported in an over-under stereo pattern where the projection pattern is repeated with the left eye on top and the right eye at the bottom.
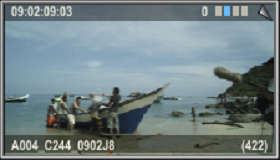
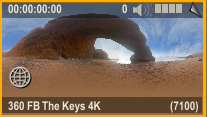
Once a shot has been properly marked as 360 media, the proxy image will show a globe icon.
The Player will now recognize the shot and when switching to 360 mode create the correct spherical projection from the image source.
Note that when rendering out 360 media, SCRATCH will automatically include the proper 360 metadata and projection type so other systems can use it to automatically
show the image using the correct projection.