GENERAL
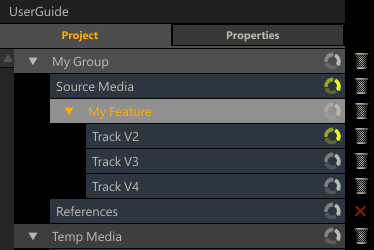
A Project is made up of one or more Timelines and Timelines can be organized into Groups. A Timeline in turn can have one or more sub-Timelines linked to it. Each sub-Timeline is a timeline in itself but serves as a (video) Track on the main timeline in a multi-layered timeline setup. The Groups, Timelines and Tracks are shown in a panel on the left side of the Viewport, which you can open and close by a swipe-left action with the mouse or use Quick Key: q. The panel has two tabs: the Project Tree with and the Properties tab with metadata on the project itself.
PROJECT TREE
Each new Project begins with a single Timeline in a single Group. As new timlines are added, they appear in the tree.
With the controls at the bottom of the Project Tree panel you can manipulate the elements.

- The Add button will create a new Timeline to the currently selected group. When the T button is enabled, the new Timeline will be a sub-Timeline of the current Timeline and act as a Track in the multi-layered timeline setup. In Chapter 5 - The Player, Tracks are discussed in more detail.
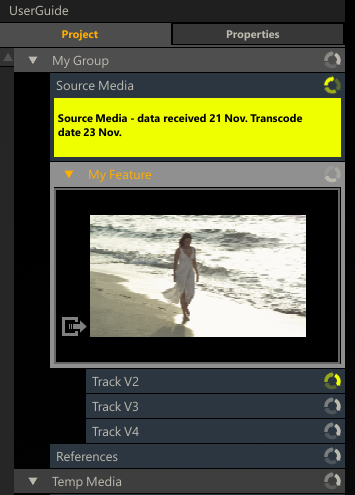
- With the Show button you can toggle the appearance of all the Project Tree items to one of three states: Collapse (just show timeline names, Shots (show timeline poster frame), Note (show any annotations with each timeline). See below for a more elaborate explanation of these states.
- By clicking on the Edit button an additional row of controls appears and the Project Tree switches into edit mode.

With the Project Tree in Edit mode you can:
- Create additional groups with the New Group button.
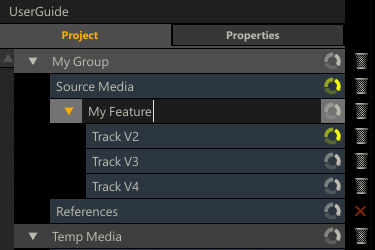
- Change the names of the Project Tree items (Timelines or Groups) by clicking on them.
- Mark an item for deletion by clicking on the Delete icon next to the item. This will change the icon to a red cross. To remove the marked items permanently you click the Delete button.
Changing the order of Timelines within a Group, the order of Groups or moving a Timeline from one Group to another is done by dragging and dropping the item. You start a drag action by clicking on the item and hold down the left mouse button momentarily. The item will then be attached to the cursor and you will be able to drag it across the Project List (you can release the mouse button). A white line will appear indicating the new position of the item if you would click again.

When holding the Alt-key down when starting a drag action, a copy is made of the Timeline or Group. The copy can now be dropped anywhere within the Project List the same way as you would when moving an item.
You can remove an item from the pen by swiping to any side of the screen or by Quick Key: escape.
When dragging a Timeline item and hovering over the right section of another Timeline item, a white border surrounding the item hovered over appears. This means that dropping the item at that position will turn it into a sub-Timeline, i.e. create a Track.

When hovering over a position that does not allow a drop - like dropping an item onto itself - the drop-position-line will appear red.
You can toggle the state of an individual Project item by clicking on the cycle icon in the right corner of the item. Alternatively, you can also use the Show button at the bottom of the Project Tree to toggle the state of all items at once.
- Collapse: Default state of a Timeline item showing just it's name.
- Shot: Shows the (poster) image of the first clip on the active slot of the timeline.
- Note: This shows an annotation below the item you can edit. When there is text present, the cycle icon will be colored the same color of the note. For more on sticky notes, see the corresponding paragraph in the section about shots, later in this chapter.
- You can also collapse or expand a Group or Timeline with Tracks by clicking on the arrow icon on the left of the item.
If the Project Tree becomes too long to fit on the screen you can use the scroll bar at the left of the Project List to scroll up and down.
PROJECT PROPERTIES
The second tab of the Project panel gives you the option to store project metadata.
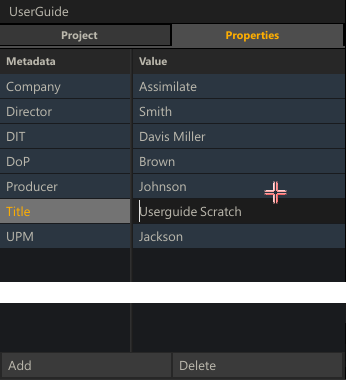
The project metadata is for information purposes and can also be used for (burn-in) image display, file name masks or in SCRATCH generated reports. In the Panel itself you can add new name-value pairs or remove existing by using the corresponding Add and Delete buttons at the bottom of the panel. By clicking inside the value-cell of the data grid you can start to update the text. You can control the default list of metadata items for a new project from the System Setting - dialog. Please see Chapter - Customizing SCRATCH for more information.