GENERAL
When you open a project from the Start-up Screen, you always first enter the the Construct-tab. The Construct is the main media-management interface for your Project. This is where you perform the larger tasks of loading media and creating timelines. The construct offers a series of tools to manage the various dimensions of media in SCRATCH.
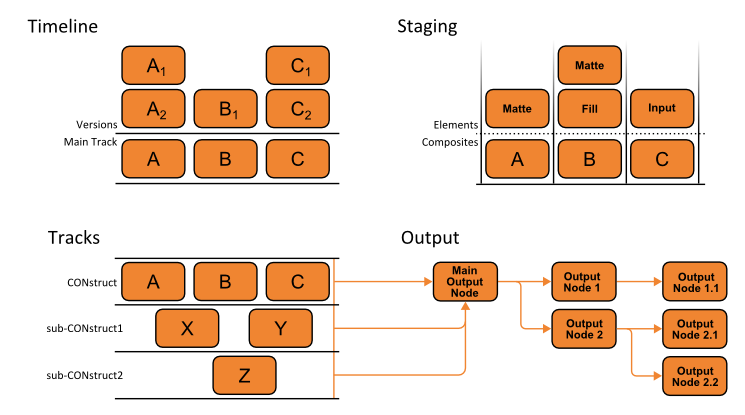
- Timeline - a project can contain multiple Timelines. Timelines can be organized in Groups within the Project.
- A Timeline consist of multiple Slots.
- Each Slot can contain one or more Shots stacked on top of each other; e.g. different (graded) versions of the same Shot.
- All the Shots at the bottom layer of all the Slots together make up the actual timeline and feed into the Main Output Node.
- The Main Output Node of a Timeline determines things like the actual framerate and resolution of that Timeline.
- From the Main Output node you create (derived) Output Nodes to create an Output Tree, which allow you to create versions (different resolutions / framerates / etc.) of the same Timeline. The Output Tree is discussed in Chapter - Render.
- A Timeline can also act as sub-Timeline or sub-Track in a multi-layered timeline. Each sub-Timeline is the fill of a layer on the Main Output Node of the the primary Timeline.
- Staging - all Shots in SCRATCH have their own holding area for managing the composite elements (input / fill / matte media) that make up that shot.
A new project starts with a single (empty) Timeline in a Group.
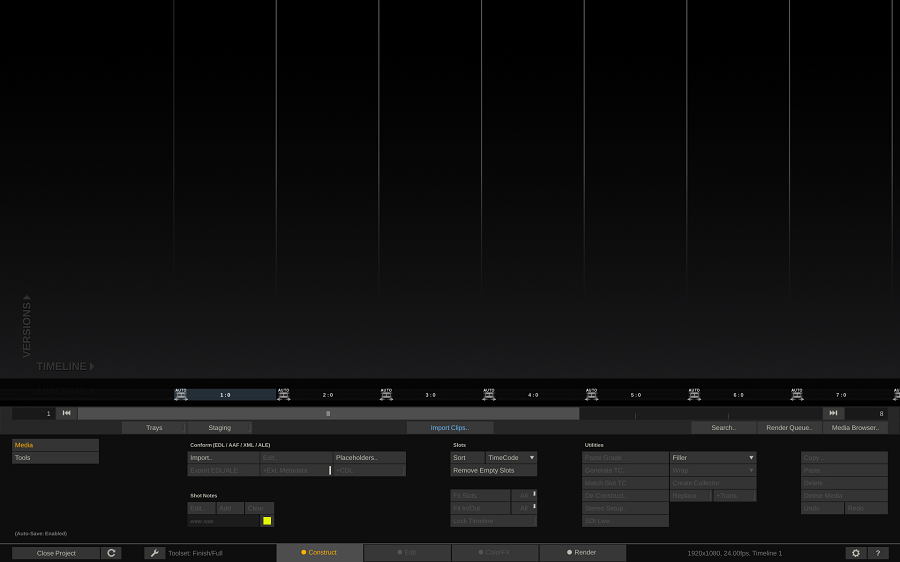
IMPORT CLIPS
The first time you enter an empty project the Import Clips button in the middle of the menu bar is highlighted blue as in general the first task you would do is loading media into your project. The Import Clips opens up a file browser where you can navigate to the location of the media you want to load.
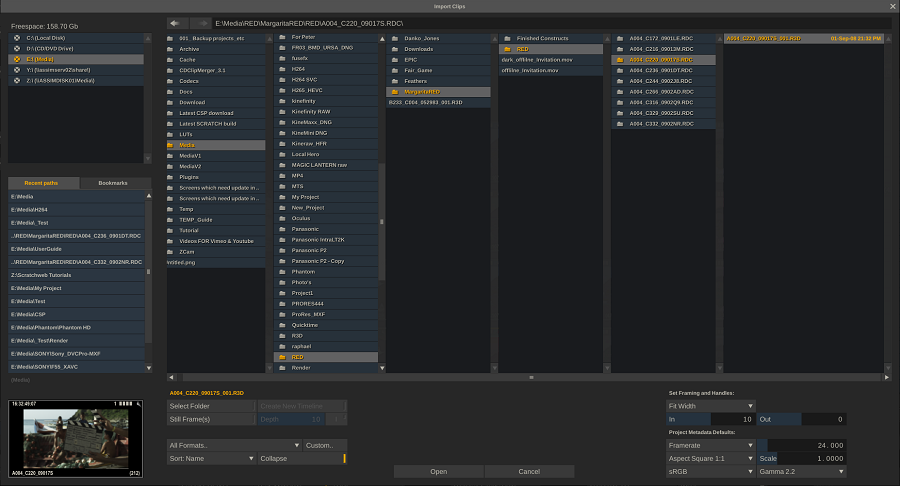
By default SCRATCH recognizes entire file sequences and groups them together into a single entry in the Browser. The number of frames in a sequence is shown in square brackets. The Browser has various functions to facilitate loading multiple shots at once.You can load a clip by selecting it in the Browser and pressing the Open button or by double-clicking on the clip name. Once the clip is loaded, it is attached to the SCRATCH cursor and you can select which slot to drop the clip into.
You can also select multiple clips in the same folder by holding down Quick Key: Ctrl and clicking a second / next clip. After clicking the Open button all clips are attached to the pen.
Next to the basic single shot load, the Browser has various functions to facilitate the task of loading large numbers of shots at the same time.
SELECT FOLDER
When you enable the Select Folder button you only have to select a folder for the Load operation. SCRATCH searches from the selected folder down through any sub-folders, and loads any image file that it finds. By using the Depth Numerical Slate, you can control how SCRATCH interprets the folder structure and how the clips get loaded.
For example, assume you have the following folder structure with a file sequence in each of the Take folders:
\Roll_01
\Scene_01
\Shot_01
\Take_01
\Take_02
\Shot_02
\Take_01
\Take_02
\Take_03
\Shot_03
\Take_01
\Scene_02
\Shot_04
\Take_01
\Take_02
\Take_03
\Shot_05
\Take_01
\Take_02
\Scene_03
\Shot_06
\Take_01
\Take_02
\Shot_07
\Take_01
\Take_02
\Take_03
If you select the Roll_01 folder as the base folder, with a Depth setting of 1, all the clips from the base folder down will be loaded into 3 slots. Slot 1 would contain all the shots within the Scene_01folder; Slot 2 would contain all the shots within the Scene_02 folder; and Slot 3 would contain all the shots within the Scene_03 folder.
As a second example using the same folder structure but setting the Depth to 2, would result in 7 slots, one for each Shot folder.
In this way, you can control how the shots are loaded in so that they maintain the same overall structure once they are loaded into SCRATCH. This can be especially useful when loading large numbers of folders, but still being able to find a specific shot quickly for review.
Note: The Multiple Shots function can theoretically take a long time to finish. To abort the function, press Quick Key: Escape.
CREATE NEW TIMELINE
When you enable this option (in combination with Select Folder), SCRATCH opens the Clip Import Options panel after you select Open in the file browser. In this panel you can enter additional options for loading the media.
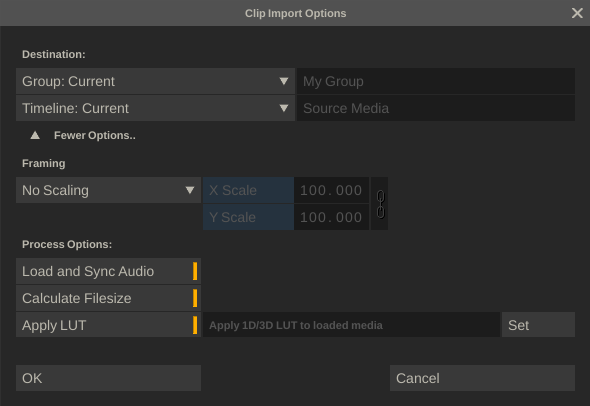
Destination
Select whether to create a new group, to create a new group with the next sequence number or to create a new group with the name of the selected folder. Select whether to load media in a single new timeline, a new timeline per sub-folder or the current selected timeline.
Framing
Set a default scaling for all loaded clips. Note that each new timeline will by default have the resolution of the project default. With these framing options you can set a specific scaling or do a fit to the timeline resolution.
Load and Sync Audio
Search in the selected folder for audio file and try to match that audio with the loaded clips, based on timecode. for more information on the audio sync function see the paragraph on the Media Browser later in this chapter.
Calculate File Size
Determine the total file size for each clip (wheter it is a file-sequence of a container format) and store that as metadata with the clip, so that it can be used for reporting purposes later.
Apply LUT
Apply a specific LUT to each loaded clip. Note that this LUT is applied as source LUT on the shot as opposed to a grading LUT (see Chapter - ColorFX for the difference).
INVERSE (I)
By default SCRATCH will add each shot found on top of any shot already present in a Slot. By using the Inverse (I) button you can change this behavior. When enabled, SCRATCH will put each shot found on the first (timeline) layer of the Slot. Reversing the load position can be helpful if you want to replace an existing timeline with a newer version of the media, while maintaining the existing one as a version.
STILL FRAMES
By default SCRATCH recognizes frame sequences and loads them as a single shot. Use this option to override this behavior and load each file as an independent still frames.
FORMATS
This option presents you with a list of all formats SCRATCH can read. Use this option to filter the results the Browser is showing. By selecting the format you also control how certain media is interpreted. Some media might have the same file extension but can only be interpreted in a certain way. By setting a specific format you help SCRATCH determine this interpretation process and as such speed up the loading considerably.
CUSTOM
The Custom option allows you to create and apply a more advanced filter for loading media. The option shows a dialog to enable multiple specific formats. This way you can make your custom selection. Make sure the Formats option is set to Custom.
SORT
Sort order for the display of folders and files: name or file (modified) date.
COLLAPSE
By default SCRATCH shows file-sequences as a single file with the number of files. When switching off this option SCRATCH will show all individual files. Please note that whatever file you select - SCRATCH will still load it as a sequence starting at the first frame. Unless you enable the Still Frames option.
FRAMING AND HANDLES
Here you can set the default framing to be applied to the selected shot(s) and assign in/out handles. The Framing can be set to None, Fit Width or Fit Height. The Fit options will fit the selected shots to the resolution of the main output node of the current Construct.
The handle values can be used in situations where a known number of head and tail handles exist. For example, if a project is scanned from film using a standard 8 frames of handles at the head and tail, you could set the head and tail handles in SCRATCH to 8, and all shots would be loaded with their IN and OUT marks already set to eliminate the 8 frame handles. The handle frames will still be available, but by default the portion of the shot that determines the slot length in SCRATCH,will also be the duration between the IN and OUT marks.
You can modify the in- and out-handles of loaded clips further from within the Editor (see Chapter 6: The Editor) or from the Media Browser (see in a later section of this chapter).
PROJECT METADATA DEFAULTS
In most cases SCRATCH will read the framerate, scale and particular color space for a clip from the metadata information in the media file(s). In case the file does not contain that information - SCRATCH will use the project defaults. You can adjust these default with the controls in this section.
Note: The values entered here are ONLY used for media that does not have proper metadata available itself - no metadata is overridden by these settings.
The re are several interface elements that are available at all times when you are in the Construct.
TAB NAVIGATION
The bottom part of the screen is taken by the tab-navigation bar and contains a series of generic functions - not specific to the Construct module.

CLOSE PROJECT
Close the current project and return to the startup screen. This is available from all modules: Construct, Edit, ColorFX and Render. The status of the Project is saved so that the next time the Project is entered it will start up on the same Construct.
REFRESH PROJECT
Reload the current project. This is functionally the same as exiting the Project to the Start-up Screen and then re-entering the Project again. Reloading a project can be useful if the status of certain media changed from offline to online or to quickly process pending (XML) script to update the project. Note that if there is pending XML script for the current project , the Refresh button will turn blue and reloading will only process the script and not fully reload the project (to speed up processing of the scrip). For more information on working with XML script in SCRATCH, see the XML section in Chapter – Customizing SCRATCH.
TOOLSET & TABS
Discussed in the Chapter - Getting Started.
TIMELINE RESOLUTION AND FRAMERATE
The label to the right of the various tabs shows the resolution, framerate and name of the current selected timeline in the project. The resolution and framerate of a timeline are set through the main output node of the timeline in the Render tab of the project (see chapter - Render). However, an easy way to adjust the resolution and framerate of a timeline is to drag/drop a shot onto this label. This adjusts the main output node to the resolution and framerate of the shot yo dropped.
USER PREFERENCES / HELP
Clicking the gear icon or using Quick Key: Z opens the User Preferences dialog. The User Preferences are divided along the various modules in SCRATCH. All the settings are explained in the panel itself.
The Help button opens a panel with all available quick keys and gestures as well as links to the online manual. This pnel can also be opened with Qucik Key: h.
COMMAND MENU
The Command Menu can be accessed by right-clicking anywhere in the Viewport of the Construct or using Quick Key: ' or ~. The menu opens at the current cursor location and the availability of the options depends on the current selection of slots / shots.
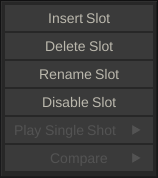
All the Slot options in this menu are discussed in the paragraph on Slots later in this chapter. The Play Single Shot option is only available if a shot is selected and will open the selected shot in the SCRATCH player (as opposed to entering the player with the full timeline). Alternatively you can also hoover the mouse over a specific shot and use Quick Key: Esc. The Compare option is only available if multiple shots are selected in the current timeline. SCRATCH will then enter the player with those selected shots. This can be useful for a quick compare of different shots in your timeline.
GENERIC COPY, PASTE, DELETE, UNDO AND SAVE ALL BUTTONS
On the right bottom side of the menu in the Construct are a series of buttons that are present at all times.
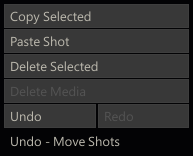
COPY
The Copy button remains grayed out unless a shot, a slot or group of shots or slots have been selected. Once a selection has been made, the Copy button activates and changes its title depending on what is selected. If a single item has been selected in the timeline, Copy Selected is displayed. If multiple items have been selected, Copy Selection is displayed. Clicking on the Copy button copies the current selection into the Copy Buffer. The original items remain in their current location within the timeline.
PASTE
Once shots or slots are copied into the Copy Buffer, you can Paste them in another part of the timeline or a different timeline altogether. The Paste Shot/Slot button begins copying shots at the currently selected slot.
DELETE
The Delete button remains grayed out unless a shot, a slot or group of shots or slots have been selected. Once a selection has been made,the Delete button activates and changes its title depending on what is selected. If a single shot has been picked up in the timeline, Delete Shot is displayed. If multiple shots have been selected, Delete Selection is displayed. Clicking on the Delete button removes the selected shot or shots from the timeline.
DELETE MEDIA
Any time media is generated by SCRATCH, frames are stored in the designated output folder. The Delete Media button allows you to purge all of the processed frames from the current Construct. This does not delete original source images; only files that have been created as part of the SCRATCH processing of that Construct are affected.
Note: Normally you cannot delete source references directly from within SCRATCH. However, if Allow Delete Shot has been enabled in the User Settings Menu, the Delete Media button changes to [Delete Media & REF]. You will be able to delete both generated media and the original source references at the same time. This is potentially very destructive, so you must confirm this action by clicking OK after [Delete Media &REF] has been clicked.
UNDO AND REDO
SCRATCH maintains an Undo/Redo Stack per Timeline. Each Stack has a maximum of 25 actions that can be undone. There are however a number of actions that cannot be undone or will clear the Stack: conforming an EDL/ALE, deleting / renaming timelines or groups cannot be undone. Switching between timelines will preserve the undo stack of the individual timeline, however entering / exiting the player with a timeline will also clear the undo stack for it. The label below the Undo and Redo button contains a description of the action that is currently at the top of the Stack.Next to using the buttons there are also two quick keys available for undo and redo action. Undo / Redo can also be called with Quick Key: Ctrl + z and Quick Key: Ctrl + y.
SAVE ALL
When the Save Mode in the User Settings (see Chapter - The Startup Screen) is set to manual, an additional Save All button appears on the bottom left side of the screen. Clicking on this button saves the state of the current timeline. alternatively you can use Quick Key: Ctrl + s.
EVENT LOG
If SCRATCH detects a missing element (such as e.g. a LUT) when loading an existing project, the Event Log dialog will pop up to notify you. The log might also popup when e.g. a render fails to execute properly. Alternatively you can also open the Event Log also yourself by using Quick Key: Ctrl + E.
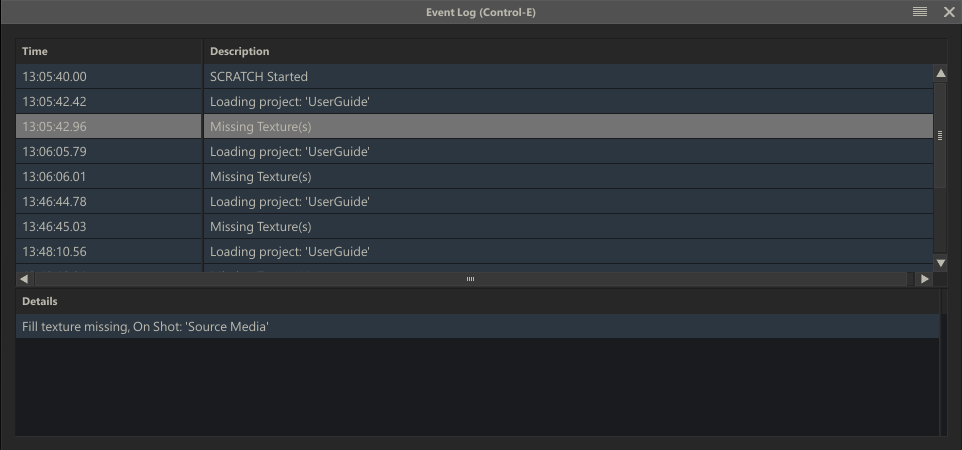
Note that in certain cases the location of the missing item is displayed in the details section of an event and you can double click on the details to automatically navigate to the timeline / shot where the problem exists.